# Getting started

Welcome to LTO Network developer documentation!

{% hint style="danger" %}

## LTO Network is shutting down!

[Read more about the migration to Base with EQTY](https://blog.ltonetwork.com/a-new-chapter-for-lto-network-transition-to-base-and-a-dao-driven-future/)
{% endhint %}

[LTO Network](https://ltonetwork.com) is a hybrid blockchain, with a focus on identities and ownership. It has a private layer that utilizes a public blockchain for consensus.

{% hint style="info" %}
If you want more info or notice that some link is broken - [**join the Tech Chat on Telegram**](https://t.me/LTOtech) and let us know. All links to papers, blog, articles, and so on - [you can find here](https://blog.ltonetwork.com/lto-network-sources/).
{% endhint %}

## Buying and staking LTO

Transactions on the LTO blockchain need LTO tokens to get you started. We summarized tutorials for the most commonly used exchanges, detailing all the necessary steps on *'how to buy LTO tokens'*.&#x20;

What comes after your purchase? Staking, of course! LTO offers a competitive APY in form of staking rewards, so let us walk you through the process of putting your LTO tokens to work by staking them with an LTO network community node.

{% content-ref url="/pages/-M\_tdyav\_H32aanUZfbZ" %}
[Buying and staking LTO](/tutorials/buying-and-staking-lto)
{% endcontent-ref %}

## Mining

LTO's eco-friendly mining mechanism relies on *Leased-Proof-of-Stake*, a variant of the Proof-of-Stake consensus algorithm. The easiest way to get started is to run your own validator node and stake LTO tokens.&#x20;

In our mining tutorials, we cover the basics about running your own LTO node, chances of generating blocks, the process of becoming an LTO network community node, and distributing block rewards to your node's stakers.

{% content-ref url="/pages/-M\_qOFVouYjtiSZ1SL5b" %}
[Mining](/tutorials/mining)
{% endcontent-ref %}

## Anchoring

Anchoring on a blockchain is a simple and cheap way to notarize documents or timestamp data. By adding a hash on the blockchain, data becomes tamper-proof.

Integrating anchoring is relatively simple and should take between a couple of hours and a few days depending on the complexity of your application.

{% content-ref url="/pages/-LmBELg-\_YPsLkOTWXtL" %}
[Anchoring](/tutorials/anchoring)
{% endcontent-ref %}

## Ownables

Ownables are CosmWasm smart contracts that define ownership. Instead of running on a blockchain node, Ownables run directly in a wallet using the LTO Network [private layer](/protocol/private).

{% content-ref url="/pages/egHazNxwKPn5tAmVqy7R" %}
[What are Ownables?](/ownables/what-are-ownables)
{% endcontent-ref %}


# What is LTO Network?

LTO Network is a hybrid blockchain, with a public and a private layer. It focuses on ownership of digital (off-chain) and real-world assets.

## Truly permissionless

The public layer is a proof-of-stake permissionless blockchain with a fixed set of transaction types. It has a different approach to on-chain statements, which does not include smart contracts.

> *Anyone can talk. Nobody has to listen.*

While most blockchains are permissionless on a global level, permissions are introduced through smart contracts. A smart contract keeps track of a custom state, which determines what statements *(as calls to the contract)* are accepted onto the chain. Secondly, the contract allows a verifier to get concrete answers based on the state.

LTO has a different approach. Any statement is allowed onto the blockchain, as long as the fee is paid. The verifier is the end-user (application) and determines which statements to consider and which to ignore. It's also up to the verifier to determine an answer based on the set of statements.

Let's have a look at an example...

### Example

Volvo created a car and sold it to Arnold, which in term sold it to Bob.

<img src="https://4048573506-files.gitbook.io/~/files/v0/b/gitbook-x-prod.appspot.com/o/spaces%2F-LB0RTB-jl8RVmWX9aeE-887967055%2Fuploads%2FseUv74kJYIgwhDCXrWdi%2Ffile.excalidraw.svg?alt=media&amp;token=3cafa6f2-9bef-4ea0-8eba-f42dabf505c5" alt="" class="gitbook-drawing">

We could represent this with an NFT smart contract. The NFT is minted by Volvo and transferred to Arnold, who transfers it to Bob. The verifier can ask the contract who the current owner is: Bob.

On LTO, we would present this as 3 statements. Each statement would have the same subject, which should be a unique reference to the car. To find out the current owner, a verifier needs to track the car from the manufacturer, following all related statements.

#### Invalid statement

Xavier wants to make a statement that he transferred the car to David.&#x20;

<img src="https://4048573506-files.gitbook.io/~/files/v0/b/gitbook-x-prod.appspot.com/o/spaces%2F-LB0RTB-jl8RVmWX9aeE-887967055%2Fuploads%2FLL77KhZ6qinGHRzivCOT%2Ffile.excalidraw.svg?alt=media&amp;token=64de9bde-71fc-4887-94fe-330e5df131b8" alt="" class="gitbook-drawing">

With a smart contract, this statement would be denied, as Xavier isn't the owner of the car.

On LTO, Xavier is able to publish this statement on-chain. A verifier will disregard this statement because it doesn't come across it when tracking it from the manufacturer.

#### Authorized statement

Since we're tracking a real-world asset, we might come across a situation where an authority, like law enforcement, has taken hold of an asset without the consent of the current owner.

<img src="https://4048573506-files.gitbook.io/~/files/v0/b/gitbook-x-prod.appspot.com/o/spaces%2F-LB0RTB-jl8RVmWX9aeE-887967055%2Fuploads%2FcVpvbTUwrAGlomlIg6ga%2Ffile.excalidraw.svg?alt=media&amp;token=99fc63e4-a889-4c52-830e-0b847be2fe24" alt="" class="gitbook-drawing">

To make this possible with a smart contract, the issuers must keep a list of authorized accounts that are able to seize a token.

On LTO, the police can publish this statement on-chain. It's up to the verifier to determine if should honor this statement, making David the current owner.

### Responsibility

Looking at the previous example, we can see the key difference between the smart contract and the approach taken by LTO Network.

With a smart contract, it's the original issuer that determines which statements should be accepted. This does not match the scenario in the real world. It's typically not up to the manufacturer of the car to determine which authority is recognized and which isn't.

With statements on LTO Network, it's up to the verifier to determine with authority to recognize. This more closely resembles the real-world situation, where it's up to a potential buyer to ensure he's purchasing the car from the legal owner.

### Conclusion

The design choices make LTO Network better suited for mimicking real-world scenarios and tracking off-chain assets than most other blockchains. On the other hand, it makes it less suited for on-chain assets, as validators might come to a different conclusion if they don't follow the same ruleset.

Putting the responsibility of validation on the end-user (application) is uncommon for a blockchain, but very common for other decentralized technologies. For example; anyone can issue a [verifiable credential](/protocol/identities/verifiable-credentials). It's up to the recipient of the verifiable claim to determine whether or not to accept it.

Because of this, it will feel more natural to combine non-blockchain decentralized technologies with LTO Network than with most other blockchains.

## Decentralized graph

Smart contracts provide an isolated state. With LTO Network, we need to consider all data on the network to make conclusions. The best way to look at the information on the LTO public blockchain is as a decentralized directed graph.

A graph is made up of points (also called vertices) connected with edges. Both the points and edges can have data. On LTO, the points are accounts and the edges are created through associations.

<img src="https://4048573506-files.gitbook.io/~/files/v0/b/gitbook-x-prod.appspot.com/o/spaces%2F-LB0RTB-jl8RVmWX9aeE-887967055%2Fuploads%2F7A40CRhjKtowJVVqkQoz%2Ffile.excalidraw.svg?alt=media&amp;token=d6a3b10c-2282-4482-8662-4d458f71d0d2" alt="" class="gitbook-drawing">

### Statements

The graph can help determine which statements to consider and which to ignore. There are different kinds of statements that can be made. Off-chain these are in the form of verifiable credentials. On-chain, there are statement transactions allowing a public statement about any subject and/or another account.

Anchoring can also be seen as a statement. It's limited to just publishing a hash, but more cost-efficient.

### Identities

The graph allows you to specify other keys that you own and for what purpose you use them. This information is used to build up a [DID document](/protocol/identities/decentralized-identifiers). Decentralized Identifiers (DID) is an emerging standard for (off-chain) authentication, that's already widely supported.

Besides public keys, services can be defined as part of the DID document. This is supported by LTO through Data transactions. Other personal information like name, address, etc is never part of a DID document.

## Private layer

The private layer is not a blockchain. It consists of individual micro-ledgers, called event chains, that are shared between accounts.

A blockchain accomplishes decentralization by sharing data between public nodes (run by independent parties), where it's stored in such a way that the authenticity can be validated. The user only needs to store their private key in a wallet application. The information is retrieved from a public node.

Sharing information publicly isn't always a viable option. It may reveal company secrets or contain personal information. Especially with personal information we need to be careful. Information on a blockchain can't be erased, which violates privacy regulations like GDPR.

With the LTO private layer data isn't stored by public nodes but in the wallet of the user. The public blockchain is only utilized to validate the authenticity of the stored data.

<img src="https://4048573506-files.gitbook.io/~/files/v0/b/gitbook-x-prod.appspot.com/o/spaces%2F-LB0RTB-jl8RVmWX9aeE-887967055%2Fuploads%2Fm2nHYR1cfXLfv08B1pBo%2Ffile.excalidraw.svg?alt=media&amp;token=ae66a276-9a57-490f-b290-3b3a1242439f" alt="" class="gitbook-drawing">

### Messaging

Unless account holders physically meet, it's not possible to send data directly from one wallet to another. To solve this, data is wrapped in messages that are routed through a relay service.

This service is comparable to e-mail, except it works with encrypted messages, and the service endpoint is configured through the DID document, rather than through DNS. The relay protocol is based on AMPQ, ensuring that messages aren't lost even when a service is temporarily unavailable.

{% hint style="warning" %}
[DIDComm](https://didcomm.org/) is an open standard with a functionality that's similar to LTO Messaging. At this moment the technology is under development and available libraries are not production ready. In the future, LTO might switch from our custom protocol to DIDComm.
{% endhint %}

### Event chain

Normally a ledger is a hash chain of blocks, with each block containing multiple transactions. The event chain consists of individual events. Each event references the previous event, forming a hash chain.

<figure><img src="https://4048573506-files.gitbook.io/~/files/v0/b/gitbook-x-prod.appspot.com/o/spaces%2F-LB0RTB-jl8RVmWX9aeE-887967055%2Fuploads%2FsKmCs40JNtDASjxbO4GB%2Fscreenshot-demo.ownables.info-2023.07.11-19_02_40.png?alt=media&amp;token=3fa15b69-e5b0-49fb-85b7-403f268ba76e" alt=""><figcaption></figcaption></figure>

The private layer doesn't have a consensus method. Instead, event chains rely on anchoring events on the public chain to prevent rollback attacks.

The information within the event chain depends on the application that consumes it. It's typically data that's already being used by the application. For Ownables, these are CosmWasm messages. For other applications, this could be the changes that would otherwise be posted to a REST API.

By storing this information as a chain of events, different client applications can come to the same state as long as they follow the same rules.

### Ownables

The event chain can be used to decentralize any application. However, it's important that all clients run the same application, or at least follow the same rules.

With Ownables, these rules are written as code, in the form of a CosmWasm smart contract. Each event on the event chain contains a message, that's used to update the contract state.

{% hint style="success" %}
The advantage of Webassembly (Wasm) is that it can be run anywhere; in the browser, on mobile apps, and on the server.
{% endhint %}

## Continue reading

Read the rest of the documentation to learn more about LTO Networks. Start with the [**Tutorials**](/) to start using practical guides. The [**Protocol**](/protocol/cryptography) section explains the topics discussed here, in depth.


# Buying and staking LTO

Tutorials for exchanges, the official web wallet, and web wallet staking.

## Buying LTO

Buying LTO tokens or crypto in general sometimes needs a little getting used to. To make it easier on you and to help you avoid mistakes in the process we summarize tutorials for the biggest exchanges (CEX and DEX) right here.

### Exchanges

The number of exchanges offering LTO is steadily growing and writing a tutorial for every exchange is currently not feasible. Instead, we focus on markets with the biggest impact, namely Binance, Bitmax, Uniswap, and Pancake Swap, in addition to creating an abstract tutorial for other exchanges which usually offer ERC-20 LTO tokens.

{% content-ref url="/pages/-M\_teOMibqDLO3xqvunN" %}
[Binance](/tutorials/buying-and-staking-lto/exchanges/binance)
{% endcontent-ref %}

{% content-ref url="/pages/-M\_teb5tWu5q5kpHllvQ" %}
[AscendEX (Bitmax)](/tutorials/buying-and-staking-lto/exchanges/bitmax)
{% endcontent-ref %}

{% content-ref url="/pages/-M\_teRboTMb8jIWalaYq" %}
[Uniswap](/tutorials/buying-and-staking-lto/exchanges/uniswap)
{% endcontent-ref %}

{% content-ref url="/pages/-M\_tedBWJwSk\_1RfKQTL" %}
[PancakeSwap](/tutorials/buying-and-staking-lto/exchanges/pancake-swap)
{% endcontent-ref %}

{% content-ref url="/pages/-M\_tefRK9gY4xVb-6Cq5" %}
[Other exchanges](/tutorials/buying-and-staking-lto/exchanges/other-exchanges)
{% endcontent-ref %}

After you got yourself your first LTO tokens let's dive deeper into the official LTO web wallet and LTO staking.&#x20;

## Staking LTO

To stake LTO with one of the public validators you will need a [web wallet](https://wallet.lto.network/) first. Check out our tutorial for creating one:

{% content-ref url="/pages/-MbGDZVg6sadxonmtj3T" %}
[Creating your LTO web wallet](/tutorials/buying-and-staking-lto/creating-your-lto-web-wallet)
{% endcontent-ref %}

Staking is possible as soon as you transfer your LTO tokens from an exchange to your web wallet. Refer to this helpful tutorial to find out how:

{% content-ref url="/pages/-MbGE8w7lj-hlLx0Y23x" %}
[Staking LTO tokens](/tutorials/buying-and-staking-lto/staking-lto-tokens)
{% endcontent-ref %}


# Exchanges


# Binance

Step-by-step guide of buying LTO on Binance.

## Finding LTO on Binance

To find LTO on Binance simply select *Markets* in the bottom menu and search for **LTO**. Binance currently offers two trading pairs for LTO:

* LTO/USDT
* LTO/BTC

![LTO Markets on Binance.](https://4048573506-files.gitbook.io/~/files/v0/b/gitbook-legacy-files/o/assets%2F-LB0RTB-jl8RVmWX9aeE%2F-Mb3C12HJ2YDZKVg45Lh%2F-Mb3Gu9quaIiyWuQhImT%2FScreenshot_20210530-222809.png?alt=media\&token=cb88c8d3-e25c-4a56-8388-f72f53fadfc7)

This means you will need either USDT or BTC on Binance first before you can buy LTO. The easiest way is to buy USDT or BTC directly on Binance and you're good to go.&#x20;

{% hint style="success" %}
&#x20;If you already own BTC or USDT you can also simply transfer them to your Binance account.
{% endhint %}

All that's left now is buying LTO and transferring it to your LTO web wallet to stake it.

## Buying LTO on Binance

Once you selected your LTO pair you need to click the buy button. This will open a new view where you now can choose how many LTO to buy. When specifying the amount of LTO you can also click on the 25% / 50% / 75% / 100% to select a percentage of your funds for the current purchase. The last step is to click *Buy LTO* and you're the proud owner of LTO tokens!

![Market overview (left) and order overview (right).](https://4048573506-files.gitbook.io/~/files/v0/b/gitbook-legacy-files/o/assets%2F-LB0RTB-jl8RVmWX9aeE%2F-Mb3C12HJ2YDZKVg45Lh%2F-Mb3O6UZcxC76inPUvaf%2FUnion_Result.jpg?alt=media\&token=a422f276-6f15-42b1-943c-1ddd6b7e9fe7)

## Transferring LTO from Binance

After you bought your LTO they can be found in your *spot wallet*. To get there click the *Wallets* tab and select *Spot* to get the overview of your crypto tokens. Select LTO and you will be able to see your currently available tokens.

![Location of the spot wallet (left) and the content of the LTO wallet (right).](https://4048573506-files.gitbook.io/~/files/v0/b/gitbook-legacy-files/o/assets%2F-LB0RTB-jl8RVmWX9aeE%2F-Mb3C12HJ2YDZKVg45Lh%2F-Mb3PqE5eMpv99Km9AcY%2FwalletOverview.jpg?alt=media\&token=94a70957-c0bf-4bec-835f-279cb815fca5)

Select *Withdrawal* to start the process. The most important step of the transfer starts now, as you need to provide the recipient information:

* Address - the wallet address you transfer your LTO tokens to
* Network - this is chosen *automatically* by the app depending on the address you provided
* Amount - how much LTO are you transferring&#x20;

![Example withdrawal to LTO mainnet.](https://4048573506-files.gitbook.io/~/files/v0/b/gitbook-legacy-files/o/assets%2F-LB0RTB-jl8RVmWX9aeE%2F-Mb3C12HJ2YDZKVg45Lh%2F-Mb3SQB_W8f8ht4SAFcg%2FScreenshot_20210528-225936~2.png?alt=media\&token=07d82bc6-39dd-4d9b-9e49-8a8840a86948)

#### Address

Binance automatically parses the address you enter, meaning you can use an LTO mainnet address, an ERC-20 address, or even BEP-20 or BEP-2.

{% hint style="success" %}
To avoid mistakes simply copy your LTO wallet address by clicking it in the web wallet and pasting it into the address field on Binance.
{% endhint %}

#### Network

Based on the format of the address Binance decides which network to use. You usually don't need to change anything. For the sake of simplicity, we assume you used an LTO mainnet address.

{% hint style="info" %}
If you want to stake your LTO on the mainnet you have to use the web wallet at present. If you don't want to stake your LTO you can also directly transfer to, e.g., MetaMask by providing your ERC-20 address and choosing ERC-20 as the Network.
{% endhint %}

#### Amount

Choose the amount you want to transfer or simply select *MAX*.

#### Confirmation and Sending

The last step is selecting *Withdrawal* and confirming the transaction. At present Binance retains a 5 LTO fee, meaning the amount transferred to your LTO web wallet will be your chosen amount minus 5 LTO.

![Confirmation dialog (left) and a successful withdrawal result (right).](https://4048573506-files.gitbook.io/~/files/v0/b/gitbook-legacy-files/o/assets%2F-LB0RTB-jl8RVmWX9aeE%2F-Mb3C12HJ2YDZKVg45Lh%2F-Mb3TUFK866MSqqxbdMz%2Fwithdrawal.jpg?alt=media\&token=d5cdc768-9c2c-4284-9332-e13c1bde4872)

Congratulations! After a few seconds, your LTO tokens should already appear in your web wallet.&#x20;


# AscendEX (Bitmax)

Step-by-step guide of buying LTO on AscendEX (formerly Bitmax).

## Finding LTO on AscendEX

To find LTO on AscendEX simply select *Markets* in the top menu and search for **LTO**. AscendEX currently offers two trading pairs for LTO:

* LTO/USDT
* LTO/BTC

![Search the Market for LTO and you will find a USDT and BTC market.](https://4048573506-files.gitbook.io/~/files/v0/b/gitbook-legacy-files/o/assets%2F-LB0RTB-jl8RVmWX9aeE%2F-Mb719E_3tL0cuVTRFdd%2F-Mb7AJQ8jMtqgXpnyz4J%2FScreen%20Shot%202021-06-01%20at%2017.15.00.png?alt=media\&token=98f00916-61dc-4a41-a8cd-0dbd40a8b8d2)

This means you will need either USDT or BTC on AscendEX first before you can buy LTO. The easiest way is to buy USDT or BTC directly on AscendEX and you're good to go.&#x20;

{% hint style="success" %}
&#x20;If you already own BTC or USDT you can also simply transfer them to your AscendEX account.
{% endhint %}

All that's left now is buying LTO and transferring it to your LTO web wallet to stake it.

## Buying LTO on AscendEX

Once you found the market you need (see *finding LTO on AscendEX*) select *Trade* and you will be forwarded to the LTO trading view:

![The LTO trading view shows the LTO market, the order books and lets you buy LTO.](https://4048573506-files.gitbook.io/~/files/v0/b/gitbook-legacy-files/o/assets%2F-LB0RTB-jl8RVmWX9aeE%2F-Mb7_tCN77V4NI5mOhEM%2F-Mb7cx2G-0dPBYu-nylI%2FScreen%20Shot%202021-06-01%20at%2019.32.36.png?alt=media\&token=fd5c920a-a1f1-4697-b332-d8eb18d80bec)

Select the amount of LTO you want to buy by either typing the amount or using the slider to allocate a percentage of your funds. Clicking on *Buy* will automatically place the order and once it is executed you can see the LTO tokens in your *Total Asset* overview.

![](https://4048573506-files.gitbook.io/~/files/v0/b/gitbook-legacy-files/o/assets%2F-LB0RTB-jl8RVmWX9aeE%2F-MbIDww4yuCCsQMXEyhP%2F-MbINWByYHAiuGF8qhwR%2FScreen%20Shot%202021-06-03%20at%2021.01.51.png?alt=media\&token=434d1a6c-6d9f-4d45-b298-d0f1dd8590ba)

## Transferring LTO from AscendEX

Selecting your total asset overview in your account will give you a summary of all assets your account currently holds. Hovering over LTO shows you the options to withdraw, deposit, transfer, trade, and delegate. We want to withdraw LTO in this tutorial, so select *Withdraw*.

![Your total asset overview will include your LTO tokens and the withdrawal option.](https://4048573506-files.gitbook.io/~/files/v0/b/gitbook-legacy-files/o/assets%2F-LB0RTB-jl8RVmWX9aeE%2F-MbIDww4yuCCsQMXEyhP%2F-MbIOCY4CO7_58piEf-I%2FScreen%20Shot%202021-06-03%20at%2021.05.02.png?alt=media\&token=36b65fa2-2bd5-4bb1-b666-5d623a69a7c9)

In the withdraw tab you have the choice of withdrawing your LTO tokens as ERC-20 (any ETH address, e.g., MetaMask) or LTO mainnet (e.g., the LTO web wallet). For this tutorial, we select the LTO mainnet since the fees are way smaller on the mainnet compared to the ETH network. &#x20;

![Withdrawing LTO on AscendEX is available for ERC-20 or LTO mainnet.](https://4048573506-files.gitbook.io/~/files/v0/b/gitbook-legacy-files/o/assets%2F-LB0RTB-jl8RVmWX9aeE%2F-MbIDww4yuCCsQMXEyhP%2F-MbIOvaeFZwrvIVX29I7%2FScreen%20Shot%202021-06-03%20at%2021.07.15.png?alt=media\&token=b61afddb-33c7-4cf8-9f8b-a6081de00540)

{% hint style="success" %}
To avoid mistakes simply copy your LTO wallet address by clicking it in the web wallet and pasting it into the address field on AscendEX.
{% endhint %}

After filling in your address and your amount you're good to go. Select *Confirm* and then fill in your 2FA information and you're done. The LTO tokens should arrive in your wallet moments later already.


# Uniswap

Step-by-step guide of buying LTO on Uniswap.

In this tutorial, we'll cover merely the basic steps on how to buy LTO tokens on Uniswap. If you require a more in-depth introduction you can refer to [other resources](https://academy.binance.com/en/articles/what-is-uniswap-and-how-does-it-work).&#x20;

## Prerequisites

For the sake of simplicity, we will assume you have a MetaMask wallet that you are using to connect to Uniswap and buy LTO tokens. Should you be using another wallet the preparation will have similar steps depending on the wallet used.

### MetaMask configuration

First, you have to add LTO tokens to MetaMask. Simply tap the *Add token* button to start the process:

![MetaMask token overview.](https://4048573506-files.gitbook.io/~/files/v0/b/gitbook-legacy-files/o/assets%2F-LB0RTB-jl8RVmWX9aeE%2F-MbIYoI-glFfIKl1aqhE%2F-MbL6mq5PJMMTQhZcQba%2FScreen%20Shot%202021-06-04%20at%2010.14.36.png?alt=media\&token=a6e00da8-49ad-491d-8717-9320554eee87)

To find LTO you will need to provide LTO's contract address. This ensures that the right token will be added to your token overview.

**LTO ERC-20 address : 0x3DB6Ba6ab6F95efed1a6E794caD492fAAabF294D**

![Copy the address into the search field to avoid mistakes.](https://4048573506-files.gitbook.io/~/files/v0/b/gitbook-legacy-files/o/assets%2F-LB0RTB-jl8RVmWX9aeE%2F-MbIYoI-glFfIKl1aqhE%2F-MbL7ZRok7GtGOiQPakT%2FScreen%20Shot%202021-06-04%20at%2010.16.19.png?alt=media\&token=0713a126-2956-42ec-8384-fb8189263d21)

Confirm your selection and you're ready to go. LTO Network Token (LTO) should now appear in your MetaMask token overview and you are set up to explore Uniswap.&#x20;

## Uniswap

On Uniswap we will be swapping ETH for LTO tokens. First, you need to connect your wallet to Uniswap. We will be using MetaMask for this tutorial. Second, you need to make sure there is actually some ETH in your wallet. If you don't own any ETH you can't swap them for LTO tokens.&#x20;

### Finding LTO on Uniswap

After connecting your wallet to Uniswap you should be presented with the following dialog:

![Uniswap ETH <> token dialog.](https://4048573506-files.gitbook.io/~/files/v0/b/gitbook-legacy-files/o/assets%2F-LB0RTB-jl8RVmWX9aeE%2F-MbIYoI-glFfIKl1aqhE%2F-MbLSOKJkKdblug_gY1k%2FScreen%20Shot%202021-06-04%20at%2010.39.06.png?alt=media\&token=81ca3741-a4d7-4998-8ee5-44060fb3b477)

Similar to our import of LTO tokens in MetaMask, we will be adding the token to our transaction. You need to select LTO Network tokens and import them.

![LTO Network token import dialog (left) and import confirmation (right) on Uniswap.](https://4048573506-files.gitbook.io/~/files/v0/b/gitbook-legacy-files/o/assets%2F-LB0RTB-jl8RVmWX9aeE%2F-MbIYoI-glFfIKl1aqhE%2F-MbLSrVret79W6ksmTAE%2FUniswap_add_LTO.jpg?alt=media\&token=0df1d28f-b993-420e-9fec-d4d82c989df8)

{% hint style="danger" %}
Always double-check the address of the imported token. If it's not **0x3DB6Ba6ab6F95efed1a6E794caD492fAAabF294D** something might not be correct and you should not continue with the import.
{% endhint %}

### Buying LTO on Uniswap

Now you're all set for the swap. Select the amount you wish to swap and if the conditions seem to your liking confirm the swap.

![Swap conditions will be shown before you can finally start the swap.](https://4048573506-files.gitbook.io/~/files/v0/b/gitbook-legacy-files/o/assets%2F-LB0RTB-jl8RVmWX9aeE%2F-MbIYoI-glFfIKl1aqhE%2F-MbLUe8SAD9QOg059QrN%2FScreen%20Shot%202021-06-04%20at%2010.59.06.png?alt=media\&token=ce8d59c4-419f-43c2-b183-92a8b02b8835)

After your confirmation, the swap will be started. Shortly after you should be able to see the results in your MetaMask wallet already:

![As a result of the swap LTO tokens will appear in your MetaMask wallet.](https://4048573506-files.gitbook.io/~/files/v0/b/gitbook-legacy-files/o/assets%2F-LB0RTB-jl8RVmWX9aeE%2F-MbIYoI-glFfIKl1aqhE%2F-MbLVLLChO9gO7To3BnV%2FScreen%20Shot%202021-06-04%20at%2011.00.49.png?alt=media\&token=54d4d9c3-bfea-439c-bd4f-2ad15bf8528f)

### Transferring LTO from Uniswap

Contrary to our CEX tutorials, if you use a DEX like Uniswap there is no need to transfer your tokens from Uniswap since they are already in your wallet. To transfer them to the mainnet simply refer to our LTO token bridge tutorial on transferring exchange tokens (ERC-20) to mainnet tokens.

{% content-ref url="/pages/-Mb74jeucmcCfeOpR9mx" %}
[Using the LTO token bridge](/tutorials/buying-and-staking-lto/using-the-lto-bridge)
{% endcontent-ref %}


# PancakeSwap

Step-by-step guide of buying LTO on PancakeSwap.

In this tutorial, we'll cover merely the basic steps on how to buy LTO tokens on PancakeSwap. If you require a more in-depth introduction you can refer to [other resources](https://academy.binance.com/en/articles/a-guide-to-pancakeswap).&#x20;

## Prerequisites

For the sake of simplicity, we will assume you have a MetaMask wallet that you are using to connect to PancakeSwap and buy LTO tokens. Should you be using another wallet the preparation will have similar steps depending on the wallet used.

### MetaMask configuration

Two steps are required to configure MetaMask for PancakeSwap. First, you need to enable the BNB network on MetaMask. A simple tutorial can be found [here](https://academy.binance.com/en/articles/connecting-metamask-to-binance-smart-chain), follow it and add the **BNB Mainnet**.

Second, after you added the BNB Smart Chain, we can add the LTO token to the MetaMask token overview. Simply tap the *Add token* button to start the process:

![MetaMask token overview.](https://4048573506-files.gitbook.io/~/files/v0/b/gitbook-legacy-files/o/assets%2F-LB0RTB-jl8RVmWX9aeE%2F-MbQAezspNhLL3Ng7Str%2F-MbQC2nalClfHHf_I44I%2FScreen%20Shot%202021-06-05%20at%2010.02.19.png?alt=media\&token=52673de8-cdc9-49dc-9cd4-56602559de88)

To find LTO you will need to provide LTO's contract address. This ensures that the right token will be added to your token overview.

**LTO BEP-20 address : 0x857B222Fc79e1cBBf8Ca5f78CB133d1b7CF34BBd**

![Copy the address into the search field to avoid mistakes.](https://4048573506-files.gitbook.io/~/files/v0/b/gitbook-legacy-files/o/assets%2F-LB0RTB-jl8RVmWX9aeE%2F-MbQAezspNhLL3Ng7Str%2F-MbQC7ZL9mHVy1k-w74r%2FScreen%20Shot%202021-06-05%20at%2010.03.25.png?alt=media\&token=a859781c-0e7b-4cb6-9984-8207352c8154)

Confirm your selection and you're ready to go. LTO token (LTO) should now appear in your MetaMask token overview and you are set up to explore PancakeSwap.&#x20;

## PancakeSwap

On PancakeSwap we will be swapping BNB for LTO tokens. First, you need to connect your wallet to PancakeSwap. We will be using MetaMask for this tutorial, see the preparation steps above for the necessary prerequisites. Second, you need to make sure there is actually some BNB in your wallet. If you don't own any BNB you can't swap them for LTO tokens.

### Finding LTO on PancakeSwap

First of all, connect your wallet to PancakeSwap, and in the options menu on the left select *Trade* > *Exchange*.

![](https://4048573506-files.gitbook.io/~/files/v0/b/gitbook-legacy-files/o/assets%2F-LB0RTB-jl8RVmWX9aeE%2F-MbQE4RAGZVboxZScoG7%2F-MbRgQlWwcWlZzmKVCHX%2FScreen%20Shot%202021-06-05%20at%2010.34.35.png?alt=media\&token=538a35b5-c82e-43ff-86f5-228be25077fc)

Next, you will be presented with the following dialog:

![PancakeSwap BNB <> token Exchange.](https://4048573506-files.gitbook.io/~/files/v0/b/gitbook-legacy-files/o/assets%2F-LB0RTB-jl8RVmWX9aeE%2F-MbQE4RAGZVboxZScoG7%2F-MbRiWOh7Q8WCKmzBdTj%2FScreen%20Shot%202021-06-05%20at%2010.35.15.png?alt=media\&token=51012864-f88e-434a-8278-c7c0647dd765)

Similar to our import of LTO tokens in MetaMask, we will be adding the token to our transaction. You need to select LTO tokens and import them.

![LTO token import dialog (left) and import confirmation (right) on PancakeSwap.](https://4048573506-files.gitbook.io/~/files/v0/b/gitbook-legacy-files/o/assets%2F-LB0RTB-jl8RVmWX9aeE%2F-MbQE4RAGZVboxZScoG7%2F-MbRjUydICNwNRDZSOqR%2FLTO_token_import_PS.jpg?alt=media\&token=2f33363c-a15a-492e-91d9-d21d7241108b)

{% hint style="danger" %}
Always double-check the address of the imported token. If it's not **0x857B222Fc79e1cBBf8Ca5f78CB133d1b7CF34BBd** something might not be correct and you should not continue with the import.
{% endhint %}

### Buying LTO on PancakeSwap

Now you're all set for the swap. Select the amount you wish to swap and if the conditions seem to your liking confirm the swap.

![Swap conditions will be shown before you can finally start the swap.](https://4048573506-files.gitbook.io/~/files/v0/b/gitbook-legacy-files/o/assets%2F-LB0RTB-jl8RVmWX9aeE%2F-MbQE4RAGZVboxZScoG7%2F-MbRgh3qbNnj91nYAaEB%2FScreen%20Shot%202021-06-05%20at%2016.27.47.png?alt=media\&token=0245df01-1e14-46ea-87a6-244445ab230c)

After your confirmation, the swap will be started. Shortly after you should be able to see the results in your MetaMask wallet already:

![As a result of the swap your LTO tokens will appear in your MetaMask wallet.](https://4048573506-files.gitbook.io/~/files/v0/b/gitbook-legacy-files/o/assets%2F-LB0RTB-jl8RVmWX9aeE%2F-MbQE4RAGZVboxZScoG7%2F-MbRfVRo90ybgwMglVY0%2FScreen%20Shot%202021-06-05%20at%2016.28.38.png?alt=media\&token=ecbdb24b-395b-4ba4-a206-bf4edc0c915e)

### Transferring LTO from PancakeSwap

Contrary to our CEX tutorials, if you use a DEX like PancakeSwap there is no need to transfer your tokens from PancakeSwap since they are already in your wallet. However, the current tokens you hold are BEP-20 LTO tokens. We summarized an[ additional tutorial in our blog](https://blog.ltonetwork.com/how-to-swap-lto-bep2-to-lto-bep20/) on how to transfer BEP-20 tokens to BEP-2 tokens and vice versa. To transfer BEP-2 to the mainnet simply refer to our LTO token bridge tutorial on transferring **exchange tokens to mainnet tokens**.

{% hint style="info" %}
An obvious alternative to LTO's bridge mechanism at this point is Binance itself. If you send the BEP-2 / BEP-20 LTO tokens to your Binance account you will be able to withdraw LTO as any supported token:

* Mainnet,
* ERC-20,
* BEP-2, and
* BEP-20.&#x20;
  {% endhint %}

{% content-ref url="/pages/-Mb74jeucmcCfeOpR9mx" %}
[Using the LTO token bridge](/tutorials/buying-and-staking-lto/using-the-lto-bridge)
{% endcontent-ref %}


# Other exchanges

Abstract step-by-step guide of buying LTO on independent exchanges.

## Finding LTO tokens

On most exchanges, you need to find the market pairs LTO is traded for. Prominent examples include:

* LTO/BTC
* LTO/USDT
* LTO/ETH
* ... and many more.

Once you found the right pair for you make sure you have enough funds to make your transaction.

## Buying LTO tokens

Buying is mostly an automated process. Once you found the right LTO pair and have enough funds available on the exchange you simply place your order and wait until it is filled.

Afterward, you will see your LTO position in your exchange asset overview. This asset summary can be called Wallets, Assets, even Funds sometimes, and will list all your tokens available to you. Selecting LTO tokens usually opens up a detailed view of your LTO position and allows you to withdraw LTO tokens from the exchange to, for example, your LTO web wallet where you can participate in staking LTO tokens.

## Transferring LTO tokens

If the exchange offers transfers to the LTO mainnet the process is quite simple. Simply copy your LTO web wallet address and transfer your LTO tokens to this exact address. Most exchanges will take a little fee.

{% hint style="warning" %}
It's recommended to transfer LTO tokens from the exchange to your own wallet. If you leave your cryptocurrency on an exchange, the private keys to your coins are with the exchange and your tokens could be stolen.
{% endhint %}

If the exchange is only offering exchange tokens (e.g., ERC-20 or BEP-2), you should use the LTO token bridge instead. The process is quite similar to the '**exchange token to mainnet**' tutorial:

{% content-ref url="/pages/-Mb74jeucmcCfeOpR9mx" %}
[Using the LTO token bridge](/tutorials/buying-and-staking-lto/using-the-lto-bridge)
{% endcontent-ref %}

The only difference is that you transfer the exchange funds to the token bridge address provided. That's it, after the transaction from the exchange goes through you will be credited your tokens to your LTO web wallet by the bridge.


# Creating your LTO web wallet

Detailed description about the LTO web wallet creation.

## Creating a web wallet

The web wallet is an official vault for your LTO tokens. If don't have one already visit <https://wallet.lto.network/> and create a new account by selecting *Continue*:

![The wallet creation dialog.](https://4048573506-files.gitbook.io/~/files/v0/b/gitbook-legacy-files/o/assets%2F-LB0RTB-jl8RVmWX9aeE%2F-Mb7Am2toqnAeLkApyr4%2F-Mb7J2kRQLBYfl1CA653%2FScreen%20Shot%202021-06-01%20at%2017.42.25.png?alt=media\&token=4bb86199-02ad-4ebd-b29e-241ec48c1cc5)

Each wallet is unique and has a unique address. This uniqueness is based on an initial secret which in LTO's case consists of 15 words to which we refer to as **seed phrase**. Store these words somewhere safe and never communicate them to anyone. If you lose access to your wallet the seed phrase is the only possibility to restore that access. *Meaning, anyone with that seed phrase can also access your wallet.*

![Keep your seed phrase secret, never disclose it to anyone!](https://4048573506-files.gitbook.io/~/files/v0/b/gitbook-legacy-files/o/assets%2F-LB0RTB-jl8RVmWX9aeE%2F-Mb7Am2toqnAeLkApyr4%2F-Mb7JFMa3FnfU7ePvUeq%2FScreen%20Shot%202021-06-01%20at%2017.45.19.png?alt=media\&token=7aaf54af-fc4f-4ab7-8173-4527c8a7d2cd)

{% hint style="danger" %}
Scammers often masquerade as support or admin account lookalikes for cryptocurrency to ask you for your seed phrase. Never communicate it to anyone, not even if you think it's LTO support or LTO admins chatting with you.
{% endhint %}

After confirming that you wrote down your seed phrase you will have a small challenge by selecting the words in the right order to prove that you actually saved your seed phrase. Finish it and you're done! You now have access to your personal LTO web wallet.

![Congratulations! Your very own LTO web wallet.](https://4048573506-files.gitbook.io/~/files/v0/b/gitbook-legacy-files/o/assets%2F-LB0RTB-jl8RVmWX9aeE%2F-Mb7Am2toqnAeLkApyr4%2F-Mb7JbtHgkRyM__Xyebb%2FScreen%20Shot%202021-06-01%20at%2017.48.14.png?alt=media\&token=ec0ab06a-a45e-4a34-b3be-3209fd0cb2b1)

{% hint style="success" %}
By clicking the wallet address in the top left corner you copy it to your clipboard. This is very useful if you are transferring funds to your web wallet since you're immune to spelling errors.
{% endhint %}


# Using the LTO token bridge

Bridging mainnet, ERC-20, and BEP-2.

LTO's token bridge helps you convert from the exchange tokens on ERC-20 or BEP-2 to the utility tokens on the mainnet and vice versa. You can even convert from one exchange token to another, however, keep in mind that fees can vary greatly between different exchange variants due to ETH or BSC network fees. Converting from exchange tokens to mainnet being usually the lowest fee. BEP-20 is currently not supported by the token bridge but you can still swap these tokens following [this tutorial](https://blog.ltonetwork.com/how-to-swap-lto-bep2-to-lto-bep20/).

## Exchange token to mainnet

To start things off, we'll assume you have LTO tokens in your wallet and would like to convert them to mainnet tokens, e.g., to stake them with one of the community nodes. This direction has minimal fees, at present 10 LTO. The initial situation might look like this:

![Metamask token overview.](https://4048573506-files.gitbook.io/~/files/v0/b/gitbook-legacy-files/o/assets%2F-LB0RTB-jl8RVmWX9aeE%2F-MbIYoI-glFfIKl1aqhE%2F-MbLVLLChO9gO7To3BnV%2FScreen%20Shot%202021-06-04%20at%2011.00.49.png?alt=media\&token=54d4d9c3-bfea-439c-bd4f-2ad15bf8528f)

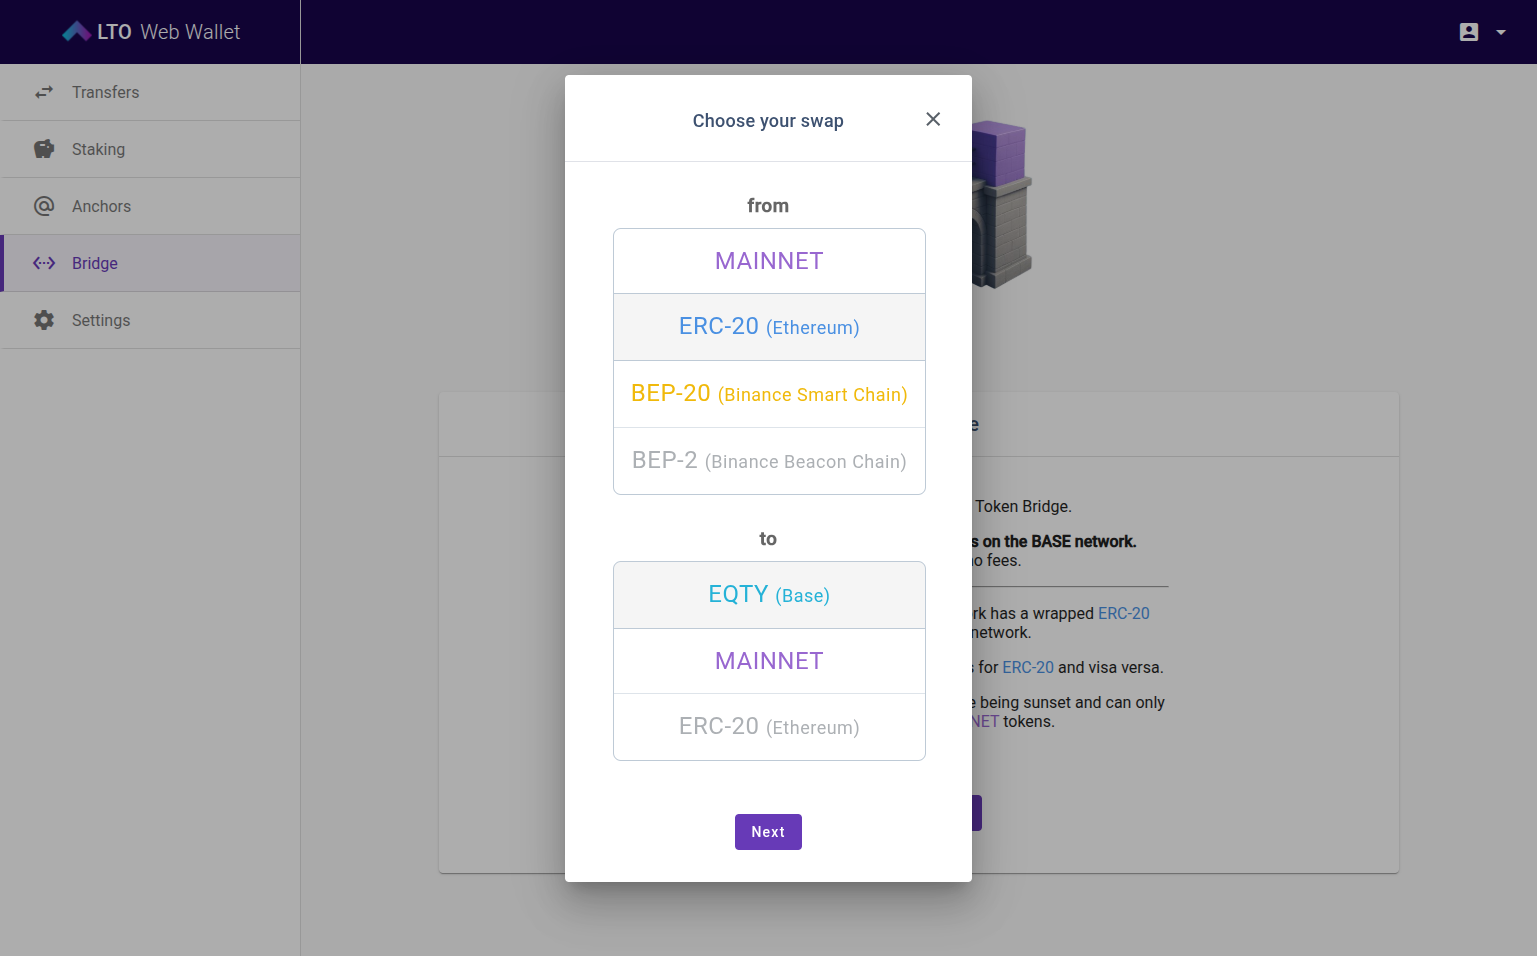
Essentially, all you need to do is transfer your LTO tokens to an address and that's it. To find out your address for this transaction head over to <https://wallet.lto.network/>, log into your LTO web wallet, and select **Bridge** in the options menu on the left side. The following dialog will appear where you need to select the exchange token you have (ERC-20 in this tutorial) and the token you want to exchange for (mainnet in this tutorial).

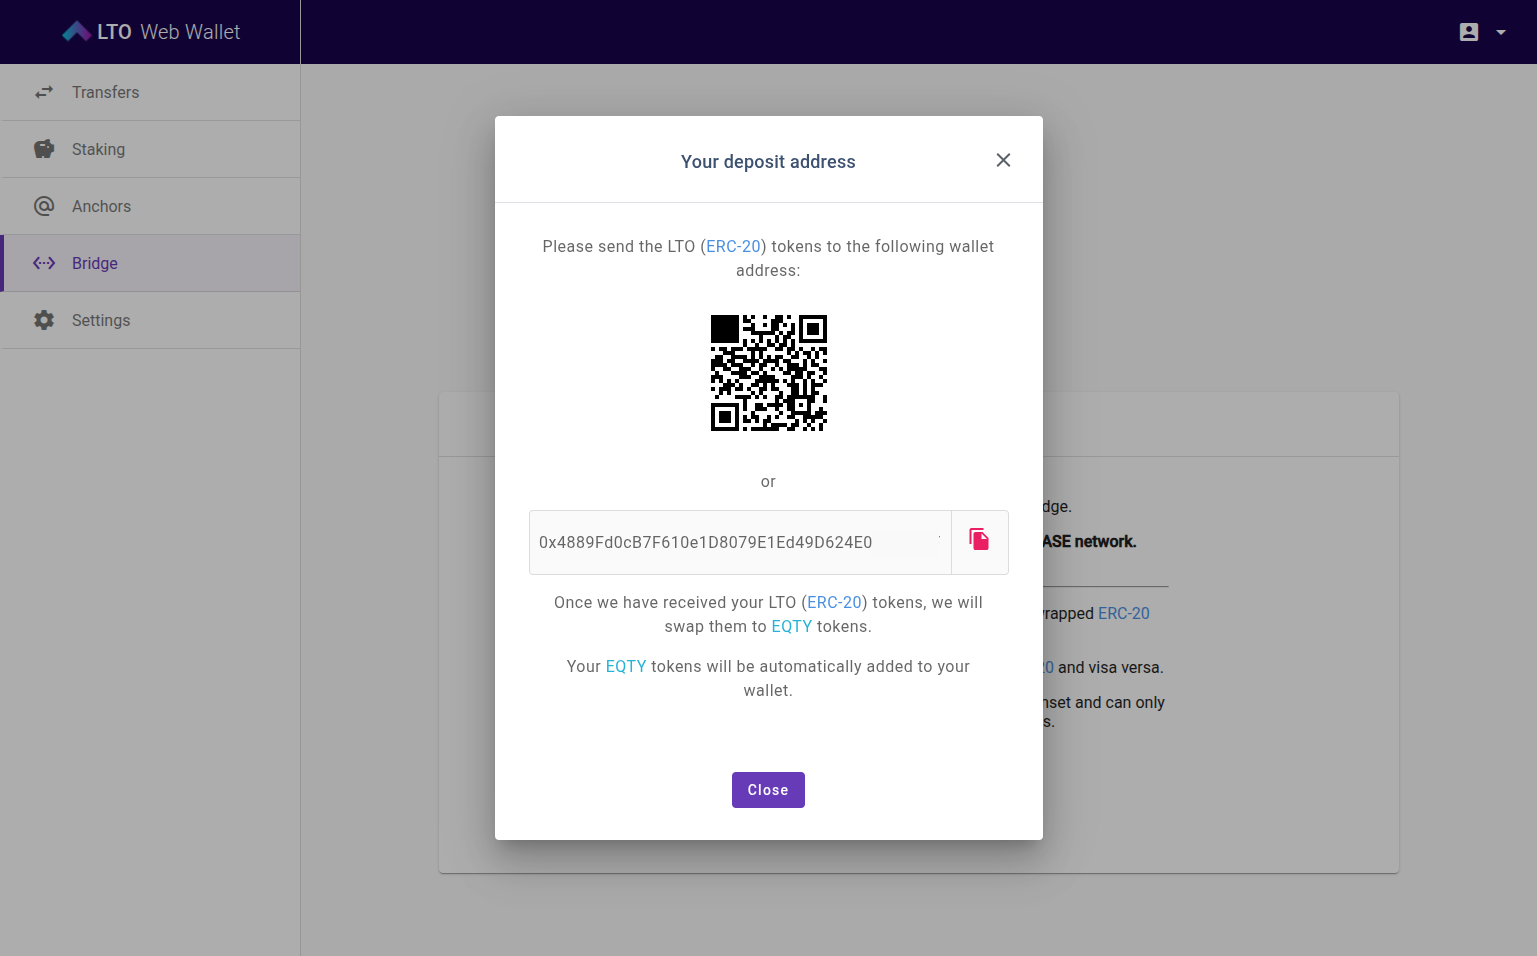
![Token selection (left) and deposit address generation (right).](https://4048573506-files.gitbook.io/~/files/v0/b/gitbook-legacy-files/o/assets%2F-LB0RTB-jl8RVmWX9aeE%2F-MbLZqW3I8aUGyMqYrLg%2F-MbLb2VYN4aX7PigNoiT%2FLTO_token_bridge.jpg?alt=media\&token=ccda03fd-28b0-4c87-b2d3-7511f0eaf3f1)

As you see in the picture above on the left a token address will be generated for you depending on the exchange token you selected. In this tutorial we selected ETH and hence will transfer our token from MetaMask to the address provided by the token bridge:&#x20;

![Transaction summary for the bridge address.](https://4048573506-files.gitbook.io/~/files/v0/b/gitbook-legacy-files/o/assets%2F-LB0RTB-jl8RVmWX9aeE%2F-MbLZqW3I8aUGyMqYrLg%2F-MbLaIYCYdTm6hyXdgH6%2FScreen%20Shot%202021-06-04%20at%2011.05.01.png?alt=media\&token=47a5bb73-15d4-4b2f-853d-493f0b597bf6)

{% hint style="info" %}
Transactions always use us fees, so-called gas fees, for example, ETH for ERC-20 tokens. If you want to transfer your LTO exchange tokens you should have enough native tokens to cover the transaction.&#x20;
{% endhint %}

MetaMask will notify you once the transaction goes through. Shortly after you should also receive your LTO mainnet tokens in your web wallet.&#x20;

## Mainnet to exchange token

A mainnet to exchange token swap has higher fees due to the higher transaction fees on the side of the bridge. In this tutorial, we will be transferring mainnet LTO tokens from our web wallet to the MetaMask wallet, and thus the gas fees are paid by the bridge. To counter this the LTO mainnet fees are higher to pay for these gas fees. At present, a transaction from a mainnet to an ERC-20 address costs 100 LTO. Depending on the ETH price and gas fees per transaction these LTO fees might increase or decrease. Prices for BEP-2 may vary as well, since it's a different network.

To start our transaction select **Bridge** in the options menu of your web wallet. For this tutorial, we will perform an LTO mainnet to ERC-20 transaction.

![LTO Mainnet to exchange token swap.](https://4048573506-files.gitbook.io/~/files/v0/b/gitbook-legacy-files/o/assets%2F-LB0RTB-jl8RVmWX9aeE%2F-MbMCQve5oSQ26KOhgBG%2F-MbMEoagvXcBh5-tM-yU%2FScreen%20Shot%202021-06-04%20at%2015.35.53.png?alt=media\&token=251b206f-2e38-4885-a707-4684ca44000f)

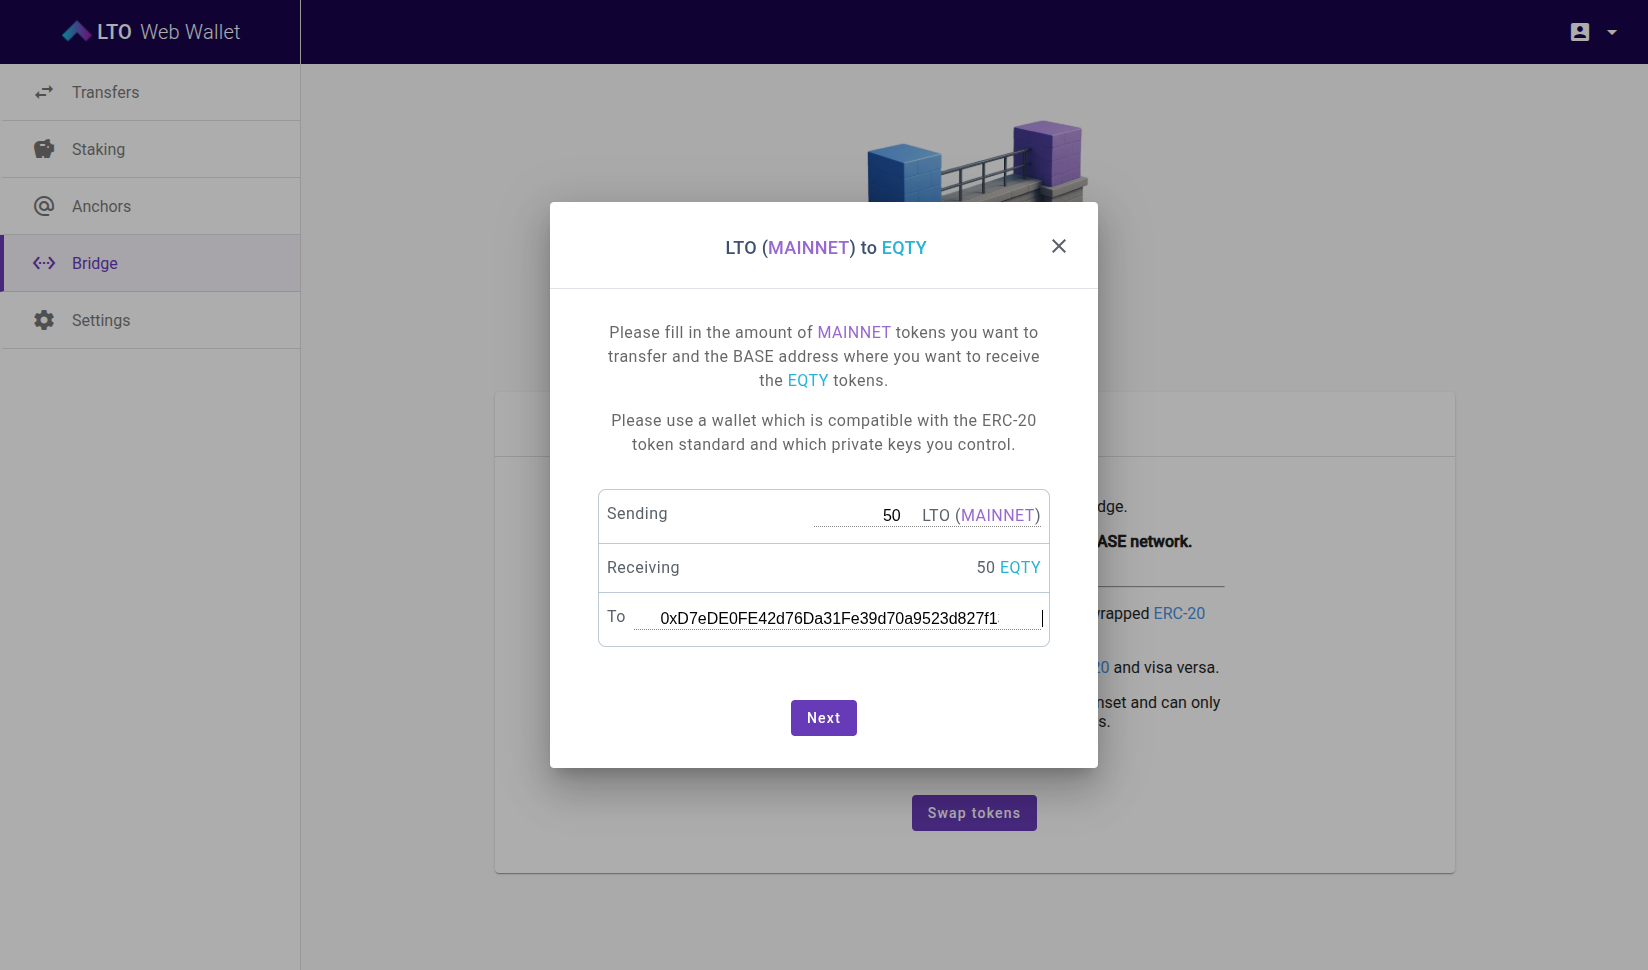
Next, you need to provide the number of tokens you're sending *plus an additional 100 LTO fee*. This is made transparent in the following transfer dialog. Once the **receiving** amount looks good to you provide the ETH address you would like to receive your tokens at and you're done.

![Token bridge dialog for the mainnet to ERC-20 transfer.](https://4048573506-files.gitbook.io/~/files/v0/b/gitbook-legacy-files/o/assets%2F-LB0RTB-jl8RVmWX9aeE%2F-MbMCQve5oSQ26KOhgBG%2F-MbMHfDBpMM40dEbKcPa%2FScreen%20Shot%202021-06-04%20at%2015.50.03.png?alt=media\&token=5629f766-6bc9-49ad-8e0d-6d39a15ca7b5)

After the transfer will go through (might take a few minutes) you will be able to see your LTO tokens in your wallet, provided you added LTO Network tokens to your wallet overview:

![Wallet token overview (MetaMask example).](https://4048573506-files.gitbook.io/~/files/v0/b/gitbook-legacy-files/o/assets%2F-LB0RTB-jl8RVmWX9aeE%2F-MbIYoI-glFfIKl1aqhE%2F-MbLVLLChO9gO7To3BnV%2FScreen%20Shot%202021-06-04%20at%2011.00.49.png?alt=media\&token=54d4d9c3-bfea-439c-bd4f-2ad15bf8528f)


# Staking LTO tokens

Tutorial for staking on the official LTO web wallet.

## Staking LTO&#x20;

Now, that you have your web wallet and bought your LTO tokens from one of the exchanges, you probably want to stake your LTO and make use of the current network APY (yearly [ROI](https://www.ltonod.es/)). To do that head to the leasing menu on the left:

![Enter the Leasing menu for an overview of your leases and community nodes.](https://4048573506-files.gitbook.io/~/files/v0/b/gitbook-legacy-files/o/assets%2F-LB0RTB-jl8RVmWX9aeE%2F-Mb7Am2toqnAeLkApyr4%2F-Mb7KGTFoT5WN4MHZ_47%2FScreen%20Shot%202021-06-01%20at%2017.48.40.png?alt=media\&token=1ccfea1e-e4c5-492a-a2f5-c483dabafb27)

Since we have a brand new wallet there are no leases listed here right now. Let's change that by selecting *Start lease*, and chose one of the community nodes to lease to.

![The Leasing overview will have all the leases you start in a chronological order.](https://4048573506-files.gitbook.io/~/files/v0/b/gitbook-legacy-files/o/assets%2F-LB0RTB-jl8RVmWX9aeE%2F-Mb7Am2toqnAeLkApyr4%2F-Mb7KdaGyQdO1C-IyW0Z%2FScreen%20Shot%202021-06-01%20at%2017.49.01.png?alt=media\&token=4d4d891b-5d0e-46dc-9be8-e1edda92ad0a)

{% hint style="warning" %}
While the lease starts nearly immediately, it will take approximately 16 hours to mature. Once a lease matures it starts generating LTO rewards for you.
{% endhint %}

![The leasing tab provides an overview of community nodes.](https://4048573506-files.gitbook.io/~/files/v0/b/gitbook-legacy-files/o/assets%2F-LB0RTB-jl8RVmWX9aeE%2F-Mb7Am2toqnAeLkApyr4%2F-Mb7KiYahwfHneVhr-WG%2FScreen%20Shot%202021-06-01%20at%2017.49.55.png?alt=media\&token=f340a6ac-d14c-430f-b505-d9e4e10e5632)

Select any one of these community nodes and start your lease. You will need to specify how many of your LTO tokens you want to lease, and you will pay a 1 LTO fee for the lease to start.

{% hint style="danger" %}
Leasing *and* canceling a lease cost 1 LTO each! So if you get your leasing rewards from a node do not cancel your old lease, simply open a new lease for the reward. Otherwise, you'll lose 16 hours and the LTO fees.
{% endhint %}

And now you've officially staked your LTO! You can check the [public community node overview](https://www.ltonod.es/) *(provided by LTONod.es)* to find out who to contact for node-related questions or when your node pays out rewards.


# Mining

Setup your own node and start mining LTO.

Contrary to a lot of cryptos you don't need GPUs or ASICs to mine LTO. Similar to many PoS tokens the most important prerequisite is a computer with a good bandwidth connection, e.g., a VPS, your home server, or even your PC. You will find lots of tutorials on setting up a node in our public node section:

{% content-ref url="/pages/-MQn5oMMUm5O1MZzqkbM" %}
[Public node](/node/public-node)
{% endcontent-ref %}

Since setting up a node and running it for mining LTO can open up its own set of questions we further summed up best practices for you to explore on the following pages:

{% content-ref url="/pages/-LqZXVWK2CzGnHRrpLZ-" %}
[Setup your node wallets](/tutorials/mining/prepare-setup-your-wallet)
{% endcontent-ref %}

{% content-ref url="/pages/-Mb5Y-sq3UXv1ig8\_7Dp" %}
[Node management](/tutorials/mining/node-management)
{% endcontent-ref %}

Lastly, should you at some point decide you want to become an official community node and offer your node up for staking to everybody in the community here is a roadmap for you to follow:

{% content-ref url="/pages/-Mb5YXlJzfRjU6hda9CF" %}
[Public community nodes](/tutorials/mining/public-community-nodes)
{% endcontent-ref %}

Should you need more advice on topics not covered in our tutorial feel free to ask in the [LTO tech chat](https://t.me/LTOtech)!


# Setup your node wallets

This page details how to setup your wallets in a secure way for staking on your own node.

## **Wallets for your node**

Don’t have an LTO Network wallet yet? Create one at [https://wallet.lto.network.](https://wallet.lto.network./)You need mainnet tokens to be able to stake (be part of the network with your tokens). If you don't have any LTO tokens yet you might want to check out tutorials about Buying LTO:

{% content-ref url="/pages/-M\_tdyav\_H32aanUZfbZ" %}
[Buying and staking LTO](/tutorials/buying-and-staking-lto)
{% endcontent-ref %}

Otherwise, chances are you already have tokens. Here are two additional edge cases that might apply to you if you already own LTO:

* Do you have ERC-20 or BEP-2 LTO tokens? Transfer them to mainnet tokens using the bridge function in the wallet interface. You can also refer to our tutorial at:

{% content-ref url="/pages/-Mb74jeucmcCfeOpR9mx" %}
[Using the LTO token bridge](/tutorials/buying-and-staking-lto/using-the-lto-bridge)
{% endcontent-ref %}

![Using the LTO token bridge you can swap your exchange tokens for mainnet tokens.](https://4048573506-files.gitbook.io/~/files/v0/b/gitbook-legacy-files/o/assets%2F-LB0RTB-jl8RVmWX9aeE%2F-MbLZqW3I8aUGyMqYrLg%2F-MbLb2VYN4aX7PigNoiT%2FLTO_token_bridge.jpg?alt=media\&token=ccda03fd-28b0-4c87-b2d3-7511f0eaf3f1)

* Do you still have Investor Seed (Waves) tokens? Transfer them using the Waves Token Swap option in your freshly created wallet.

![“Waves Token Swap” option in LTO Network Wallet.](https://cdn-images-1.medium.com/max/1600/1*AbFELf_LiQoOOShgTMLbng.png)

The wallet you just created is (will be) your personal wallet. We’ll want another wallet which we’ll use just for staking. This new wallet will also receive the earnings. Go ahead and create another wallet. We’ll use the lease function of the LTO Network to lease your tokens from your personal wallet to the 2nd wallet.

As always make sure to write down the seeds of your wallet(s). You can use these to recover your wallet later if needed. Also, you’ll need the seed later on when configuring your Public node.

## **Leasing to your node**

The next step is creating your lease. You will want to lease your tokens from your personal wallet (Wallet #1) to your 2nd wallet (the wallet we’ll use for the node).

![Screenshot of the Leasing page in the LTO Network wallet interface.](https://cdn-images-1.medium.com/max/1600/1*cZnkI9ht6X1-73oZm_76cg.png)

As a first step click the “Start lease” button:

* Specify the recipient: \<the address of your 2nd wallet>
* Specify the amount (max = balance minus fee): \<enter a number>

Click Start lease and confirm to activate.

![A successfully activated lease from Wallet #1 — Personal wallet.](https://cdn-images-1.medium.com/max/1600/1*Q7N5XnVodoVbBfhnV9TKwg.png)

You can check out your 2nd wallet and see the lease was successful.

![A successful lease from Wallet #2 — Node.](https://cdn-images-1.medium.com/max/1600/1*eNZWqd9wxuC8x3HbBHed9w.png)

You’ll need at least 1.000 LTO in your wallet to be able to run a node. You probably want to make sure you have 10.000+ LTO. You can utilize the [Community ROI calculator](https://lto-lease.com/tools/roi) to calculate your possible benefits.

Next up is configuring your Public node. You can choose from multiple deployment methods outlined on the public node subpages:

{% content-ref url="/pages/-MQn5oMMUm5O1MZzqkbM" %}
[Public node](/node/public-node)
{% endcontent-ref %}

&#x20;Happy staking!


# Node management

Run and manage your own node.

## Basic considerations

There are some initial considerations you should clear before deciding on running and managing your own node. Since you have come this far in the tutorials you have probably already consulted the technical requirements for running your own node:

{% content-ref url="/pages/-LmBELgABOhaL6DfR9Un" %}
[Requirements](/node/public-node/installation-guide/requirements)
{% endcontent-ref %}

Next up are the economic aspects. The minimum amount of tokens needed is 1000 for your node to participate in the network. However, with 1000 LTO your node probably will not be generating enough LTO tokens to cover your server costs. You should consult the next paragraph *Probability to generate blocks* to calculate the necessary amount for you. At present this number is anywhere between 70k - 100k, depending on your provider. If you have below that you might consider staking on one of the public community nodes instead.

Lastly, you might want to become one of the public community nodes yourself. If so the last paragraph of this page, *Paying out rewards* is definitely worth a read. Also, the tutorial on how to become a community node is a must-read as well:

{% content-ref url="/pages/-Mb5YXlJzfRjU6hda9CF" %}
[Public community nodes](/tutorials/mining/public-community-nodes)
{% endcontent-ref %}

If not, there is no real necessity for you to dive deep into node reward payments because all of the rewards will be consolidated and staked on your node automatically.

## Probability to generate blocks

By running your own node you participate in the network and get a chance to generate new blocks. These blocks will provide your node with the node rewards depending on the number of transactions in the block. The more transactions are collected in your node's generated block, the higher the node reward will be. The staking consensus is regarded in more detail in the [LTO Whitepaper](< https://ltonetwork.com/documents/LTO%20Network%20-%20Technical%20Paper.pdf>), see section 15 and especially the subsections 15.1 to 15.4 to have a thorough understanding of LTO's consensus.

How many blocks your node will generate depends on the funds staked on the node. Generally speaking, the higher the stake is the more blocks you will generate. The community set up an exemplary [Community model](https://docs.google.com/spreadsheets/u/0/d/1KcqI0Uay0ogJL8TILqKjESjiz0bwMrYeMz8k5TCUbHA/htmlview) to visualize the probability of an LTO stake generating new blocks. *There you can see how high the probability is to generate a block after a certain amount of time has passed.*

{% hint style="info" %}
A probability to generate a new block in 24 hours of 90% means that 9 out of 10 days you should generate a block daily. While this may manifest as a block each day, it can also manifest as two blocks every second day and none in between.
{% endhint %}

If after initially starting your node you find it does not generate blocks as fast as you think it should don't be discouraged. The initial node setup takes time until your node is fully synchronized with the network and the blockchain is up-to-date on your machine. Check your node logs for errors and check the community overviews (e.g., [lto nodes ](https://www.ltonod.es/)or [lto tools](https://lto.tools/nodes/)).&#x20;

{% hint style="info" %}
To check your node's logs run `docker logs -f public-node`. This way you can detect grave error messages, for example, network problems.
{% endhint %}

To have a rough estimate of how long you will have to wait before generating a block you can use the following approximation:

$$
((1 - (s\_1 / S ))^d)^h = P
$$

with

* $$S$$ being the total amount of staked LTO on the network
* $$s\_1$$being the amount of LTO staked on your node
* $$d$$ being the number of blocks forged per hour
* $$h$$ being the number of hours your node will be running without generating a block.

Play around with the $$h$$ parameter to determine when the resulting probability $$P$$ goes close to zero, as that is the amount of time you will have to wait on average before generating a block. If you want the *percentage* simply multiply $$P$$ by 100.

{% hint style="warning" %}
This formula is an oversimplified version of the actual probability from the [LTO Whitepaper](< https://ltonetwork.com/documents/LTO%20Network%20-%20Technical%20Paper.pdf>).&#x20;
{% endhint %}

## Paying out rewards

If you have several wallets leasing to your node or simply plan to pay out your node rewards into your own wallet on a regular basis, you will need to look for payout scripts. Luckily the community has got you covered on this one:

{% embed url="<https://github.com/jayjaynl/LTO_LPoSDistributor>" %}

The LPoSDistributor provides scripts to handle the day-to-day node payments. This tutorial is simply a boiled-down explanation from the project's README, please refer to it for a more in-depth view. The project is subdivided into three parts:

* the collection logic (appng.js or start\_collector.sh)
* the validation logic (checkPaymentsFile.js)
* the payment logic (massPayment.js or masstx.js)

{% hint style="warning" %}
If you encounter problems running start\_collector.sh on UNIX machines it may be due to the DOS line endings. Run a `sed -i -e 's/\r$//' start_collector.sh` to fix that.
{% endhint %}

### Collection logic

First, you'll need to configure the file batchinfo.json once so that the script knows the starting point of all the computations. All future updates will do this automatically, so you only have to configure the first run:

```javascript
EDIT file batchinfo.json with vim or nano;

{
    "batchdata": {
        "paymentid": "1",				<== Leave as is
        "paystartblock": "1044012",			<== Put here same value as 'scanstartblock'. It's when payouts should start
        "paystopblock": "1050000",			<== Put here a value when payouts should stop (i.e. paystartblock+5000)
							    It doesn't really matter, as long as it is higher than paystartblock.
							    It only counts for the first run, and if no blocks were forged yet, that
							    is no problem. Follow up session results are just queued up in line :-))
        "scanstartblock": "1044012"			<== Put here the blockheight of the first ACTIVE lease
    }
}
```

Next up, is the computation of the collected blocks. This happens in the file appng.js, and you'll need to perform the following changes:

```javascript
const myleasewallet = '<your node wallet>';		<== Put here the address of the wallet that your node uses
const myquerynode = "http://localhost:6869";		<== The node and API port that you use (defaults to localhost)
const feedistributionpercentage = 90;			<== How many % do you want to share with your leasers (defaults to 90%)
const blockwindowsize = 10000;				<== How many blocks to process for every subsequent paymentcycle.

var nofeearray = [ ];					<== Put here wallet addresses that you want to exclude from payments,
							    Default empty, so everyone get's payouts
```

With this, you have a configured collection and reward computation logic. You can run it with `node appng.js` or `./start_collector.sh`.

{% hint style="warning" %}
Make sure start collector.sh is actually executable by running `chmod u+x start_collector.sh`.&#x20;
{% endhint %}

You can also automate this step by including start\_collector.sh into your crontab in your /etc/crontab file:

```javascript
00 01 * * * root cd /home/myuser/LTO_LPoSDistributor/ && ./start_collector.sh
```

### Validation logic

To validate the computations you can use the file checkPaymentsFile.js. It will list the next payments coming from your node and provide you with the opportunity to do some sanity checking before you actually start the payments in the next step. You can start the validation with '`node checkPaymentsFile.js`' but before you need to edit it:

```javascript
var config = {
    <SNIP>,
    node: 'http://localhost:6869',			<== Change this value to your blockchain node/API port (defaults to localhost)
    <SNIP>
};
```

### Payment logic

Finally, you should be able to pay out the rewards you computed and validated in the steps before. First, edit the files **massPayment.js** and **masstx.js**:

```javascript
var config = {
    <SNIP>,
    node: 'http://localhost:6869',			<== Change this value to your blockchain node/API port (defaults to localhost)
    apiKey: 'your api key'				<== Put here the API key of your lto node
};
```

Usually, it makes the most sense to use **masstx.js** to pay out your rewards, since your fees will be minimized. Run '`node masstx.js`' to finalize the payment and payout your node's rewards to your stakers.

{% hint style="warning" %}
For security reasons, remove 'rwx' world rights from massPayment.js and masstx.js: `chmod o-rwx massPayment.js`
{% endhint %}


# Public community nodes

A step-by-step tutorial on becoming a public community node.

## Becoming a public community node

Anyone can become a public node on the LTO network as long as all prerequisites are met, the necessary contact info has been made available to the community, and basic git proficiency is part of your repertoire.

### Prerequisites

To take your node public you obviously need to set up your own node first. If you haven't done so feel free to refer to our tutorials in this regard:

{% content-ref url="/pages/-LqZXVWK2CzGnHRrpLZ-" %}
[Setup your node wallets](/tutorials/mining/prepare-setup-your-wallet)
{% endcontent-ref %}

{% content-ref url="/pages/-MQn5oMMUm5O1MZzqkbM" %}
[Public node](/node/public-node)
{% endcontent-ref %}

Furthermore, it helps a lot if you already demonstrated your ability to do payouts, e.g., through the community-provided payout script. Refer to the *Node management* tutorial for more information.

{% content-ref url="/pages/-Mb5Y-sq3UXv1ig8\_7Dp" %}
[Node management](/tutorials/mining/node-management)
{% endcontent-ref %}

### Information disclosure

The team keeps track of the public community nodes in a [separate document](https://docs.google.com/spreadsheets/d/1R9OPQxW9dD9anq217ffm9sXINV_xKTNNaiHcY_eOWmw/edit#gid=0). To get listed there you need to provide [Christian Zhang](https://t.me/ChristianZH) with the following info:

* Node LTO Address
* Your Telegram Name
* Node Name
* Node Website / Telegram Channel
* The Payout schedule

### Web wallet listing/lease tab

The last step is getting listed in the official web wallet. You will require a github account and you will need to create a pull request with your node as part of the lease tab list.

![The lease tab lists public community nodes.](https://4048573506-files.gitbook.io/~/files/v0/b/gitbook-legacy-files/o/assets%2F-LB0RTB-jl8RVmWX9aeE%2F-Mb6dYN_ClMKnfNZrEoK%2F-Mb6tb-9l8lC-vK7xc8k%2FScreen%20Shot%202021-06-01%20at%2016.06.39.png?alt=media\&token=2b96bfec-04f9-4432-968c-2cf6cfb9a035)

First things first, head over to github, and if you don't have an account already create one. Once you're done go to the [LTO UI project page](https://github.com/ltonetwork/lto-ui) and fork the project.

![Fork the LTO UI project to edit the necessary file.](https://4048573506-files.gitbook.io/~/files/v0/b/gitbook-legacy-files/o/assets%2F-LB0RTB-jl8RVmWX9aeE%2F-Mb6dYN_ClMKnfNZrEoK%2F-Mb6vM7dTujHBgqmMULF%2FScreen%20Shot%202021-06-01%20at%2016.11.37.png?alt=media\&token=c499429f-4197-4208-960a-e3ccfe4de5cf)

Now you should have your local fork of the LTO UI project in your own github. To include your node in the community nodes leasing tab you will need to edit the communityNodes.json. Input your node data at the end of the list, same as the other nodes. The list is randomized before being displayed in the web wallet lease tab, so the position in the web wallet is different each time.

![Edit the communityNodes.json with a text editor of your choice and you're good to go.](https://4048573506-files.gitbook.io/~/files/v0/b/gitbook-legacy-files/o/assets%2F-LB0RTB-jl8RVmWX9aeE%2F-Mb6dYN_ClMKnfNZrEoK%2F-Mb6xbVnAf5hkwWxijCT%2FScreen%20Shot%202021-06-01%20at%2016.23.06.png?alt=media\&token=972a94a4-10e1-4399-8dc0-09a65d1b90d5)

All that's left is for you to create a pull request with the [original LTO UI project](https://github.com/ltonetwork/lto-ui). That's it, you're done. As soon as the pull request is granted by the LTO team your node will be part of the leasing tab the next time there is a new build. Congratulations!

![Create a pull request after editing the communityNodes.json file.](https://4048573506-files.gitbook.io/~/files/v0/b/gitbook-legacy-files/o/assets%2F-LB0RTB-jl8RVmWX9aeE%2F-Mb6dYN_ClMKnfNZrEoK%2F-Mb6zL09EsXlmNh6ZLft%2FScreen%20Shot%202021-06-01%20at%2016.29.59.png?alt=media\&token=142ec201-be71-4eba-8a97-8cb9fa06e38a)


# Anchoring

Anchoring on a blockchain is a simple and cheap way to notarize documents and timestamp data. Authorization levels and ACLs offer limited protection against manipulation by those in charge or tasked to maintain the system.

You can provide indisputable proof of existence by securing a hash on the LTO Network public blockchain: [https://anchor-demo.lto.network/demo](https://anchor-demo.lto.network/demo/)

{% hint style="info" %}
The anchoring node indexes anchor and association transactions and provides an easy-to-use REST API. However, it's not required to run an anchoring node to anchor on LTO Network. You can use one of the client libraries to create an anchor transaction and broadcast that via a public node like [nodes.lto.network](https://nodes.lto.network).
{% endhint %}

## REST API

The LTO node comes in several flavors. Anchoring nodes expose an HTTP REST interface allowing you to easily submit anchor transactions. The transactions are signed by the node and (thus) paid by the account associated with the node.

To anchor send a POST request to [https://anchor-demo.lto.network/](https://anchor-demo.lto.network/api-docs/) with a JSON body.

```
{
  "hash": "47DEQpj8HBSa+/TImW+5JCeuQeRkm5NMpJWZG3hSuFU=",
  "encoding": "base64"
}
```

The following encodings are accepted; *hex*, *base58,* and *base64*.

The node exposes a Swagger UI which you can use to try out all the available HTTP endpoints.

![Swagger interface LTO Network Anchoring node](https://cdn-images-1.medium.com/max/1600/1*-tuVnK4w9JuAxc5HP2l9Ag.png)

### LTO mainnet

The demo service uses LTO testnet. Transactions on testnet are free, but the network isn't secure and must not be used in production.

To anchor on LTO mainnet, [install your own anchoring node](broken://pages/-LmshvRewyAgagiu3uwF) using docker. Submitting anchoring transactions on mainnet requires a transaction fee.&#x20;

If the node is set up correctly, you’ll need to provide the API key for each request as `X-LTO-Key` request header. This key has been configured as environment variable `LTO_API_KEY` during set up.


# Hashing

An anchor transaction accepts any 64 bytes (512 bits) as the hash. This allows you to choose almost any hashing algorithm. Based on your requirements choose a fast algorithm like SHA-2 or BLAKE2b or a slow algorithm like BCrypt. The algorithm isn’t stored in the transaction, it’s up to you pick and use one consistently or to store which algorithm was used.

To hash a document, read it to apply the hashing function on the binary data. Structured data should be serialized (e.g. as JSON). Beware that serialization process should be deterministic; in other words, if you provide the same data, you should always get the same serialized data.

### **Plain hash**

For public records, simply apply the hashing function on the data and use that for the anchor transaction. This could be applicable for public archives, allowing them to prove the authenticity of stored documents.

This should not be used for private data as the hash could leak information. For instance, if an organization would create a hash from client-data existing of the customer name, address, etc, an unauthorized party might be able to recreate the hash and find out if a person is a client with this company.

[*See hashing examples in several languages*](https://gist.github.com/jasny/2200f68f8109b22e61863466374a5c1d#file-sha256-md)

### **Peppered hash (HMAC)**

With a peppered hash, a secret key is used in addition to the data to create the hash. You need both the key and data to recreate and thus verify a hash. This makes it impossible to recreate a hash, based only on publicly available data.

The secret key can be a password used by the application for all hashes or a string of random bytes, which is stored together with the data. It’s recommended that the secret is (at least) 32 bytes long.

HMAC is a standardized method to create a peppered hash. It utilizes a pseudorandom function rather than simply concatenating the pepper and the data.

> **If the data contains personal data of an individual, you MUST use a 32-byte random secret key in order to comply with GDPR regulations.**

[*See HMAC examples in several languages*](https://gist.github.com/jasny/2200f68f8109b22e61863466374a5c1d#file-sha256-hmac-md)

### **Signature hash**

Rather than hashing the data, it’s also an option to create a hash of a cryptographic signature. This proofs that not only that the document or data existed on a specific time, but also that is was authorized by a specific party.

Signatures should be created using an asymmetric algorithm with a private key for signing and a public key for verification. To verify authenticity, the document, signature and public key must be provided.

### **Salt**

A salt is a string of random bytes added to the data. Unlike a pepper, a salt is visible for everybody as it’s appended to the hash.

Salting a hash prevents recreating a hash and then trying to find it by scanning all anchor transactions on the blockchain as can be done through LTO history nodes.

Some algorithms like BCrypt will always salt the hash. In other cases, you can choose to add the salt manually. Due to the limit of 64 bytes, it’s not possible to add a salt to a 512 bit hash.

For 256 bit algorithms prepend 32 random bytes to the data. Then append this 32-byte string to the hash.

### Certificate

An alternative method is to create a certificate that contains the hash of the document as well as other metadata. The hash of the certificate is used for anchoring.

[Yaml](https://yaml.org/) is a recommended format at it’s easy to read for both humans and computers.

```
certkey: 87XN8jg78YfwTtP+m+YFASxd0j4aKfN/JmmJDDXnXAk=
document:
  name: blank.txt
  hash: 47DEQpj8HBSa+/TImW+5JCeuQeRkm5NMpJWZG3hSuFU=
owner:
  name: Acme Corp.
  public_key: QIhH7QuVkc6/xY+fFzEJt6v9BSZBzDTH6mA29HbsLlE=
date: 2018-03-06T20:12:00+0100
signature: Pnuj1viOLFNtyV1sLialluW4jDj1ZWf6+KjZrazhEq0U028PCOBulc…
```

In this case, `certkey` is a random value that functions as pepper. All values are base64 encoded, but you could also choose base58 encoding or hexadecimal representation.

The document is connected to the certificate via the document hash. The certificate can be verified on the LTO public blockchain.


# LTO Web Wallet

The official wallet web app is available at <https://wallet.lto.network> and enables users to:

* Generate a **new seed phrase** (new wallet keys) or [**connect a Ledger Device**](/wallets/wallet-web-app/howto-install-lto-app-on-ledger)
* Transfer native LTO coins to an address
* Lease native LTO coins to an address
* Anchor document hashes to the LTO Network blockchain
* Utilize the bridge (swap to other networks like Ethereum and Binance Smart Chain)

In the general wallet, multiple accounts can be created and imported.

The wallet web app operates fully on the client side. Accounts are only stored locally, encrypted, and secured with the password that has been set during creation or import. Network information (like balance, and previous transactions) is fetched from a node's API, using the public wallet address.

Transactions are signed locally, and only the signed transaction is broadcasted to a node to be propagated in the LTO Network. No sensitive data is ever transmitted to an external server.

## Create Account

In order to create an account, go to <https://wallet.lto.network/> and click on **Create Account** in the top right corner. It will notify you about creating a new account - click **Continue**.

![](https://4048573506-files.gitbook.io/~/files/v0/b/gitbook-legacy-files/o/assets%2F-LB0RTB-jl8RVmWX9aeE%2F-Mfro2DcoVHLq-Z-Dxtm%2F-MfrouwFU4s3pM8ExhJi%2Fimage.png?alt=media\&token=36647cdf-46e7-4047-b30f-2d3a2ca0aa4a)

A name and password are asked to store and secure your account. (Note that this is a non-custodial wallet and this data resides on your PC)

![](https://4048573506-files.gitbook.io/~/files/v0/b/gitbook-legacy-files/o/assets%2F-LB0RTB-jl8RVmWX9aeE%2F-MfrpRfH4os5LJGJDgFN%2F-MfrplphcBPZotrGW0iZ%2Fimage.png?alt=media\&token=695165a8-7eed-422e-8dbd-7acbc91f3652)

Click Continue.\
The next screen will show you your 15 word seed phrase. **Write these words down carefully!** This is needed if you ever want to import your account again.

![](https://4048573506-files.gitbook.io/~/files/v0/b/gitbook-legacy-files/o/assets%2F-LB0RTB-jl8RVmWX9aeE%2F-MfrpRfH4os5LJGJDgFN%2F-MfsB5NqdHttFQ_pz6QC%2Fimage.png?alt=media\&token=62af53f1-cbf9-4cb6-8f35-e0d753c5b8b8)

The screen provides two options:

* "I've written it down" - Click this if you have written down your seed phrase, you will be asked to **verify the seed** after. Confirm if you did.
* "Do it later" - It will open the wallet immediately **without** confirming/verifying the seed phrase. You can obtain the seed phrase in the "Settings" menu when the account is unlocked.

## Interface

The interface of the wallet is pretty self-explanatory and intuitive while using it.

### Main screen

1. Your wallet's public address
2. The total amount your wallet holds
3. The amount of effective LTO for the past 1000 blocks
4. The total amount spendable
5. The total amount your wallet holds + the amount leased to it
6. List of transfers (incoming/outgoing)
7. Menu

![](https://4048573506-files.gitbook.io/~/files/v0/b/gitbook-legacy-files/o/assets%2F-LB0RTB-jl8RVmWX9aeE%2F-MfsC6liUbl9E_L8kNR1%2F-MfsESVr9Xb_NY_jThJu%2Fimage.png?alt=media\&token=e41254c0-a268-45f0-afb6-a73c72ed1105)

### Leasing

1. Start a new lease (full how-to available [here](/tutorials/buying-and-staking-lto/staking-lto-tokens))
2. List of lease transactions for your wallet
3. Button to cancel an active lease (only visible on active leases)

![](https://4048573506-files.gitbook.io/~/files/v0/b/gitbook-legacy-files/o/assets%2F-LB0RTB-jl8RVmWX9aeE%2F-MfsC6liUbl9E_L8kNR1%2F-MfsFOAzKevW78RMsHEE%2Fimage.png?alt=media\&token=dcb85ce3-f833-4c8a-bcb1-9b484fe8a9df)

### Bridge

The Bridge allows swapping LTO to tokens to ERC20 on Ethereum or BEP2 on Binance chain. For more information, please follow the bridging guide.

{% content-ref url="/pages/-Mb74jeucmcCfeOpR9mx" %}
[Using the LTO token bridge](/tutorials/buying-and-staking-lto/using-the-lto-bridge)
{% endcontent-ref %}

### **Settings**

1. Your public wallet address
2. Your public key
3. Your backup phrase (seed phrase) (Do not share this with anyone!)
4. Your private key (Do not share this with anyone!)
5. Ability to set a script (Smart Account). It provides an option to disable the ability to transfer coins and would set it so it can only do other transactions like anchoring. Do not use this as a coin holder, this is mostly used by integrators.

**Note** that certain attributes are not visible in case you are connected with a Ledger device or Universal Wallet.

![](https://4048573506-files.gitbook.io/~/files/v0/b/gitbook-legacy-files/o/assets%2F-LB0RTB-jl8RVmWX9aeE%2F-MfsC6liUbl9E_L8kNR1%2F-MfsGtLx3JbSZxvvY87h%2Fimage.png?alt=media\&token=6d41593f-d4ef-4665-8d28-1ce411c2285f)


# Using Ledger

## How to: Install LTO app on Ledger

![](https://4048573506-files.gitbook.io/~/files/v0/b/gitbook-legacy-files/o/assets%2F-LB0RTB-jl8RVmWX9aeE%2F-MjZG1d2DKB6aP7-FSVv%2F-MjZGPJr8MP7Kq2h5k49%2Fimage.png?alt=media\&token=73be4d78-6f1b-4bc9-92fd-7669f6632870)

A Ledger device is a hardware wallet. Hardware wallets are considered very secure for the storage of a user’s private keys in the blockchain. Your digital assets are safe even when used on an infected or untrusted computer.‌

Please note that this tutorial applies only to **Native LTO coins (LTO Mainnet)**. Do not try to send or receive tokens directly from Ethereum or Binance chains as your funds may be lost forever!‌

### Before you begin <a href="#before-you-begin" id="before-you-begin"></a>

* You have initialized your Ledger device
* The latest firmware has been installed
* Ledger Live is ready to use‌

### Install the LTO Network app on your Ledger Nano <a href="#install-the-lto-network-app-on-your-ledger-nano" id="install-the-lto-network-app-on-your-ledger-nano"></a>

1. Open the Manager in Ledger Live.
2. Connect and unlock your Ledger Nano.
3. If asked, allow the manager on your device by pressing the right button.
4. Find LTO Network in the app catalog.
5. Click the Install button of the app.
6. An installation window appears.
7. Your device will display Processing…
8. The app installation is confirmed.

There are currently multiple ways to interact with the LTO Network blockchain using a Ledger hardware wallet: the [**Official Web Wallet**](/wallets/wallet-web-app) and [**third-party wallets**](/wallets/third-party-wallets) like stakely.io and an installable CLI Walle&#x74;**.**

## Connect**ing** Ledger (Official Web Wallet)

In order to connect your Ledger device in the wallet, connect your Ledger Device to your computer and open the LTO Network app. Make sure it's connected to your browser and go to [https://wallet.lto.network/ ](https://wallet.lto.network/)and click on **Ledger Device**. This will open up the wallet for your account.

![](https://4048573506-files.gitbook.io/~/files/v0/b/gitbook-legacy-files/o/assets%2F-LB0RTB-jl8RVmWX9aeE%2F-MjZVyKDs6KcSaPlrxgr%2F-MjZXV0aWk3YWVBUy1hG%2FLedger%20mainnet%20wallet.jpg?alt=media\&token=bac44515-6d61-4596-b6a9-5bb0d6344764)

### Interface

The interface is exactly the same as described on the [Official Web UI](/wallets/wallet-web-app) page. The only addition while using a Ledger device is that it requires to sign transactions by physically touching your Ledger device.

### Signing transactions

On-chain actions need to be signed with your keys, and will therefore need the Ledger to be connected.\
After you click Send, Lease, or any other action, it will prompt you to sign with the Ledger device.

![](https://4048573506-files.gitbook.io/~/files/v0/b/gitbook-legacy-files/o/assets%2F-LB0RTB-jl8RVmWX9aeE%2F-MjZCoF1wGGEQUFNrM4c%2F-MjZENdI7lQQQpJz6pnx%2Fimage.png?alt=media\&token=03fb9d17-1016-4a01-a560-49edf9f9ea4e)

In case you want to sign the transaction, acknowledge the signing process on your Ledger device with "accept and sign".


# Universal Wallet

Universal Wallet is LTO's mobile wallet. It runs on Android and iPhone.

{% hint style="warning" %}
**Universal Wallet is currently under development.** More information will follow prior to the public release.
{% endhint %}

<figure><img src="https://4048573506-files.gitbook.io/~/files/v0/b/gitbook-x-prod.appspot.com/o/spaces%2F-LB0RTB-jl8RVmWX9aeE-887967055%2Fuploads%2FrXOYEaReShmbR1EuETk9%2Fphoto_2023-02-18_16-08-40.jpg?alt=media&amp;token=b72e8a1a-c69c-4c02-8d51-168a8fa5acf1" alt=""><figcaption></figcaption></figure>


# LTO CLI

LTO wallet for the commandline terminal. Great for automating tasks.

## Installation

```
pip install lto-cli
```

[pip](https://pip.pypa.io/en/stable/) is the package installer for Python.

{% hint style="warning" %}
On some older operating systems the `pip` command is linked to Python 2. In that case use `pip3` instead.
{% endhint %}

## Setup

### Manage accounts

```
lto account create
echo "my seed" | lto account seed --name foobar
lto account list
lto account show 3JuijVBB7NCwCz2Ae5HhCDsqCXzeBLRTyeL
lto account set-default foobar
lto account remove 3JuijVBB7NCwCz2Ae5HhCDsqCXzeBLRTyeL
```

### Public node

```
lto node set https://nodes.lto.network
lto node show
```

## Information

### Balance

```
lto balance
lto balance 3MyGpJh6Bb8auF3HtSr2dSJjqQVxgqLynpK
```

### Node

```
lto node status
```

## Transactions

### Anchor

```
HASH1=e3b0c44298fc1c149afbf4c8996fb92427ae41e4649b934ca495991b7852b855
HASH2=d4735e3a265e16eee03f59718b9b5d03019c07d8b6c51f90da3a666eec13ab35

lto anchor --hash $HASH1
lto anchor --hash $HASH1 --hash $HASH2   # Multiple anchors
lto anchor --hash $HASH2:$HASH1          # Mapped anchor
```

### Associations

```
lto association issue --recipient 3MyGpJh6Bb8auF3HtSr2dSJjqQVxgqLynpK --type 1 --hash e3b0c44298fc1c149afbf4c8996fb92427ae41e4649b934ca495991b7852b855
lto association revoke --recipient 3MyGpJh6Bb8auF3HtSr2dSJjqQVxgqLynpK --type 1 --hash e3b0c44298fc1c149afbf4c8996fb92427ae41e4649b934ca495991b7852b855
lto association in
lto association out
```

### Data

```
echo '{"foo": "bar"}' | lto data set
lto data get
lto data get --key=foo
```

*Data is read as JSON from stdin.*

### Transfer

```
lto transfer --recipient 3MyGpJh6Bb8auF3HtSr2dSJjqQVxgqLynpK --amount 1000000000
```

### Mass-transfer

```
echo "3N6MFpSbbzTozDcfkTUT5zZ2sNbJKFyRtRj:1000000000
3NBC7ETcdPbf4QAXSop5UCJ53yX34aGPXoz:800000000" | lto mass-transfer
```

*Recipient/amount pairs are read from stdin.*

### Burn

```
lto burn --amount=1000
```

### Leasing

```
lto lease create --recipient 3MyGpJh6Bb8auF3HtSr2dSJjqQVxgqLynpK --amount 1000000000
lto lease cancel --leaseid 6XmeG7SRWiw8pD6Uad6D9AAaY354v5TV6AJMhPpHMkqy
lto lease in
lto lease out
```

### Sponsorship

```
lto sponsorship create --recipient 3MyGpJh6Bb8auF3HtSr2dSJjqQVxgqLynpK
lto sponsorship cancel --recipient 3MyGpJh6Bb8auF3HtSr2dSJjqQVxgqLynpK
lto sponsorship in
```

### Script

```scala
match tx {
  case t:  TransferTransaction => false
  case mt: MassTransferTransaction => false
  case ss: SetScriptTransaction => false
  case b: BurnTransaction => false
  case _ => sigVerify(tx.bodyBytes, tx.proofs[0], tx.senderPublicKey)
}
```

{% hint style="warning" %}
This script will disallow transfer and burn transactions for an account and disable changing the script again. **Your tokens will be locked if you use it!**
{% endhint %}

```
cat myscript.ride | lto script
```

## Common options

```
--network CHAINID
--account NAME|ADDRESS
--sponsor NAME|ADDRESS
--no-broadcast
--unsigned
```

**--network**

Use `--network T` or `-T` to use testnet instead of mainnet. You need to set up accounts specifically for testnet.

**--account**

Select one of the accounts configured during setup. The account can be referenced by name or address. The name is only known locally. If this option is omitted, the default account is used.

**--sponsor**

Choose an account to sponsor the transaction. The sponsor will co-sign the transaction and pay the transaction fee.

**--no-broadcast**

Create and sign the transaction, but don't broadcast it to the node. The JSON will be outputted.

**--unsigned**

Create the transaction, but don't sign it. This option should only be used in combination with `--no-broadcast`.


# Third-Party Wallets


# Stakely.io wallet

How to use a Ledger device with LTO Network

## Web wallet

Click here to access the Web Wallet: <https://lto.stakely.io/>

![](https://camo.githubusercontent.com/828b3c173812a8d6a12b5e6fa5f3460210e58ebd2daa6d560493a16c0fc426ab/68747470733a2f2f692e696d6775722e636f6d2f345a7573305a652e706e67)

{% content-ref url="/pages/-MfrebrwvQcFJoI331Vi" %}
[Web wallet](/wallets/third-party-wallets/stakely.io-wallet/ledger)
{% endcontent-ref %}

## CLI wallet

![](https://camo.githubusercontent.com/1732511b071c1cbf2d3e751579ca66ae7abd6eac5bb38beb155939e66f3d7f55/68747470733a2f2f74656c656772612e70682f66696c652f6261633431653064383430393762313137326533622e706e67)

{% content-ref url="/pages/-MkgEcPlqmXii-75nvWs" %}
[Commandline](/wallets/third-party-wallets/stakely.io-wallet/commandline)
{% endcontent-ref %}

## Further Security Notes and Further Developments

Although a Ledger hardware wallet is a very secure way of storing your LTO, always initialize your account by broadcasting a transaction to enhance the security of your account effectively reducing the chances of being hit by an “Address collision”.

Some features: data transactions, mass transfers, and other new transactions -even if supported by the Ledger integration- are not supported by the web/CLI wallet. They might be implemented in future releases of the web wallet.

Ledger devices use the BIP-32 deterministic wallet generation, so even if all Cli and Web LTO wallet interfaces disappear, you will be able to recover any wallet by using your Ledger device seed.

### Final Notes

Ledger hardware wallet support for LTO Network was an unofficial development by the LTO Network community. You can contribute to the projects here:

* Ledger app + Cli Wallet: <https://github.com/iicc1/ledger-app-lto>
* Web Wallet (recommended): <https://github.com/stakely/lto-network-ledger-wallet-ui>
* Web Wallet (deprecated): <https://github.com/iicc1/lto-ledger-vue>

### Support

If you encounter any issue with your Ledger device, Web wallet, or CLI wallet, please join the LTO Network Tech Chat, or open an issue on Github.

* LTO Network tech Telegram chat: <https://t.me/ltotech>
* Ledger application GitHub issues: <https://github.com/iicc1/ledger-app-lto/issues>
* Ledger web interface GitHub issues: <https://github.com/stakely/lto-network-ledger-wallet-ui/issues>


# Web wallet

How to use a Ledger device with LTO Network

### Use a Ledger device with the Web Wallet

Click here to access the Web Wallet: <https://lto.stakely.io/>

*Please be sure to double-check that you are accessing the correct website.*

1. Connect and unlock your Ledger device.
2. Open the LTO Network app.
3. The Ledger device should be recognized immediately and the Web Wallet will display your addresses and balances.

If the Web Wallet does not recognize your Ledger device, be sure that no application is already using the device, like other browsers, wallets, or virtual machines. Try to close running programs or reboot your pc if you encounter problems.

The Web Wallet offers some useful functionalities like a **network switch**, to carry out mainnet or testnet transactions; a **balance viewer**, where you will be able to see your total and available tokens; an **address selector** and the fields needed to create transactions.

This is how it should look like when a Ledger device with the LTO Network app is installed and loaded:

![](https://camo.githubusercontent.com/828b3c173812a8d6a12b5e6fa5f3460210e58ebd2daa6d560493a16c0fc426ab/68747470733a2f2f692e696d6775722e636f6d2f345a7573305a652e706e67)

Feel free to experiment with changing your address ID or switch the network, everything will be updated instantly.

Regarding the address selector: inside a Ledger device, there are thousands of possible LTO addresses that can be used. With this web wallet, you can use up to eleven mainnet and testnet wallets, more than enough for normal use.

Here is an example of how to do a Start Lease transaction using the web wallet:

### Perform a Start Lease transaction through a Ledger device using the Web Wallet

Fill in all form fields: transaction type, amount, recipient, and fee. Once you have finished, click on **Sign transaction**.

The minimal fee for a transaction will be filled in automatically.

![](https://camo.githubusercontent.com/6d8806ac5b4c032b7c6c299fc69b8ab6367dc4832f056925c2f2596e58dc10a1/68747470733a2f2f692e696d6775722e636f6d2f5141693776594c2e706e67)

The Web Wallet will send this data to your Ledger device.

The hardware wallet will display on the screen the transaction data: transaction type, fee, amount, recipient, and transaction ID.

**Always double-check that the data shown on the Ledger device coincide with the data on Web Wallet.**

Once you have validated the data, press the **accept transaction** button. You will see on the Web Wallet that the transaction was signed and this notification will pop up:

![](https://camo.githubusercontent.com/38fc9c848356a58a7337f81cc31266357312dd7e119b67efb32a5be29b90f53c/68747470733a2f2f692e696d6775722e636f6d2f34664a3158626c2e706e67)

It means that we have the transaction ready to be broadcasted over the LTO Network blockchain. Press the **Broadcast transaction** button and it will be included in a block in a few seconds.

![](https://camo.githubusercontent.com/259eb93cc9c6f1b7798e186c28c3f62d4ac7957c88284f376e0badca1f8b589d/68747470733a2f2f692e696d6775722e636f6d2f693263674677742e706e67)

Finally, a notification will appear with a link to track this transaction with the official LTO Network **blockchain explorer**.

In case there is some error with the transaction data -as unavailable funds- an error message will be shown instead of this last notification.

{% hint style="success" %}
The Web Wallet was built to be a full **client-side** Ledger Hardware Wallet interface. There is no data interchange between the Ledger Device or Web Wallet to any external server in the signature process.
{% endhint %}


# Commandline

How to use a Ledger device with LTO Network on the commandline

### Use a Ledger device with the CLI Wallet

It was the first interface for this Ledger hardware wallet app. It consists of an **executable** that autodetects your device showing a list of possible tasks.

These executables can be downloaded here, make sure you download the correct binary and most recent for your platform (Windows, Linux, macOS): <https://github.com/iicc1/ledger-app-lto/releases>

Once you have the executable downloaded, **double-click** it, and a command prompt will appear. Don't be afraid of the console, you won't need to write any command! This is a fairly easy way to use the wallet, you just need to enter the numbers and transaction fields.

![](https://camo.githubusercontent.com/1732511b071c1cbf2d3e751579ca66ae7abd6eac5bb38beb155939e66f3d7f55/68747470733a2f2f74656c656772612e70682f66696c652f6261633431653064383430393762313137326533622e706e67)

There are six possible options to choose which are self-explanatory.

Let's see an example of how to **send LTO** with this CLI Wallet:

### Send LTO through a Ledger device using the CLI Wallet

You should have your Ledger device with the LTO Network app selected and the Cli wallet opened:

![](https://camo.githubusercontent.com/c069ff1e27ef795fad47d3e381fba39bf59e10c5cc39fbe6e5919da789bccdb8/68747470733a2f2f74656c656772612e70682f66696c652f3164373530626335386361316234353164623437342e706e67)

We first need to get our **public key** and **address** from the Ledger device, so put a **1** in the console and press enter.

A message asking for a BIP-32 path will show up, just click enter. We are going to use the default path in this tutorial.

Then, our public key and address will appear on the screen:

![](https://camo.githubusercontent.com/9d39057f21ee57700b8b990771ff2ad95d7553a250063bb5fd387e6ebbe56d55/68747470733a2f2f74656c656772612e70682f66696c652f3836323039363533633435363939626135643565642e706e67)

Now that we have this data, we can proceed to send a transaction. In this tutorial, I will do a transfer, so input a **2** and press enter.

A pop-up message asking for a path will emerge: just press enter.

Then it will ask you for a public key. You need to paste the public key we have fetched in the previous step; after that, press enter.

*Note that in Windows, to copy something on the console, you need to select the text you want to copy and press enter. Then, to paste, just do a right-click on the console.*

The CLI Wallet will ask you for a recipient. Paste the address you want to send LTO and press enter.

In the next step, you need to introduce how many LTOs you want to send. Press enter and it will try to **sign this data** with your Ledger device.

The Ledger device will display on its screen the transaction data: recipient, fee, amount, transaction ID, and your address.

**Always double-check that the data shown by your Ledger device coincide with the data on the console.**

Once you have validated the data, press the **accept transaction** button. You will see on the CLI Wallet that the transaction was signed:

![](https://camo.githubusercontent.com/74e1b5740f3e33c11f8219fcb5ecabdd1003822d0ffa7d5952c89521cc2efc1a/68747470733a2f2f74656c656772612e70682f66696c652f3465303663343735313861363663343366386135372e706e67)

Finally, we need to **broadcast** this transaction. To do that, copy everything between brackets (included) and paste it here: <https://nodes.lto.network/api-docs/index.html#!/transactions/broadcast>

![](https://camo.githubusercontent.com/cac97504fcef14e241e1ddc4cd94feab8e13c4b0ac09ad818260445fdefa6f50/68747470733a2f2f74656c656772612e70682f66696c652f3231353666666565623163626365326235326535312e706e67)

Press **Try it out!** and there should not be errors in the Response Body

If you want to track your transaction, paste the **id** value from the **Response Body** on the explorer: [https://explorer.lto.network](https://explorer.lto.network/)


# Swapping LTO to EQTY

The LTO Web Wallet allows you to swap your tokens for EQTY on the Base network. The swap is **1:1 and free of charge**. You can swap both **LTO Mainnet tokens** and **wrapped tokens (ERC-20 or BEP-20)**.

{% hint style="danger" %}

## The swap period has ended.

Swapping has available between **September 1, 00:00 UTC** and **October 31, 23:59 UTC**. It's no longer possible to swap or trade LTO tokens.
{% endhint %}

EQTY is an ERC-20 token deployed on the **Base network** with smart contract addres&#x73;**:** `0xc71f37d9bf4c5d1e7fe4bccb97e6f30b11b37d29`

You can verify the contract on **BaseScan** here: [EQTY on BaseScan](https://basescan.org/token/0xc71f37d9bf4c5d1e7fe4bccb97e6f30b11b37d29)

## Setting up your Base wallet

Before you can swap LTO into EQTY, you need a wallet on the **Base network**. This wallet will hold your EQTY tokens. Popular options are MetaMask, Trust Wallet, Coinbase Wallet, Exodus, and Ledger.

Below you’ll find instructions and links to official guides. You only need to set up **one** of these wallets or any other wallet that support EVM chains.

{% tabs %}
{% tab title="MetaMask" %}

### MetaMask

[Download MetaMask](https://metamask.io/download) for your browser or mobile. Follow the [Getting started guide](https://support.metamask.io/start/getting-started-with-metamask/) to create or import a wallet.

MetaMask supports Base. You should be able to select it under "Networks".  If Base is not listed, you can add it manually:

* Network name: Base Mainnet
* RPC URL: `https://mainnet.base.org`
* Chain ID: `8453`
* Currency symbol: `ETH`

Guide: [Custom networks in MetaMask](https://support.metamask.io/more-web3/learn/user-guide-custom-networks-and-sidechains/).

To see EQTY in MetaMask, import it as a **Custom Token**:

* Contract address: `0xc71f37d9bf4c5d1e7fe4bccb97e6f30b11b37d29`
* MetaMask will automatically detect the symbol and decimals

Guide: [Display tokens in MetaMask](https://support.metamask.io/manage-crypto/tokens/how-to-display-tokens-in-metamask/?utm_source=chatgpt.com).

{% hint style="danger" %}
Troubleshooting: If symbol/decimals fail to auto-fill when importing, ensure **only** Base is selected in the dropdown. MetaMask may mis-fetch metadata when multiple networks are included.
{% endhint %}
{% endtab %}

{% tab title="Trust Wallet" %}

### Trust Wallet

[Download Trust Wallet](https://trustwallet.com/download) for iOS, Android, or Chrome extension.

Trust Wallet natively supports the Base network.

To add EQTY:

* Tap **Add Custom Token**
* Choose **Base** as the network
* Paste the EQTY contract address: `0xc71f37d9bf4c5d1e7fe4bccb97e6f30b11b37d29`

Reference: [How to Add a Custom Token using Trust Wallet](https://trustwallet.com/blog/web3/how-to-add-a-custom-token-using-trust-wallet)
{% endtab %}

{% tab title="Base Wallet" %}

### Coinbase Wallet

Install [Base Wallet](https://www.coinbase.com/wallet) on mobile or as a browser extension.

Base Wallet has Base support out of the box. Simply select **Base** in the network menu.

EQTY will appear automatically when you receive it at your Base address.

Reference: [Tokens in Base Wallet](https://docs.base.org/base-chain/tools/tokens-in-wallet).

{% hint style="warning" %}
EQTY may appear in Coinbase Wallet without a logo and with limited information until it's propertly listed on CoinMarketCap and/or CoinGecko.
{% endhint %}
{% endtab %}

{% tab title="Exodus" %}

## Exodus Wallet

[Download Exodus](https://www.exodus.com/download) for desktop or mobile.

Exodus supports Base accounts directly. To add EQTY:

* **Mobile:** Tap Wallet → Profile → Assets → **+**, choose **Base**, and paste the EQTY contract address.
* **Desktop:** Settings → Assets → **Add Custom Token**, select **Base**, and paste the EQTY contract address.

**EQTY contract address:** `0xc71f37d9bf4c5d1e7fe4bccb97e6f30b11b37d29`

Reference: [Exodus – How to add a custom token](https://www.exodus.com/support/en/articles/8598810-how-do-i-add-a-custom-token).\
Reference: [Explore the Base ecosystem with Exodus](https://www.exodus.com/support/en/articles/8717855-explore-the-base-web3-ecosystem-with-exodus).
{% endtab %}

{% tab title="Ledger" %}

## Ledger device

[Buy a Ledger](https://www.ledger.com/) and [download Ledger Live](https://www.ledger.com/ledger-live) to manage it.

1. **Install and update**

* Install Ledger Live and update firmware.
* In Ledger Live, install the **Ethereum** app on your device.

2. **Add a Base account**

* Ledger Live → **Accounts** → **Add account** → choose **Base**.
* Connect and unlock your Ledger, then **open the Ethereum app**. Ledger Live will create a Base account (0x… address).

3. **Get your Base address**

* Ledger Live → **Receive** → pick your **Base** account.
* Verify the address on the device screen and copy it. You will need this address for the swap.

4. **Seeing and sending EQTY**

* Ledger Live shows ETH and supported tokens on Base. If EQTY is not visible yet, you can still receive it at your Base address.
* To view or move EQTY, connect your Ledger to a compatible wallet, eg:
  * **MetaMask**: select Base, then **Import tokens** with EQTY contract.
  * **Exodus**: add a **custom token** on Base with the EQTY contract.

EQTY Smart contract addresss: `0xc71f37d9bf4c5d1e7fe4bccb97e6f30b11b37d29`

Reference: [BASE on Ledger](https://support.ledger.com/article/13334147998877-zd)
{% endtab %}
{% endtabs %}

{% hint style="success" %}
During the swap process you will need to provide your **Base wallet address**. Make sure you have it ready once your wallet is set up.
{% endhint %}

## Swapping LTO (Mainnet) to EQTY

### Step 1 – Log into the Web Wallet

Go to <https://wallet.lto.network> and sign in. If your account is not listed, restore it from your seed phrase or connect via Universal Wallet or Ledger.

{% hint style="warning" %}
**Important:** If your LTO tokens are **leased**, you must cancel the lease first. There is an **unbonding period of 3000 blocks (about 2 days)**. Only after unbonding can you swap your tokens.
{% endhint %}

### Step 2 – Open the Bridge

Click **Bridge** in the left-hand menu, then select **Swap tokens**.

<figure><img src="https://4048573506-files.gitbook.io/~/files/v0/b/gitbook-x-prod.appspot.com/o/spaces%2F-LB0RTB-jl8RVmWX9aeE-887967055%2Fuploads%2FpmWq7TbVin0lZOIvAHWp%2Fstep1.png?alt=media&amp;token=f9fefa33-d4fe-4132-a7b0-0e3a74909ba1" alt=""><figcaption></figcaption></figure>

### Step 3 – Choose the Swap

Select:

* **From:** MAINNET
* **To:** EQTY (Base)

Click **Next**.

<figure><img src="https://4048573506-files.gitbook.io/~/files/v0/b/gitbook-x-prod.appspot.com/o/spaces%2F-LB0RTB-jl8RVmWX9aeE-887967055%2Fuploads%2FxSJtfTJNE9EPPzOMUlLm%2Fmainnet-step2.png?alt=media&amp;token=20e62f0e-b07a-418b-81a9-9ee3d05c5876" alt=""><figcaption></figcaption></figure>

### Step 4 – Enter Swap Details

* Enter the amount of **LTO (Mainnet)** you want to swap.
* The receiving amount of EQTY will be shown (always 1:1).
* Paste your Base address in the **To** field.

Click **Next**.

<figure><img src="https://4048573506-files.gitbook.io/~/files/v0/b/gitbook-x-prod.appspot.com/o/spaces%2F-LB0RTB-jl8RVmWX9aeE-887967055%2Fuploads%2FksjEN9PdctDepLNI59Mz%2Fmainnet-step3.png?alt=media&amp;token=91f14de3-db58-45c3-a6a9-9a3fe120f7ea" alt=""><figcaption></figcaption></figure>

### Step 5 – Confirm and Transfer

Double-check the details:

* Amount of tokens
* Destination Base address

Tick the confirmation box, then press **Transfer**.

<figure><img src="https://4048573506-files.gitbook.io/~/files/v0/b/gitbook-x-prod.appspot.com/o/spaces%2F-LB0RTB-jl8RVmWX9aeE-887967055%2Fuploads%2F2TC2jmk2cULgwBnesBr2%2Fmainnet-step4.png?alt=media&amp;token=ba4f9540-55f7-4602-aeb2-18b7c61b4972" alt=""><figcaption></figcaption></figure>

### Step 6 – Completion

The bridge will convert your LTO (Mainnet) tokens into EQTY. You’ll see a success message showing the Base address that will receive them. Click **Close**. Your EQTY tokens will appear in your Base wallet.

<figure><img src="https://4048573506-files.gitbook.io/~/files/v0/b/gitbook-x-prod.appspot.com/o/spaces%2F-LB0RTB-jl8RVmWX9aeE-887967055%2Fuploads%2FDxwHkElS30STTBKwor7e%2Fmainnet-step5.png?alt=media&amp;token=fd7f082d-39eb-4867-9366-26396f06af69" alt=""><figcaption></figcaption></figure>

✅ Done! You’ve successfully swapped your LTO into EQTY.

{% hint style="danger" %}
The swap normally takes around **15 minutes**. If it takes longer than **1 hour**, something is wrong. Please fill out [this form](https://docs.google.com/forms/u/1/d/1rmAciVHi4B2ZclVvWZOQo3b7VgQmC6vdoG5pUfUDwqM).
{% endhint %}

## Swapping Wrapped Tokens (ERC-20 or BEP-20) to EQTY

You can also swap LTO tokens from Ethereum (ERC-20) or Binance Smart Chain (BEP-20) directly into EQTY. This can be useful if you already hold your tokens on an exchange or in a wallet outside of LTO Mainnet.

### Step 1 – Log into the Web Wallet

Go to <https://wallet.lto.network> and sign in. If you don't have an account, you can create a new one. The account is not used when swapping from ERC-20 / BEP-20 to EQTY.

### Step 2 – Start the Swap

Go to the **Bridge** page and click **Swap tokens**.

<figure><img src="https://4048573506-files.gitbook.io/~/files/v0/b/gitbook-x-prod.appspot.com/o/spaces%2F-LB0RTB-jl8RVmWX9aeE-887967055%2Fuploads%2FpmWq7TbVin0lZOIvAHWp%2Fstep1.png?alt=media&amp;token=f9fefa33-d4fe-4132-a7b0-0e3a74909ba1" alt=""><figcaption></figcaption></figure>

### Step 3 – Choose the Swap

Select your wrapped token type as the source:

* ERC-20 (Ethereum)
* BEP-20 (Binance Smart Chain)

Select **EQTY (Base)** as the destination. Click **Next**.

<figure><img src="https://4048573506-files.gitbook.io/~/files/v0/b/gitbook-x-prod.appspot.com/o/spaces%2F-LB0RTB-jl8RVmWX9aeE-887967055%2Fuploads%2FyjKiT0FMrNDqZVSO1yAx%2Ferc20-step2.png?alt=media&amp;token=87a54bab-103b-45de-90eb-9e67d70e95bd" alt=""><figcaption></figcaption></figure>

### Step 4 – Enter Your EQTY Address

Paste your Base address where you want to receive EQTY tokens. Click **Next**.

<figure><img src="https://4048573506-files.gitbook.io/~/files/v0/b/gitbook-x-prod.appspot.com/o/spaces%2F-LB0RTB-jl8RVmWX9aeE-887967055%2Fuploads%2FvCemKTlj7vDEMRMU1Nw6%2Ferc20-step3.png?alt=media&amp;token=a66e1a5e-6e6c-427a-96b1-3b6df586945a" alt=""><figcaption></figcaption></figure>

### Step 5 – Get Your Deposit Address

The wallet will show you a **deposit address** for the wrapped tokens. Send your LTO (ERC-20 or BEP-20) tokens to this address using your Ethereum / BSc wallet (eg Metamask or Trustwallet). You may also send tokens directly from a centralized exchange.

You can scan the QR code or copy the address.

<figure><img src="https://4048573506-files.gitbook.io/~/files/v0/b/gitbook-x-prod.appspot.com/o/spaces%2F-LB0RTB-jl8RVmWX9aeE-887967055%2Fuploads%2F8knCEKMX7JxYAoER8FOl%2Ferc20-step4.png?alt=media&amp;token=6fa8e2c0-610e-41d9-bacc-0a47e203c2c8" alt=""><figcaption></figcaption></figure>

### Step 5 – Completion

Once the bridge has received your wrapped tokens, it will automatically mint EQTY and deliver them to your Base wallet.

✅ Done! You’ve successfully swapped your LTO into EQTY.

{% hint style="danger" %}
The swap normally takes around **15 minutes**. If it takes longer than **1 hour**, something is wrong. Please fill out [this form](https://docs.google.com/forms/u/1/d/1rmAciVHi4B2ZclVvWZOQo3b7VgQmC6vdoG5pUfUDwqM).
{% endhint %}


# ERC20 Token Swap

With the release of the v2 LTO ERC20 token we developed a webpage that allows users to swap their v1 tokens to the new v2 tokens.

* [V1 Token on Etherscan](https://etherscan.io/token/0x3db6ba6ab6f95efed1a6e794cad492faaabf294d)
* [V2 Token on Etherscan](https://etherscan.io/token/0xd01409314acb3b245cea9500ece3f6fd4d70ea30)

## Official Token Swap Page

The official token swap page is available at <https://swap.lto.network/>

![swap.lto.network](https://4048573506-files.gitbook.io/~/files/v0/b/gitbook-x-prod.appspot.com/o/spaces%2F-LB0RTB-jl8RVmWX9aeE-887967055%2Fuploads%2FZSN6lIC2wdz34rkSyTdy%2Fimage.png?alt=media\&token=dd3d7a1e-4434-44cd-83b6-34707f47e636)

By clicking on "Unlock Wallet", you'll be greeted with the choice of your wallet provider. *WalletConnect* will always be available, alongside any wallet providers you have installed on your browser (injected providers).

![Choose a wallet provider](https://4048573506-files.gitbook.io/~/files/v0/b/gitbook-x-prod.appspot.com/o/spaces%2F-LB0RTB-jl8RVmWX9aeE-887967055%2Fuploads%2F8R3doWl44RHnLlXN7JPB%2Fimage.png?alt=media\&token=11664b4b-5411-41f6-9d1a-5dfda699846c)

Once you've connected with your wallet provider, you can see your v1 and v2 token balance. To swap tokens, you must first hit "Approve", so that the contract has the required allowance to make the transaction.

![Hit Approve to have an allowance](https://4048573506-files.gitbook.io/~/files/v0/b/gitbook-x-prod.appspot.com/o/spaces%2F-LB0RTB-jl8RVmWX9aeE-887967055%2Fuploads%2FZByD6imQy8oivubeyqEm%2Fimage.png?alt=media\&token=9299f0ba-4081-4188-a963-08611c3fe10c)

This will prompt a confirmation screen with your wallet provider, which once approved, will take a few seconds to load and confirm the block. The "Swap" button should become available then.

![Hit Swap to swap your tokens](https://4048573506-files.gitbook.io/~/files/v0/b/gitbook-x-prod.appspot.com/o/spaces%2F-LB0RTB-jl8RVmWX9aeE-887967055%2Fuploads%2FSybG4ADQCxIiyO1G4RL1%2Fimage.png?alt=media\&token=f8035d4d-bfe2-40d6-af8c-67ca7160138e)

Once again, "Swap" will prompt a confirmation screen with the wallet provider. Once everything is complete, you should be left with all your v1 tokens now swapped to v2.

![All tokens swapped to v2](https://4048573506-files.gitbook.io/~/files/v0/b/gitbook-x-prod.appspot.com/o/spaces%2F-LB0RTB-jl8RVmWX9aeE-887967055%2Fuploads%2FuWXUmx8UyLP5c4WuXo40%2Fimage.png?alt=media\&token=9909284a-4e7e-4c1e-ae80-fa8f613bdba2)


# Public node


# Installation Guide


# Mainnet & Testnet

***Mainnet*** – short for main network – is the original and functional blockchain where actual transactions take place in the distributed ledger and the native cryptocurrency possesses real economic value. In other words, the mainnet refers to the actual open-sourced blockchain itself that is publicly verifiable.

The mainnet carries out the functionality of executing real transactions within the network which is stored on the blockchain and is referred to as the ‘end product’ that is open for the public to use. Each transaction executed on the blockchain requires participants to pay a transaction fee (payable in the native coin) so as to incentivize miners to validate the transactions and prevent network spamming. For their hard work, miners will be rewarded with the transaction fees paid by the participants.

You can access LTO mainnet via a [node](https://github.com/ltonetwork/lto-public-node). It's integrated with the GUI in the LTO web-wallet, allowing anyone to use it without any technical knowledge or blockchain downloads.

***Testnet*** – short for test network – is an alternative LTO blockchain, to be used ***for testing***. Testnet LTO tokens are separate and distinct from actual LTO tokens, and are never supposed to have any value. This allows application developers or testers to experiment without having to use real LTO or worrying about breaking the main LTO chain.

Testnet is used a lot for developing purposes, assume you are building a new feature and it requires you to send and receive LTO and you don't have any real LTO or you don't want to waste with mistakes, here you use test network (testnet).

## Mainnet vs Testnet

A mainnet and a testnet are two separate networks that operate independently from each other.

|                        | Mainnet                                           | Testnet                 |
| ---------------------- | ------------------------------------------------- | ----------------------- |
| Purpose                | LTO Functional blockchain                         | LTO Testing environment |
| Transactions           | LTO real transactions stored on actual blockchain | Fake transactions       |
| LTO Tokens             | Posses real value                                 | No monetary value       |
| Transactions frequency | High                                              | Low                     |
| Mining                 | Possible to earn rewards                          | Not possible            |


# Requirements

## Requirements

* [Docker](https://www.docker.com/)
* [Docker compose >= v3.0](https://docs.docker.com/compose/)

*You can obtain the latest version of* `docker-compose` *using pip.*

## System requirements

**The Minimal requirements are:**

1 vCPU 4Gb RAM 30Gb SSD

**Recommended configuration is:**

2+ vCPU 8Gb RAM +30Gb SSD


# Configuration

Before you run the public node you will need to configure a few environment variables:

* `LTO_WALLET_SEED`: The seed of your wallet. Your account will need at least 1000 LTO to be able to start mining. Alternatively, you can use `LTO_WALLET_SEED_BASE58` with base58 encoded wallet seed.
* `LTO_NETWORK`: Choose the network you want to connect your node to. The options are: `MAINNET` and `TESTNET` (default is`MAINNET`).

For other options check out: [Public Node on Github](https://github.com/ltonetwork/lto-public-node)


# (Virtual) Machine

## Run on a (virtual) machine

```
docker-compose up
```

Docker compose is configured to run the node on a local machine on port 80. If you would like to run the node on different port you will need to change the `docker-compose.yml` to

```
ports:
    - <your-port>:80
```

This way the node will be accessible via port 80.

Or you can use a reverse proxy like NGINX to make the node publicly available. This is highly recommended.


# Nginx reverse proxy (optional)

This page shows the steps required to setup an Nginx reverse proxy to securely access your node's API remotely.

LTO Network nodes have a cool web interface where you can check info about your node, network and even sign and send transactions. It also serves as a REST API with its own Swagger documentation.

Once you have your LTO Node configured and running, you should be able to access the web interface with the following url: [http://localhost:6869](http://localhost:6869/)

![](https://www.dumbitcoin.com/wp-content/uploads/2019/01/main-1024x612.png)

Without a graphical interface, e.g in a VPS, doing a curl <http://localhost:6869> serves to check if your node has the web interface enabled. If it is not, the response is a connection refused error.

If your web interface is not working, the reason is that the following lines are missing from your Docker config file. Add them to enable the API:

```
- LTO_ENABLE_REST_API=true
- LTO_API_KEY=<somestrongpassword>
```

The second line is optional and intended to be used solely for executing privileged actions from the web interface.

Do not forget to rebuild the image when the config file is changed

```
$ docker-compose down 
$ docker-compose up
```

At this point you might be wondering: How do I access this web interface from outside the network?

That is the exact purpose of this tutorial. The following paragraph shows how to configure Nginx as a reverse proxy to access the LTO node web interface from the internet securely without opening any port.

## Step 1: Setup our Nginx reverse proxy

First of all Nginx must be installed

```
$ sudo apt update
$ sudo apt install nginx
```

If everything is installed correctly, you should see that Nginx service is active with this command

```
$ systemctl status nginx
```

![](https://www.dumbitcoin.com/wp-content/uploads/2019/01/Sin-t%C3%ADtulo.jpg)

Also, if you paste your public IP in any browser, the Nginx default page should appear.

Now w move to create our reverse proxy.

We need to edit a file located in /etc/nginx/sites-available/default, delete everything and paste the following text:

```
server {
    listen 80 ;
    location / {
        proxy_pass http://localhost:6869;
    }
}
```

Finally, restart Nginx to apply changes

```
$ sudo systemctl restart nginx
```

At this moment, the reverse proxy should be working. Paste the public IP of your node machine in any browser and should be visible and working.

It is strongly recommended to use secure connections using a SSL/TLS certificate when managing API keys. Continue reading to improve the security.

## **Step 2: Adding HTTPS support to the reverse proxy**

In order to do this, we need to have a registered domain name pointing to the public node IP. There are many places where you can get really cheap domains, even free. SSL certificates prohibits to be assigned directly to IP addresses, so having a domain name is a requisite here.

We will use the well known certificate generator Certbot. To install it:

```
$ sudo add-apt-repository ppa:certbot/certbot
$ sudo apt-get update
$ sudo apt-get install python-certbot-nginx
```

Before executing Certbot, we must set our domain name into Nginx. At the second line in /etc/nginx/sites-available/default, insert:

```
server_name yourdomainforlto.com;
```

Then restart Nginx to apply changes

```
$ sudo systemctl restart nginx
```

Launch Certbot and follow the process that is short and straightforward. It will ask your email to be notified for renewals and alerts. Select the option to redirect to HTTPS if you want to use only HTTPS (recommended).

```
$ sudo certbot --nginx -d yourdomainforlto.com
```

In some cases, Certbot will throw a firewall error if your system has ufw firewall enabled. In order to solve this, allow Nginx with the following command

```
$ sudo ufw allow 'Nginx Full'
$ sudo ufw delete allow 'Nginx HTTP'
```

There is a more complete tutorial about Nginx, Certbot and Ufw [here](https://www.digitalocean.com/community/tutorials/how-to-secure-nginx-with-let-s-encrypt-on-ubuntu-16-04).

At this point, Certbot has generated a Let’s Encrypt SSL certificate for your site and also configured your Nginx secure reverse proxy. Now you should be able to enter your node web interface from your custom domain name securely through HTTPS, congratulations!

![](https://www.dumbitcoin.com/wp-content/uploads/2019/01/certf.jpg)

## **Optional: Setting a login and password for your node web interface**

This is an extra security measure, setting a login and password for your site will allow you to give access only to the people with this information. It doesn’t matters if you have configured a SSL certificate or not, it will work anyway. In order to do this, enter the following commands. LTOuser is an example username. It will ask you for the password to set.

```
$ sudo sh -c "echo -n 'LTOuser:' >> /etc/nginx/.htpasswd"
$ sudo sh -c "openssl passwd -apr1 >> /etc/nginx/.htpasswd"
```

Finally, edit again the file /etc/nginx/sites-available/defaultand add the following lines under the proxy\_pass line for example

```
auth_basic "LTOuser";
auth_basic_user_file /etc/nginx/.htpasswd;
```

Don’t forget to restart Nginx to apply changes

```
$ sudo systemctl restart nginx
```

At this moment, when someone tries to enter into your node web interface, the browser will prompt a message to enter the authentication data.

![](https://www.dumbitcoin.com/wp-content/uploads/2019/01/Sin-t%C3%ADtulolto.jpg)


# Troubleshooting FAQ

## 1. My public node seems to be up and running but when checking the logs from time to time I get a message of this type:

```bash
Error mining Block: BlockAppendError(Block is not a child of the last block,Block(4Bk5FxnuKMPqZeh4Rfyn1pE6UyNYfznQd7MtUhKtNug15WoxvhkjtCeo4AVMAW2AEXFw2DMfxd1MZ3G71SiJdnUC -> 245bVsJ..., txs=0, features=Set()))
```

When this happens, your node most likely went out-of-sync, in order to fix it you should follow the next steps:

```bash
# stop your node (if spinned up by docker compose)
$ docker-compose down

# sync your node's clock with NTP server
$ sudo service ntp stop
$ sudo ntpdate pool.ntp.org
$ sudo service ntp start

# spin up your node again
$ docker-compose up -d
```


# Cloud installation

You can participate in network validation and earn LTO.

In this sub-section, you will find guides on how to set up a public community node within various cloud services. For more information on staking and ROI, [please see this blog page](https://blog.lto.network/staking-and-leasing-lto-network-node-guide/). &#x20;

For more community incentives, you can [check out this blog page](https://blog.lto.network/distributed-workforce-community-dao-level-up/).


# Alibaba Cloud

This page shows the 2 steps ( >:) ) needed to get an LTO Network node up and running using Alibaba Cloud, specifically Elastic Container Instances.

So you decided you want to be part of the LTO Network, awesome!

A great way to be part of the community is by actively participating as a node in the network.

Make sure to check out the Prepare: [Setup your wallet page](/tutorials/mining/prepare-setup-your-wallet) before continuing. The node setup pages assume you utilize a 2-wallet setup for extra safety.

Be prepared for some **tough** configuration. Configuring a container instance on Alibaba is not at all straightforward and a lot of manual networking and security related steps are involved!

## **Step 1: Deploying your node on Alibaba Cloud using the browser interface**

![Alibaba Cloud — LTO node — Main screen](https://cdn-images-1.medium.com/max/2400/1*lBOzXNpNE7aZTIrWTNMnNA.png)

Setting up an LTO Public Node on Alibaba cloud is \_not\_ possible using a free account. There are paid services involved like a NAT Gateway and Elastic IP. Make sure you have entered your payment parameters before continuing.

Alright, let’s go!

![Alibaba Cloud — LTO node — Product overview](https://cdn-images-1.medium.com/max/2400/1*ccZVFxuIAp0bCB2EGgd6YA.png)

Alibaba Cloud offers multiple Container offerings. The Container Service gives you the option of configuring a Kubernetes cluster or Swarm cluster. We do not want this. We just want to deploy **1** container.

We’ll go with the **Elastic Container Instance** option.

![Alibaba Cloud — LTO node — Elastic Container Instance main screen](https://cdn-images-1.medium.com/max/2400/1*ufJOfrKC0i665UMzlnqSZQ.png)

On the Elastic Container Instance product page click **Create Elastic Container Group**.

![Alibaba Cloud — LTO node — ECI main configuration page](https://cdn-images-1.medium.com/max/2400/1*TUBvb-a14pZdin2kt9GlGg.png)

We’ll come back to this page a few times. Unfortunately we have to setup various network and security related stuff before being able to deploy our container.

All links you’ll click will open in a new Tab which makes it easy to jump back.

**Important:** Make sure you configure the resources in the region you’re actually using for your container deployment. In the above screenshot you see the US West 1 and then Zone B. All my configuration is done in Zone A! I will have to switch to be able to select my netwerk components, for example the vSwitch.

The configuration container configuration page asks us to select a VPC. We do not have one yet so let’s create one by clicking **Go to Console and Create**.

![Alibaba Cloud — LTO node — VPC, Virtual Private Cluster configuration](https://cdn-images-1.medium.com/max/2400/1*E94ExmWfJVf6s5MhoCWdkg.png)

In the next screen click on **Create VPC**. In the screen appearing configure a VPC and a vSwitch. As you can see in the screenshot above. This is were you configure the Zone.

Next up is configuring the NAT Gateway. Click on the **NAT Gateways** option in the menu on the left.

![Alibaba Cloud — LTO node — NAT Gateways overview](https://cdn-images-1.medium.com/max/2400/1*YHCstGaPRKeSfFUuce1DqA.png)

No NAT Gateway available yet. In the screen appearing click on **Create NAT Gateway** to create one.

![Alibaba Cloud — LTO node — NAT Gateway — This is a paid service.](https://cdn-images-1.medium.com/max/2400/1*2zW2s6SVcL_kAD5S-jfKhA.png)

Let’s go with the defaults. A Small Specification should be enough. Continue.

![Alibaba Cloud — LTO node — Finish your order](https://cdn-images-1.medium.com/max/2400/1*FQRg8DXzJGF6OkPYM9q0Uw.png)

With your order complete you can refresh your NAT Gateways overview page. You will see your NAT Gateway appearing. Let’s go to the next option to configure. The EIP.

![Alibaba Cloud — LTO node — EIP configuration page](https://cdn-images-1.medium.com/max/2400/1*nlirvcvYFlNue1VRJLrgnw.png)

The EIP is our Elastic IP Address. Click on **Elastic IP Addresses** in the menu on the left. Click **Create EIP** in the screen appearing to create our Elastic IP address.

![Alibaba Cloud — LTO node — Another paid service :)](https://cdn-images-1.medium.com/max/2400/1*nmEfeGlN_ReZhlkWo0PfkA.png)

Not sure about the max bandwidth needed. I went with 50 Mbps in this example. Make sure you have the region configured as the region were you’ll be deploying your container. Click on **Buy Now** and finish the rest of the transaction.

![Alibaba Cloud — LTO node — EIP Available](https://cdn-images-1.medium.com/max/2400/1*2GHPmGN8ysj-Pe8UaFpCxg.png)

In the above screenshot you can see that we have our freshly ordered EIP available. It’s time to bind the EIP to our NAT Gateway. Click **Bind** on the far right.

![Alibaba Cloud — LTO node — Bind EIP to our NAT Gateway](https://cdn-images-1.medium.com/max/2400/1*Zt5KoL7BxbbrOXIowx2FSQ.png)

We want to bind the EIP to our NAT Gateway. Make sure to select **NAT Gateway Instance** in the Instance Type field. Now select your **NAT Gateway Instance** and click **OK.**

![Alibaba Cloud — LTO node — EIP bind to NAT Gateway → Allocated](https://cdn-images-1.medium.com/max/2400/1*NS1NuftaVqvUYMVaSf2lgA.png)

Good job! You’ll see the status changing from Binding to Allocated when successful. With this done we can go back to our NAT Gateway and configure Source NAT.

![Alibaba Cloud — LTO node — NAT Gateways overview](https://cdn-images-1.medium.com/max/2400/1*502ZW3o9Y0O8uOyyLkfNww.png)

Click on **Configure SNAT** on the far right to configure Source NAT.

![Alibaba Cloud — LTO node — Add a SNAT entry to our table](https://cdn-images-1.medium.com/max/2400/1*VqP3BoDCjDwgwP8fxOFY7w.png)

To continue click on **Create SNAT Entry** a new screen will appear.

![Alibaba Cloud — LTO node — Create SNAT Entry page](https://cdn-images-1.medium.com/max/2400/1*JgDdNaFqS246-EDQWcRnNg.png)

Select our vSwitch and select our EIP. Your IP address will differ from the above screenshot. Now click **OK** to continue.

![Alibaba Cloud — LTO node — We’re back in the ECI configuration page](https://cdn-images-1.medium.com/max/2400/1*7fulmEwc2I6JSMdAzxV21A.png)

OK, we’re back in the ECI configuration page. As you can see we switched our zone to Zone A as I configured my vSwitch in Zone A. I’ve selected my VPC and my vSwitch.

Next up is the configuration of a Security Group. We’ll do this by clicking on **Create Security Group**.

![Alibaba Cloud — LTO node — Security Groups overview](https://cdn-images-1.medium.com/max/2400/1*NBiSWu8-nZNo33nD3QYgnA.png)

Click **Create Security Group** to continue.

![Alibaba Cloud — LTO node — Rules!](https://cdn-images-1.medium.com/max/2400/1*IGDikoR6vGapAw_HX2Z2LA.png)

We do not really want rules but still, let’s click on **Create Rules Now**. Accept the proposed rules.

![Alibaba Cloud — LTO node — Security group ingress overview](https://cdn-images-1.medium.com/max/2400/1*i5urc99VHdpSyN_AiKGtlQ.png)

Go to the ingress rules tab of our security group. Select all the rules there and remove them. We do not need ingress rules to make our LTO Public Node work.

![Alibaba Cloud — LTO node — Back to the ECI configuration](https://cdn-images-1.medium.com/max/2400/1*wXNF8hJf3fTiUcXuM6sKfw.png)

With our Security Group created and configured we can finally continue with the configuration of our Elastic Container Instance. Click on **Select Security Group** and select our freshly created security group from the list. Click **Select**.

Now scroll down to the Container Group Name for the next step.

![Alibaba Cloud — LTO node — Finally, some container configuration](https://4048573506-files.gitbook.io/~/files/v0/b/gitbook-x-prod.appspot.com/o/spaces%2F-LB0RTB-jl8RVmWX9aeE-887967055%2Fuploads%2FH50afay344AoTFybRUTE%2Falibaba1.jpg?alt=media\&token=78795c89-93e8-4c10-9654-4eff1739db49)

We’re almost there. It’s time todo some container configuration.

Please enter a:

* Container Group Name: you choose!
* Container Name: you choose!

Fill in the Docker Image name for the public node and fill in “latest” in the version field.

Select 1 vCPU and the 2GiB memory option will appear. We do not need 4 GiB.

Finally enter the environment variables. Unlike in the above screenshot we need to configure 3 parameters:

* LTO\_WALLET\_SEED: The seed of the wallet you use for staking
* LTO\_WALLET\_PASSWORD: You choose a password
* LTO\_NODE\_NAME: Optional but can be a good idea :)

{% hint style="info" %}
A future update might include the usage of secrets to secure our configuration.
{% endhint %}

Let’s **Create** the container.

![Alibaba Cloud — LTO node — ECI overview page](https://4048573506-files.gitbook.io/~/files/v0/b/gitbook-x-prod.appspot.com/o/spaces%2F-LB0RTB-jl8RVmWX9aeE-887967055%2Fuploads%2FJzhn7jCjItLUxuRnS7rd%2Falibaba2.jpg?alt=media\&token=92c43293-ad23-45e7-97a9-e131ba9440d2)

A small summary before kicking off the creation process. If everything looks good to you click on **Create ECI** to activate the container.

![Alibaba Cloud — LTO node — ECI instance successfully activated](https://cdn-images-1.medium.com/max/2400/1*mDCQchWlsQV5SaqOr_-49Q.png)

Yes, we did it. We created our Elastic Container Instance on Alibaba Cloud! Click **Console** to see our container in action.

![Alibaba Cloud — LTO node — Looking good! blockchain downloaded, appending MicroBlocks!](https://cdn-images-1.medium.com/max/2400/1*N-Xcl7YOptOukswRLwnX_g.png)

In the above screenshot i have selected our freshly created container instance and the **Logs** tab. I’ve selected the **Container Name** and clicked **OK** to view the log entries.

Depending on when you check the node will be busy downloading the blockchain or appending MicroBlocks :)

That’s it. You’ve successfully mastered setting up a LTO Network public node on Alibaba Cloud. Awesome!

## **Step 2: Wait for a 1.000 blocks**

You can find the LTO Network Explorer at [https://explorer.lto.network.](https://explorer.lto.network./) It shows you the blocks generated, by who, when, how big they are and how many transactions are in the block.

After launching your node check the [Explorer](https://explorer.lto.network) to see the number of the last block. Wait till another 1.000 blocks are generated and expect your node to be part of the LTO Network.

{% hint style="info" %}
Utilize the available [Community Tech Tools](https://blog.lto.network/distributed-workforce-community-dao-level-up/#tech-lab) to get more insights into the network and your participation. Let's build a secure and useful network together!
{% endhint %}

Depending on your stake (the number of LTO tokens you have in the “2nd wallet”) it will take more or less time for you to start earning LTO. Be patient and be happy. Welcome to the amazing LTO Network community! Read more [about community programs](https://blog.lto.network/distributed-workforce-community-dao-level-up/).


# AWS Elastic Beanstalk

This page explains in just 3 steps how to get your node up and running using AWS (Amazon Web Services) Elastic Bean Stalk Applications.

So you decided you want to be part of the LTO Network, awesome!

A great way to be part of the community is by actively participating as a node in the network. Running an AWS Elastic Bean Stalk LTO Network Public node will set you back around 1.10 dollar per day. You can use our [Community ROI calculator](https://lto-lease.com/tools/roi) to get an indication of your possible earnings.

Make sure to check out the Prepare: [Setup your wallet page](/tutorials/mining/prepare-setup-your-wallet) before continuing. The node setup pages assume you utilize a 2-wallet setup for extra safety.

## **Step 1: Preparing the setup of the node**

Do you have an AWS account? If not set one up through <https://console.aws.amazon.com/>.

In step 2 we will configure the actual Elastic Bean in AWS. In that step we assume you were successful in the creation of your AWS account.

The last step in preparation is the download of the: “Dockerrun.aws.json” file from the Github repository (<https://github.com/ltonetwork/lto-public-node>). Download this file (<https://raw.githubusercontent.com/ltonetwork/lto-public-node/master/Dockerrun.aws.json>) to your system and zip it using your favourite archive tool.

## **Step 2: Setting up the AWS Elastic Bean Stalk application**

Open the AWS interface: <https://console.aws.amazon.com/elasticbeanstalk/home?region=us-east-1#/applications>. If you want to change the AWS region where you want to host your application this is the time.

Let’s create our application by clicking “Create New Application”:

* Specify an Application name and a Description. Just choose yourself.

![Create New Application wizard](https://cdn-images-1.medium.com/max/1600/1*fdQLpsFi8NlNBUd_ssrYPg.png)

![We have created our application and are presented the main screen.](https://cdn-images-1.medium.com/max/1600/1*py8yRfFh4EbrBg255y8wDg.png)

Next step is to create the environment. This will be the actual node:

* Select the “Web server environment” tier and click “Select”.

![](https://cdn-images-1.medium.com/max/1600/1*fD8-p6JwbhhzcwIR318MDw.png)

In the next screen we need to specify a few things:

* Choose a name for the environment, you choose yourself.
* You can choose a name for the domain. This will be the first part of the url where you can reach your node if you choose the enable the API later on. If you don’t fill in anything here the system will auto-generate.
* Fill in a description if you want.
* Make sure to specify “Docker” as the Preconfigured platform.

![](https://cdn-images-1.medium.com/max/1600/1*4a3ABHm7potJRqym75cr9A.png)

* Finally select the “Upload your code” option under “Application code” and click the Upload button.
* Clicking the Upload button gives you the opportunity to “Choose File” the zip file (Dockerrun.aws.json.zip) you created earlier.

![](https://cdn-images-1.medium.com/max/1600/1*6mJz613SE99ZDJo-L_W4hg.png)Upload your code screen — Click upload after selecting the file.

Clicking the Upload button brings us back to web environment creation screen. We need to configure some additional things so let’s click the “Configure more options” button.

![We need to change some defaults to get the node to run.](https://cdn-images-1.medium.com/max/1600/1*3PG8t3l1hktML3ShcKityQ.png)

We want to change the following things:

* Instances, click modify: EC2 instance type, change to: t2.small
* Software, click modify:

![The Modify software screen.](https://cdn-images-1.medium.com/max/1600/1*kzwE3MvYF6E5cTGDtrn2Pw.png)

On the software screen you can choose to activate the Log streaming. Personally I find this very useful. To activate check the Log streaming box like shown in the screenshot above.

2nd is to setup the Environment properties. Depending on your wish to activate the API you configure just the first 2 variables or configure all of them.

Both LTO\_WALLET\_PASSWORD and LTO\_API\_KEY are fields for which you choose the value. The LTO\_WALLET\_SEED is your official wallets seed. In this example we use the seed (the mnemonic phrase / the list of words) of the 2nd wallet we created.

Finished configured the environment properties you can click “Save” and then “Create environment”.

AWS will now create the Elastic Bean Stalk application based on the Dockerfile (the file you uploaded) and parameters you specified. Please give this process a few minutes to complete.

![A successfully running LTO Network node](https://cdn-images-1.medium.com/max/1600/1*hKe-VQL61Paxkbfqr29XrQ.png)

If you have enabled the API (assuming you configured all 4 environment properties) you can connect to your node through your favorite webbrowser.

![The API interface for the LTO Network node.](https://cdn-images-1.medium.com/max/1600/1*dIaUMLu8m-prfpbdXEwGFw.png)

## **Step 3: Wait for a 1000 blocks**

You can find the LTO Network Explorer at [https://explorer.lto.network.](https://explorer.lto.network./) It shows you the blocks generated, by who, when, how big they are and how many transactions are in the block.

After launching your node check the [Explorer](https://explorer.lto.network) to see the number of the last block. Wait till another 1.000 blocks are generated and expect your node to be part of the LTO Network.

{% hint style="info" %}
Utilize the available [Community Tech Tools](https://blog.lto.network/distributed-workforce-community-dao-level-up/#tech-lab) to get more insights into the network and your participation. Let's build a secure and useful network together!
{% endhint %}

Depending on your stake (the number of LTO tokens you have in the “2nd wallet”) it will take more or less time for you to start earning LTO. Be patient and be happy. Welcome to the amazing LTO Network community! Read more [about community programs](https://blog.lto.network/distributed-workforce-community-dao-level-up/).


# Google Cloud

This page shows the 2 steps needed to get an LTO Network node up and running using Google Cloud, specifically using the Kubernetes Engine called Google Cloud Engine.

So you decided you want to be part of the LTO Network, awesome!

A great way to be part of the community is by actively participating as a node in the network.

Make sure to check out the Prepare: [Setup your wallet page](/tutorials/mining/prepare-setup-your-wallet) before continuing. The node setup pages assume you utilize a 2-wallet setup for extra safety.

## Step 1: **Deploying your node on Google Cloud using the browser interface**

Setting up an LTO Public Node on Google Cloud Engine is very easy. Google automates almost everything for you.

It’s quite a heavy setup for a LTO Public Node though because of the required Kubernetes cluster. In my case, Google spun up a Kubernetes Cluster when running using around 12 GB of memory. Because of this requirement running a node on Google Cloud Engine will probably be quite “expensive” (You determine the value and define what expensive means :) ).

![Google Cloud Platform — Main screen](https://cdn-images-1.medium.com/max/2400/1*IPq70LODxJghc2363rw5fg.png)

Yes, we are in the main screen. Let’s jump in immediately and click **Kubernetes Engine** -> **Clusters**.

![Google Cloud Platform — Deploy container](https://cdn-images-1.medium.com/max/2400/1*LDcn9MxG-5P7CzmR03B7_Q.png)

Before you reach the above screen you might have to enable billing. This in turn will enable the GCE — Google Cloud Engine API. Please wait 1–2 minutes before continuing.

Having enabled the API, we can start with our deployment. Click **Deploy container**.

![Google Cloud Platform — Creating a container deployment step 1](https://4048573506-files.gitbook.io/~/files/v0/b/gitbook-x-prod.appspot.com/o/spaces%2F-LB0RTB-jl8RVmWX9aeE-887967055%2Fuploads%2FMj6e9o0hOKio6HaTbnG4%2Fgoogle1.jpg?alt=media\&token=30079564-4777-4ec5-9a9e-fb3af93ea2ae)

We immediately jump into configuring our container. This does not mean we do not need networking, security, a Kubernetes cluster, etc. It simply means that Google can take care off a lot of these steps.

*On the right side under **Environment variables** you find an important node regarding access secrets. It’s definitely best practice to use secrets to store your valuable data like password(s) and also your seed. Using secrets for your environment variables makes sure they do not show up in plain text. This guide does **not** use access secrets. Let me know if you want me to add this!*

Let’s continue creating our deployment:

* Select **Existing container image**
* **Image Path**: ltonetwork/public-node
* Set your environment variables: LTO\_WALLET\_SEED, LTO\_WALLET\_PASSWORD and optionally your LTO\_NODE\_NAME.

{% hint style="info" %}
A future update might include the usage of secrets to secure our configuration.
{% endhint %}

Click **Continue**.

![Google Cloud Platform — Creating a container deployment step 2](https://cdn-images-1.medium.com/max/2400/1*_zSVFLK1osU80RYdInQHPQ.png)

Step 2 of the deployment is nothing more than naming your application. Please choose an **Application name**.

Now it’s time to create your deployment!

![Google Cloud Platform — The Deployment of the entire process](https://cdn-images-1.medium.com/max/2400/1*pp0FPmyI0YOw76nfTAR5Lg.png)

Google will take care of the deployment for you. This will take around 5 minutes. Google will start by deploying a Kubernetes Cluster. Second it will create your deployment, just like you configured and then this will spin up your pod (containing your running LTO Public node container).

Please wait for the process to finish.

![Google Cloud Platform — Deployment overview screen](https://cdn-images-1.medium.com/max/2400/1*0MhVJeAz7DHpIrcv-R31pA.png)

Something happened, our application got deployed on our freshly created Kubernetes cluster. We are not happy though! A thing called an auto-scaler is active. We want to disable this as it makes our application run multiple times in parallel.

![Google Cloud Platform — Step 1 to disable auto-scale](https://cdn-images-1.medium.com/max/2400/1*6YgVeMiDUfNR7GYHtnZCeA.png)

Click **Actions** → **Auto-scale** to open auto-scale settings.

![Google Cloud Platform — Step 2 to disable auto-scale](https://cdn-images-1.medium.com/max/2400/1*KuW5dgFZ6W_wGUyAl-sqBw.png)

Click on **Disable Autoscaler** to disable the auto-scale feature.

![Google Cloud Platform — Back in the deployment overview, now with just 1 managed pod running!](https://4048573506-files.gitbook.io/~/files/v0/b/gitbook-x-prod.appspot.com/o/spaces%2F-LB0RTB-jl8RVmWX9aeE-887967055%2Fuploads%2Fi4co52MhfFF4Op7T8CYe%2Fgoogle2.jpg?alt=media\&token=5ab30f77-fbcf-4de6-8d8e-ec346fe01298)

Back in our overview, we see we only have 1 managed pod. This is what we wanted to achieve. Now let’s see how our LTO Public Node is doing by diving in the logs.

Click **Container logs** in the middle of the screen to jump to the logging screen.

![Google Cloud Platform — See our node in action](https://cdn-images-1.medium.com/max/2400/1*uUz8CJJCM3AZeyvnrQJk8Q.png)

In the logging screen, you have the ability to click the **Play** icon to start streaming the console log of the container. You can see the blockchain being downloaded. After the blockchain has been successfully downloaded the node should start appending MicroBlocks like in the above screenshot.

That’s it. You’ve successfully mastered setting up an LTO Network public node on Google Cloud. Awesome!

## **Step 2: Wait for a 1.000 blocks**

You can find the LTO Network Explorer at [https://explorer.lto.network.](https://explorer.lto.network./) It shows you the blocks generated, by who, when, how big they are, and how many transactions are in the block.

After launching your node check the [Explorer](https://explorer.lto.network) to see the number of the last block. Wait till another 1.000 blocks are generated and expect your node to be part of the LTO Network.

{% hint style="info" %}
Utilize the available [Community Tech Tools](https://blog.lto.network/distributed-workforce-community-dao-level-up/#tech-lab) to get more insights into the network and your participation. Let's build a secure and useful network together!
{% endhint %}

Depending on your stake (the number of LTO tokens you have in the “2nd wallet”) it will take more or less time for you to start earning LTO. Be patient and be happy. Welcome to the amazing LTO Network community! Read more [about community programs](https://blog.lto.network/distributed-workforce-community-dao-level-up/).


# IBM Cloud

This page shows the 2 steps needed to get an LTO Network node up and running using IBM Cloud, specifically Kubernetes Services.

So you decided you want to be part of the LTO Network, awesome!

A great way to be part of the community is by actively participating as a node in the network.

Make sure to check out the Prepare: [Setup your wallet page](/tutorials/mining/prepare-setup-your-wallet) before continuing. The node setup pages assume you utilize a 2-wallet setup for extra safety.

## **Step 1: Deploying your node on IBM Cloud using the browser interface**

*Make sure you have a “Pay-as-you-go” or better IBM Cloud account. It’s not possible to create a Kubernetes Service on IBM Cloud with a free account.*

![IBM Cloud — Main screen](https://cdn-images-1.medium.com/max/2400/1*QTd3ZGtj10NZjGuUIfEt1Q.png)

Shown above is the main screen of IBM Cloud after your initial login. As you can see at the time I had not upgraded to a pay-as-you-go subscription. Without such a subscription you can not create a “free” Kubernetes Service cluster, a requirement (you have other more expensive paid alternatives) for hosting a container on IBM Cloud.

Please make sure you have added a subscription to your plan. If you’re ready to continue click on **Create resource** in the top right corner.

![IBM Cloud — Service Catalog](https://cdn-images-1.medium.com/max/2400/1*q5_pl5jqbmL11H9267E3Sg.png)

On the next screen user the filter to go through the catalog. We want to deploy a **Kubernetes Service**. Click the box to continue.

![IBM Cloud — Kubernetes Service overview](https://cdn-images-1.medium.com/max/2400/1*fT8iVLhrF0dHDong3FAI_g.png)

On the overview page you can click **Create** to create your Kubernetes Service cluster. If you do not have the option to click create you probably do not have the right subscription.

![IBM Cloud — Create a new Kubernetes service cluster](https://cdn-images-1.medium.com/max/2400/1*Zswdcng4mTufy5MFIQyV6A.png)

In the next screen we have the opportunity to setup a simple test cluster or deploy an actual production-ready Kubernetes cluster. For the sake of this test I choose to go with the Free cluster. Select the **Free option**, change settings if you please and click **Create cluster.**

![IBM Cloud — Alright, you requested a Kubernetes service cluster, let the waiting begin!](https://cdn-images-1.medium.com/max/2400/1*C8li3zO8q6hP0DvynMNaBQ.png)

You successfully requested a deployment of a Kubernetes Service cluster. Unfortunately this takes quite some time. It’s probably a good idea to grab a cup of coffee, tea or even better… beer!

*A Kubernetes cluster consists of multiple components. In the case of the free cluster a Master and a Worker will be deployed. The deployment of the Master will take approximately 30 minutes. The deploy of the Worker will take you an additional 5 minutes.*

![IBM Cloud — Yes! After 35 minutes we got our Kubernetes Service cluster running!](https://cdn-images-1.medium.com/max/2400/1*Wwg5X6aAX19PTlXQjjS31g.png)

With our cluster running it’s time to deploy our LTO Public Node application. Click **Kubernetes Dashboard** to open the Kubernetes dashboard main screen in a new tab.

![IBM Cloud — Kubernetes cluster dashboard](https://cdn-images-1.medium.com/max/2400/1*osBqFgmmQiwhPt3ruSUa8Q.png)

To deploy an application on the cluster click on **Create** in the top right corner.

![IBM Cloud — Kubernetes create an application](https://4048573506-files.gitbook.io/~/files/v0/b/gitbook-x-prod.appspot.com/o/spaces%2F-LB0RTB-jl8RVmWX9aeE-887967055%2Fuploads%2FPU9ty5DhtVkw1ftrD280%2FIBM1.jpg?alt=media\&token=51390ea7-16a0-446f-8c92-7f2ccebc89ca)

Select the **Create an App** tab and fill in an **App name**, **Container image**(important). Now click on **Show Advanced Options**.

![IBM Cloud — Kubernetes new application configuration of memory and environment variables](https://cdn-images-1.medium.com/max/2400/1*Cqf4CUQstOsK-doBTe075g.png)

Please change the Memory requirement to **2048** (2 GB) and add your environment variables: LTO\_WALLET\_SEED, LTO\_WALLET\_PASSWORD and LTO\_NODE\_NAME.

{% hint style="info" %}
A future update might include the usage of secrets to secure our configuration.
{% endhint %}

Scroll down and click **Create**. Your LTO Public Node will be deployed on your freshly created Kubernetes Service cluster.

![IBM Cloud — Kubernetes dashboard showing your LTO Public Node successfully deployed](https://cdn-images-1.medium.com/max/2400/1*LV21sfR5syiF_EYTkEgppA.png)

Let’s do a final check and click on our pods name in the **Pods** section of this main screen.

![IBM Cloud — Kubernetes LTO Public Node pod configuration](https://4048573506-files.gitbook.io/~/files/v0/b/gitbook-x-prod.appspot.com/o/spaces%2F-LB0RTB-jl8RVmWX9aeE-887967055%2Fuploads%2Fd2KiDiXVCIRo2wkz1EC9%2FIBM2.jpg?alt=media\&token=1f59b800-b537-49bd-880f-b5f007eed441)

This page shows the configuration of our running node. Please click on **Logs** in the top right corner to open a separate tab with our console logging.

![IBM Cloud — Kubernetes LTO Public Node console logging](https://cdn-images-1.medium.com/max/2400/1*BpT97H4_KNNOdYYeY1VuOQ.png)

In the above example, I’ve selected the auto-refresh option to make sure the console logging automatically refreshes every 5 seconds. Watch as the node downloads the blockchain and starts adding MicroBlocks.

That’s it. You’ve successfully mastered setting up an LTO Network Public Node on IBM Cloud using Kubernetes Services. Awesome!

## **Step 2: Wait for a 1.000 blocks**

You can find the LTO Network Explorer at [https://explorer.lto.network.](https://explorer.lto.network./) It shows you the blocks generated, by who, when, how big they are, and how many transactions are in the block.

After launching your node check the [Explorer](https://explorer.lto.network) to see the number of the last block. Wait till another 1.000 blocks are generated and expect your node to be part of the LTO Network.

{% hint style="info" %}
Utilize the available [Community Tech Tools](https://blog.lto.network/distributed-workforce-community-dao-level-up/#tech-lab) to get more insights into the network and your participation. Let's build a secure and useful network together!
{% endhint %}

Depending on your stake (the number of LTO tokens you have in the “2nd wallet”) it will take more or less time for you to start earning LTO. Be patient and be happy. Welcome to the amazing LTO Network community! Read more [about community programs](https://blog.lto.network/distributed-workforce-community-dao-level-up/).


# Microsoft Azure

This page shows the 2 steps needed to get an LTO Network node up and running using Microsoft Azure, specifically Azure Container Instances (Not to be confused with Azure Kubernetes Services).

So you decided you want to be part of the LTO Network, awesome!

A great way to be part of the community is by actively participating as a node in the network.

Make sure to check out the Prepare: [Setup your wallet page](/tutorials/mining/prepare-setup-your-wallet) before continuing. The node setup pages assume you utilize a 2-wallet setup for extra safety.

Below the 2-step setup procedure using the browser there is an optional procedure for using the command-line interface.

## **Step 1: Deploying your node on Azure using the browser interface**

![LTO Public Node on Azure — Main screen](https://cdn-images-1.medium.com/max/2400/1*TseFOVybCXuanMw82cV_oQ.png)

As mentioned before we’re configuring a Container instance using ACI. This is not to be confused with AKS, Azure Kubernetes Services. AKS can be used to setup a cluster for container orchestration. This is overkill for what we’re trying to achieve at this time.

Please type “container” (without an s) in the box and “Container instances” will appear. Click **Container instances**.

![LTO Public Node on Azure — Base configuration](https://4048573506-files.gitbook.io/~/files/v0/b/gitbook-x-prod.appspot.com/o/spaces%2F-LB0RTB-jl8RVmWX9aeE-887967055%2Fuploads%2FrEOw2jGGR6Jy0hx8TXlk%2Fazure1.jpg?alt=media\&token=f5157593-b7f2-4925-89f6-3b4284895d13)

First step is to configure some basic settings for your new container instance. You can not really go wrong here. The subscription entry displayed will display on your Azure subscription. You might need to create a Resource group using **create new**. Please name your container, select a Region where you want to host your container and make sure to enter the **image name**correctly. Before going to the next step we need to change 1 more thing.

![LTO Public Node on Azure — Configure memory](https://4048573506-files.gitbook.io/~/files/v0/b/gitbook-x-prod.appspot.com/o/spaces%2F-LB0RTB-jl8RVmWX9aeE-887967055%2Fuploads%2FvA9DzCqPkeTVISLkLNuh%2Fazure2.jpg?alt=media\&token=6f70ccdb-07d3-49e8-be18-a01035476578)

Let’s boost the memory a little from 1.5 GB default to 2 GB by clicking **Change size**. Now click on **Next: Networking** to go to the next step.

![LTO Public Node on Azure — No port / network changes required](https://cdn-images-1.medium.com/max/2400/1*5fxgkx0kyPn3vSq0RXi4fQ.png)

Wow, this one is easy. We don’t need to change anything here. Maybe you want to enter the DNS name label. It’s up to you. This is not a requirement. No ports need to be added at this point. You can leave it at default.

Please click **Next: Advanced** so we can start configuring our node.

![LTO Public Node on Azure — Setup your environment variables](https://cdn-images-1.medium.com/max/2400/1*WbZFJ90fLdFPPSDQN6R51A.png)

Alright at this stage you want to configure your LTO\_WALLET\_SEED. This is an important step. This should be the seed of the wallet you use for staking. We configure the LTO\_WALLET\_PASSWORD to encrypt the seed. The LTO\_NODE\_NAME is the name your node will use to identify itself on the LTO Network.

{% hint style="info" %}
A future update might include the usage of secrets to secure our configuration.
{% endhint %}

When you’re done putting in these variables click on **Review + create**.

![LTO Public Node on Azure — Validation passed — Your screen might look slightly different](https://4048573506-files.gitbook.io/~/files/v0/b/gitbook-x-prod.appspot.com/o/spaces%2F-LB0RTB-jl8RVmWX9aeE-887967055%2Fuploads%2Fi77a7OUxhW1kRDlNhpqU%2Fazure3.jpg?alt=media\&token=c3a552a6-63b5-4436-9be4-693f670f9fb1)

If validation is successful click **Create** to create your container and wait for the deployment to finish.

![LTO Public Node on Azure — Deployment of Container instance is running](https://cdn-images-1.medium.com/max/2400/1*SJmz6YOL8Ltnkswq2kDHgg.png)

The deployment might take 1–2 minutes to complete.

![LTO Public Node on Azure — A successful deployment of your LTO Public Node container on Azure](https://cdn-images-1.medium.com/max/2400/1*idBIXedXKJ1B1SOuAZ0Jow.png)

Your LTO Public Node is now running on Azure using Azure Container Instances. Not convinced? Let’s double check :) Please click on **Go to resource**.

![LTO Public Node on Azure — Connected to the console](https://4048573506-files.gitbook.io/~/files/v0/b/gitbook-x-prod.appspot.com/o/spaces%2F-LB0RTB-jl8RVmWX9aeE-887967055%2Fuploads%2FujxOeOQw42pPowaHX8T3%2Fazure4.jpg?alt=media\&token=44a80434-178d-4de4-b76b-9e87c08b780c)

Let’s click on **Containers** under **Settings**. Now click on **Connect** and select a bash shell to **Connect**. A terminal will open. Activate the terminal by clicking on the black screen.

Using the cd (change directory) command we will browse to the /lto/log directory. In this directory you’ll find our logfile called: **lto.log**.

Start a tail like in the above screenshot and follow the progress as your node downloads the blockchain or maybe is already adding MicroBlocks.

![LTO Public Node on Azure — Tailing your Node’s logfile](https://4048573506-files.gitbook.io/~/files/v0/b/gitbook-x-prod.appspot.com/o/spaces%2F-LB0RTB-jl8RVmWX9aeE-887967055%2Fuploads%2FQHBh24jfoc5pibwnOMJK%2Fazure5.jpg?alt=media\&token=33265be1-f9cc-4df9-8594-95ba3f961414)

That’s it. You’ve successfully mastered setting up a LTO Network public node on Microsoft Azure. Awesome!

## **Step 2: Wait for a 1.000 blocks**

You can find the LTO Network Explorer at [https://explorer.lto.network.](https://explorer.lto.network./) It shows you the blocks generated, by who, when, how big they are and how many transactions are in the block.

After launching your node check the [Explorer](https://explorer.lto.network) to see the number of the last block. Wait till another 1.000 blocks are generated and expect your node to be part of the LTO Network.

{% hint style="info" %}
Utilize the available [Community Tech Tools](https://blog.lto.network/distributed-workforce-community-dao-level-up/#tech-lab) to get more insights into the network and your participation. Let's build a secure and useful network together!
{% endhint %}

Depending on your stake (the number of LTO tokens you have in the “2nd wallet”) it will take more or less time for you to start earning LTO. Be patient and be happy. Welcome to the amazing LTO Network community! Read more [about community programs](https://blog.lto.network/distributed-workforce-community-dao-level-up/).

## **Optional: Deploying your node on Azure using the cmd-line interface**

Optionally you can start your container using the command-line interface. A big advantage of using the CMD is that you can automate everything.

Use the following commands to kick-off your LTO Network Public node using command line:

```
CONTAINER_RESOURCE_GROUP="lto-network-rg"
CONTAINER_LOCATION="westeurope"
CONTAINER_NAME="lto-network-node"
CONTAINER_NODE_NAME="YOUR NAME"
CONTAINER_WALLET_SEED="SEED1 SEED2 SEED3"
CONTAINER_WALLET_PASSWORD="PASSWORD"

az group create --name $CONTAINER_RESOURCE_GROUP --location $CONTAINER_LOCATION

az container create --resource-group $CONTAINER_RESOURCE_GROUP --name $CONTAINER_NAME \
 --image ltonetwork/public-node \
 --cpu 1 \
 --memory 2 \
 --os-type linux \
 --ports 80 \
 --restart-policy Always \
 --environment-variables "LTO_NODE_NAME"="$CONTAINER_NODE_NAME" \
 --secure-environment-variables "LTO_WALLET_SEED"="$CONTAINER_WALLET_SEED" "LTO_WALLET_PASSWORD"="$CONTAINER_WALLET_PASSWORD"
```

With just these two commands you have successfully launched your LTO Network Public node container application. Using the following command you can view your nodes progress:

```
az container logs --resource-group $CONTAINER_RESOURCE_GROUP --name $CONTAINER_NAME
```

You can double check your environment variable configuration using the following commands:

```
az container exec --resource-group $CONTAINER_RESOURCE_GROUP --name $CONTAINER_NAME --exec-command "/bin/bash"
$ echo $LTO_WALLET_SEED 
$ echo $LTO_WALLET_PASSWORD
```


# OKD (OpenShift)

This page shows the 2 steps needed to get an LTO Network node up and running using OpenShift (Kubernetes) in this case the community open source distribution OKD.

So you decided you want to be part of the LTO Network, awesome!

A great way to be part of the community is by actively participating as a node in the network.

Make sure to check out the Prepare: [Setup your wallet page](/tutorials/mining/prepare-setup-your-wallet) before continuing. The node setup pages assume you utilize a 2-wallet setup for extra safety.

{% hint style="info" %}
If you’re not an enterprise user you might not be familiar with Kubernetes or [OpenShift](https://www.openshift.com/). OpenShift is Red Hat’s enterprise Kubernetes distribution based on the community open source project called OKD. OpenShift is THE container application platform for many enterprises in the world.
{% endhint %}

This **proof of concept**, executed on OKD, shows the simplicity of deploying a new application onto the platform. After deployment we no longer have to worry about our node. The Kubernetes orchestrator will make sure it keeps running and if a new version of the container image becomes available the OKD platform will automatically pull the new image and perform a rolling upgrade of our running node. Secrets will make sure stuff like our seed, password and API\_key are kept safe.

## **Step 1: Deploying your node on OKD using the browser interface**

In this PoC I specifically used the browser interface to execute the steps. All of this can be done, if you’re familiar with the commands, in just a few steps from the command line. An extra advantage is that you would be able to **automate these steps** to make the process even simpler!

![okd.io homepage](https://cdn-images-1.medium.com/max/1600/1*BgZgfqi4DJFQ8yVIiU5Y0w.png)

Of course you can try all of these steps yourself. An all-in-one OKD installation is available from the [okd.io website](https://www.okd.io/). Instructions to get started are provided. It will take you no more than a few minutes to get up and running. You can simply run this on your Linux, MacOS, Windows laptop or workstation.

![OKD main screen](https://cdn-images-1.medium.com/max/2400/1*5S8F0sBmuinjt6eQSJSr8A.png)

Before deploying our node on our OKD environment we create a project (Kubernetes namespace). A project is only visible to you or to users you give access to. Let's create a project called “lto-public-node”.

![Create secret — An example of creating the LTO\_WALLET\_SEED generic secret](https://cdn-images-1.medium.com/max/2400/1*iWY-l3RUB86KhzSOlsv90g.png)

Immediately after creating a new project, you’re presented with a wizard presenting you with interesting options like Browse Catalog and Deploy Image. But before we go there we need to configure some important stuff to make sure our seed, password, and API key will stay safe.

Select **Resources → Secrets** from the menu on the left. Now click **Create Secret**. We’ll be creating secrets for as many of the environment variables as you want but let’s focus on the essential ones first:

* LTO\_WALLET\_SEED → The seed of the Staking wallet
* LTO\_PASSWORD → The password for the wallet file
* LTO\_API\_KEY → Your key for admin access to your node’s API.

![Create secret — configuration of a second secret](https://cdn-images-1.medium.com/max/2400/1*2O806UO70R7ZncMi6fG5lA.png)

In this Proof of Concept 3 generic secrets were created and later on used in the configuration of the deployment configuration.

Next step is to actually configure and deploy our image. Let’s Go!

![OKD project overview](https://cdn-images-1.medium.com/max/2400/1*_ccSBHLdWfSiVcsZ8DVB0Q.png)

With the project setup, we can start deploying our first image. Click on **Deploy Image**. The Image refers to the container image we’re going to deploy.

![OKD deploy image](https://4048573506-files.gitbook.io/~/files/v0/b/gitbook-x-prod.appspot.com/o/spaces%2F-LB0RTB-jl8RVmWX9aeE-887967055%2Fuploads%2FRTGyktftzD95kimF8fwI%2Fokd1.jpg?alt=media\&token=87b4dc67-be1e-4f47-b4ab-8aa89a497ec4)

LTO Network currently uses a public Docker repository to store their container images. The Image name is called: **ltonetwork/public-node**. Enter this name in the **Image Name** field and click on the search icon to lookup the image in the repository.

The system will give you a warning that the image will be running as *root*. This might be an issue in some production environments. It’s expected that this will be changed at some point in time.

Now scroll down for the next steps where we’ll configure the node.

![OKD deploy image — environment variables with values from Secrets](https://cdn-images-1.medium.com/max/2400/1*696-5_TeVJv5Eiml8P4KPw.png)

In this step you actually configure your node. We use the **Add Value** link to add “normal” environment variables. We use **Add Value from Config Map or Secret** to configure environment variables from the secrets we created earlier.

![OKD deploy successful](https://cdn-images-1.medium.com/max/2400/1*s2rZiU6hhSveC12H6_h-BA.png)

After configuring a name (optional) and setting our environmental variables (all optional as well) we’re ready to deploy our node. Click **Deploy**.

![OKD rolling deployment running](https://4048573506-files.gitbook.io/~/files/v0/b/gitbook-x-prod.appspot.com/o/spaces%2F-LB0RTB-jl8RVmWX9aeE-887967055%2Fuploads%2Fjs0u20Gz5WlPs6RWAILy%2Fokd2.jpg?alt=media\&token=1e0048e6-53b2-42f9-a3b6-3a5af1afb619)

Going back to the project overview screen we can see the Deployment config of our application. A **Rolling deployment** might already be running. This means the system is pulling the container image from the registry and will start deploying it. You can force a deployment by clicking the 3-dots on the far left and selecting **Deploy** from the dropdown menu.

![OKD pulling image, event log](https://cdn-images-1.medium.com/max/2400/1*SuAYIME8bvOqhzVZoobNAQ.png)

In the above screenshot you can see the Events of the rolling deployment. You can see the public node image being pulled from the registry. After a pull the system will deploy the new container image with the environment variables and other configuration items as specified.

![OKD our LTO Network node is up-and-running](https://4048573506-files.gitbook.io/~/files/v0/b/gitbook-x-prod.appspot.com/o/spaces%2F-LB0RTB-jl8RVmWX9aeE-887967055%2Fuploads%2F5BWTcwWonZddn0TEIqP7%2Fokd3.jpg?alt=media\&token=01bef2ed-ba00-44c6-9f0a-ab0039102cb5)

Back in the project overview we can see the successfully deployed LTO Network public node.

Please note that it says that if we want “Routes — External Traffic” we should create a route. We’ll do this later so we can demonstrate how to access the API.

![OKD and our container’s logfile showing the sync of the blockchain](https://cdn-images-1.medium.com/max/2400/1*OpbkLkxVfzns32BIhghOVg.png)

By clicking the blue circle with the “1 pod” in it we enter the pods configuration. In this next screen you can click on **Log** to get access to the output of the container image. During the first few minutes of deployment the node will be downloading the Blockchain. This will look something like in the above screenshot.

![OKD project overview](https://4048573506-files.gitbook.io/~/files/v0/b/gitbook-x-prod.appspot.com/o/spaces%2F-LB0RTB-jl8RVmWX9aeE-887967055%2Fuploads%2FuDc5MK9LI8idCfIZ1F3d%2Fokd4.jpg?alt=media\&token=9419dce8-8b66-4e6e-9d57-7678b16b65b1)

So, we decided to expose the API to the outside world. Important is that you enabled the API using the environment variable in an earlier step (LTO\_ENABLE\_REST\_API = true). External traffic routed in OKD is done using the routing layer. Your service will be behind a load balancer (part of OKD) when you expose it.

To expose the service to the outside world we click on the **Create Route** link. This opens the configuration screen.

![OKD configuring a route](https://cdn-images-1.medium.com/max/2400/1*d5izklJKxyHxvgrYikM4wg.png)

Not a lot you need to change here. You can of course choose to make it a secure route. The LTO node exposes the API over HTTP. With this, you can make it HTTPS. Make sure to select **6869 → 6869 (TCP)** as your **Target Port**. Scroll down and click the route creation button to create the route and expose your Swagger UI.

![OKD project overview showing our freshly created route](https://4048573506-files.gitbook.io/~/files/v0/b/gitbook-x-prod.appspot.com/o/spaces%2F-LB0RTB-jl8RVmWX9aeE-887967055%2Fuploads%2FYBCc0vJoT4GyKyUvAcb2%2Fokd5.jpg?alt=media\&token=3f2dd49b-1842-4377-b2b8-8e237b292807)

You created your route and your API is now accessible to the outside world. In the above example, a non-secure route was created. You can simply access the API webpage by **clicking the URL** displayed.

![LTO Public Node — Swagger UI — API interface](https://cdn-images-1.medium.com/max/2400/1*b45meSXK79BvGybyWQhx1Q.png)

That’s it. You’ve successfully mastered setting up an LTO Network public node on the OKD Kubernetes platform. Awesome!

## **Step 2: Wait for a 1.000 blocks**

You can find the LTO Network Explorer at [https://explorer.lto.network.](https://explorer.lto.network./) It shows you the blocks generated, by who, when, how big they are, and how many transactions are in the block.

After launching your node check the [Explorer](https://explorer.lto.network) to see the number of the last block. Wait till another 1.000 blocks are generated and expect your node to be part of the LTO Network.

{% hint style="info" %}
Utilize the available [Community Tech Tools](https://blog.lto.network/distributed-workforce-community-dao-level-up/#tech-lab) to get more insights into the network and your participation. Let's build a secure and useful network together!
{% endhint %}

Depending on your stake (the number of LTO tokens you have in the “2nd wallet”) it will take more or less time for you to start earning LTO. Be patient and be happy. Welcome to the amazing LTO Network community! Read more [about community programs](https://blog.lto.network/distributed-workforce-community-dao-level-up/).


# Raspberry Pi (Expert)

This page shows the steps needed to get an LTO Network node up and running using a Raspberry Pi. Please note that this is a non-straightforward, expert-level guide.

So you decided you want to be part of the LTO Network, awesome!

A great way to be part of the community is by actively participating as a node in the network.

Make sure to check out the Prepare: [Setup your wallet page](/tutorials/mining/prepare-setup-your-wallet) before continuing. The node setup pages assume you utilise a 2-wallet setup for extra safety.

{% hint style="info" %}
Please note that the recommended manner of running an LTO node is using the provided Docker container. This Raspberry Pi setup guide does not use the container-setup but uses an extract of the core JAR component. Please be advised this is expert-level only.
{% endhint %}

## **Step 0:** Intro to setting up a **Raspberry Pi node**

Although the LTO Public node is available as a JAR (Java ARchive), which is usually considered a platform-independent deployment artefact, it is not automatically possible to start this version of the node on a Raspberry PI, e.g., running on Raspbian. This tutorial explains how to modify the corresponding JAR-file in order to allow for a smooth start on a Raspberry Pi.

### **Problem Description**

If you try to start the node via the following command:

```
$ java -jar lto-public-all.jar lto-mainnet.conf
```

You’ll get an error message similar to the following one:

```
pi@raspberrypi:~/lto $ java -jar lto-public-all.jar lto-mainnet.conf
2019-04-22 16:09:41,453 INFO  [main] c.w.Application$ - Starting...
2019-04-22 16:09:45,939 INFO  [main] kamon.Kamon$Instance - Initializing Kamon...
2019-04-22 16:09:46,959 INFO  [main] kamon.Kamon$Instance - Kamon-autoweave has been successfully loaded.
2019-04-22 16:09:46,963 INFO  [main] kamon.Kamon$Instance - The AspectJ load time weaving agent is now attached to the JVM (you don't need to use -javaagent).
2019-04-22 16:09:46,968 INFO  [main] kamon.Kamon$Instance - This offers extra flexibility but obviously any classes loaded before attachment will not be woven.
2019-04-22 16:10:08,427 INFO  [ctor.default-dispatcher-3] a.event.slf4j.Slf4jLogger - Slf4jLogger started
2019-04-22 16:10:10,500 INFO  [ctor.default-dispatcher-4] a.event.slf4j.Slf4jLogger - Slf4jLogger started
2019-04-22 16:10:10,535 INFO  [main] c.w.Application$ - LTO v1.0.3 Blockchain Id: L
2019-04-22 16:10:11,158 ERROR [main] c.w.actor.RootActorSystem$ - Error while initializing actor system wavesplatform
java.lang.Exception: Could not load any of the factory classes: org.fusesource.leveldbjni.JniDBFactory, org.iq80.leveldb.impl.Iq80DBFactory
 at com.wavesplatform.db.LevelDBFactory$.$anonfun$load$5(LevelDBFactory.scala:35)
 at scala.Option.getOrElse(Option.scala:121)
 at com.wavesplatform.db.LevelDBFactory$.load(LevelDBFactory.scala:35)
 at com.wavesplatform.db.LevelDBFactory$.factory$lzycompute(LevelDBFactory.scala:10)
 at com.wavesplatform.db.LevelDBFactory$.factory(LevelDBFactory.scala:10)
 at com.wavesplatform.db.package$.openDB(package.scala:22)
 at com.wavesplatform.Application.<init>(Application.scala:54)
 at com.wavesplatform.Application$.$anonfun$main$3(Application.scala:413)
 at com.wavesplatform.Application$.$anonfun$main$3$adapted(Application.scala:387)
 at com.wavesplatform.actor.RootActorSystem$.start(RootActorSystem.scala:25)
 at com.wavesplatform.Application$.main(Application.scala:387)
 at com.wavesplatform.Application.main(Application.scala)
pi@raspberrypi:~/lto $
```

The reason for the error is that one of the dependencies of the node, namely the LevelDB implementation, is not compiled for the ARM architecture of the Raspberry Pi. Therefore, what we need to do in order to start it successfully is described in the next section.

## **Step 1: Getting our node up-and-running**

The basic idea of the patch is to exchange the platform dependent, and not compatible, parts of the JAR-file with corresponding parts that are compatible with the ARM architecture of the Raspberry Pi. In order to perform the next steps in a clean environment, you should copy the **lto-public-all.jar** file to a new directory from which you execute the described commands.

Throughout this setup-guide we utilize the following Github repository: <https://github.com/ltonetwork/docker-public-node>

First of all, we need to install the platform independent version of the LevelDB database with the following command:

```
$ sudo apt install libleveldb-java libleveldb-api-java
```

The second step is to unpack the JAR archive. Basically, JAR archives are simple ZIP files with a special directory structure. Therefore, we can just unpack the JAR archive with the following command:

```
$ jar -xvf lto-public-all.jar
```

After unpacking, we can remove the JAR archive itself, so that we later on, when we repackage the archive, do not include the old archive in the new one:

```
$ rm lto-public-all.jar
```

Then we secure the MANIFEST.MF file, which is sort of the configuration file of the archive, so that we can later on restore it in order to keep all information about the archive, e.g., which kind of class should be executed once we start the archive. Therefore, we copy the META-INF/MANIFEST.MF file to the current directory:

```
$ cp META-INF/MANIFEST.MF .
```

The next step is to remove all traces of the platform dependent version of the LevelDB packages:

```
$ rm -rf `find . -name *leveldb*`
```

Now we just need to extract the platform independent version of the LevelDB installation that we did in the first step. In order to do so, we need to copy two files in our current directory:

```
$ cp /usr/share/java/leveldb-api.jar .
$ cp /usr/share/java/leveldb.jar .
```

And again, we need to unpack those archives in the current directory:

```
$ jar -xvf leveldb-api.jar
$ jar -xvf leveldb.jar
```

Now, we can again remove those two archive files in order not to include those as archives in the new node archive that we will create in the last step:

```
$ rm -f *.jar
```

Finally, we need to recover the MANIFEST.MF file that we have secured before:

```
$ cp MANIFEST.MF META-INF/
```

before we can finally package the content of our current directory into a new archive that will then be our JAR-archive that we can start the node with:

```
$ jar -cfm lto-public-all-arm.jar META-INF/MANIFEST.MF *
```

This process might take some time. After it finishes, the created JAR-archive lto-public-all-arm.jar can be copied to whatever directory you want to start your node from. The following command will then start your node:

```
$ java -jar lto-public-all-arm.jar lto-mainnet.conf
```

### Final considerations

Since a Raspberry Pi has very limited ressources, both from a computational as well as from a memory (RAM) point of view, one can not assume that a node on a Raspberry Pi will run with high performance. Nevertheless, it might make sense in some scenarios, e.g., providing an API to the LTO network, running a test environment or providing a testnet node.

The steps described above should not only work on a Raspberry Pi but should also create deployment artifact for other ARM based boards. Depending on the underlying operating systems, some tweaks may be necessary though.

That’s it. You’ve successfully mastered setting up an LTO Network public node on your Raspberry Pi. Awesome!

## **Step 2: Wait for a 1.000 blocks**

You can find the LTO Network Explorer at [https://explorer.lto.network.](https://explorer.lto.network./) It shows you the blocks generated, by who, when, how big they are and how many transactions are in the block.

After launching your node check the [Explorer](https://explorer.lto.network) to see the number of the last block. Wait till another 1.000 blocks are generated and expect your node to be part of the LTO Network.

{% hint style="info" %}
Utilize the available [Community Tech Tools](https://blog.lto.network/distributed-workforce-community-dao-level-up/#tech-lab) to get more insights into the network and your participation. Let's build a secure and useful network together!
{% endhint %}

Depending on your stake (the number of LTO tokens you have in the “2nd wallet”) it will take more or less time for you to start earning LTO. Be patient and be happy. Welcome to the amazing LTO Network community! Read more [about community programs](https://blog.lto.network/distributed-workforce-community-dao-level-up/).


# Ubuntu Linux with Container

This page explains all the steps required to get your node up and running using a Ubuntu Linux (virtual) server.

So you decided you want to be part of the LTO Network, awesome!

A great way to be part of the community is by actively participating as a node in the network.

Make sure to check out the Prepare: [Setup your wallet page](/tutorials/mining/prepare-setup-your-wallet) before continuing. The node setup pages assume you utilize a 2-wallet setup for extra safety.

## Step 0: Intro to setting up a secure Ubuntu server for the first time

This tutorial is meant for beginners who want to set up an Ubuntu server for the first time. It contains the very basic steps of installing Ubuntu on a new server, enhance security and installing the LTO Network Public node. The tutorial is based on Ubuntu 16.04. It is recommended to run nodes on a rented VPS. Most providers offer a single click to install an OS. Things may differ depending on your provider.

{% hint style="info" %}
Replace everything between **< >** with your own values.
{% endhint %}

To install Ubuntu, use the following official tutorial which will guide you through the process. <https://tutorials.ubuntu.com/tutorial/tutorial-install-ubuntu-server-1604>

![Make sure to install OpenSSH in step 10 of the official installation proces. Others are optional.](https://cdn-images-1.medium.com/max/1600/1*hhyjlitkKdf4Eem0NxV__Q.png)

We’re using [SSH](https://en.wikipedia.org/wiki/Secure_Shell) to connect to our server. For Windows use either PowerShell (run as administrator) or [PuTTy](https://www.putty.org/).

Mac users can use the built-in terminal (spotlight, command + spacebar: search for terminal)

{% hint style="info" %}
It is most likely that you’ve created a user with your own username during the installation and you’ll never have to login as ‘root’. If this is the case for you, you can skip to step 3.
{% endhint %}

By default, the root account password is locked in Ubuntu. This means that you cannot login as root directly or use the su command to become the root user. However, since the root account physically exists it is still possible to run programs with root-level privileges. This is where sudo comes in — it allows authorized users to run certain programs as root without having to know the root password. **If you are, for some reason, logging in as root, please first follow step 1 and 2.**

## Step 1: Basic system setup as root

If you are done with the installation, connect to your server through SSH, using the root account provided by your host.

```
$ ssh root@<ip-address>
example: ssh root@13.37.13.37
```

Change the root password (type your new password twice):

```
# passwd
```

Login again to your system using a different terminal to make sure your password change was successful.

```
$ ssh @<ip-address>
example: ssh root@13.37.13.37
```

## Step 2: Adding a new user

Now, we’re going to create a new regular user as it is not recommended to use the ‘root’ account for your node.

```
# adduser <new_user>
example: adduser john
```

Enter a new and strong password twice and press enter six times to accept the default values.

Now we’re going to add the new user to the ‘sudo’ group. sudo allows a permitted user to execute a command as the superuser or another user, as specified by the security policy.

```
# usermod -a -G sudo <new_user>
example: sudo usermod -a -G sudo john
```

Exit and connect to your server as the new user, not as root. Use the password you’ve set while creating the new user.

```
# exit
$ ssh <new_user>@<ip-address>
example: ssh john@13.37.13.37
```

### **Step 2.1: Extra security measure - add SSH key to your user**

{% hint style="info" %}
While it is possible to manage your servers using password-based logins, it is often a better idea to set up and use SSH key pairs. SSH keys are more secure than passwords, and can help you login without having to remember long passwords.
{% endhint %}

More info and extensive guide: <https://www.digitalocean.com/community/tutorials/how-to-set-up-ssh-keys-on-ubuntu-1604>

## Step 3: Adding our user to the sudo group

If you’ve followed step 1 and 2, you can now skip to step 4. If you are done with the installation, connect to your server through SSH, using the account you have set up during the installation process.

```
$ ssh john@<ip-address>
example: ssh john@13.37.13.37
```

We need to add the user to the ‘sudo’ group. sudo allows a permitted user to execute a command as the superuser or another user, as specified by the security policy.

```
$ sudo usermod -a -G sudo <user>
example: sudo usermod -a -G sudo john
```

## Step 4: Updating and installing packages on your server

The following commands require root privileges. To grant root privileges, simply prepend sudo to all the commands you need to run as root. If you ever get a ‘permission denied’ error, you probably forgot to prepend sudo to the command. Example: ‘sudo apt-get install npm’. Whenever you get the question if you want to continue and additional disk space will be used, just press Y on your keyboard.

It is important to update all the existing packages on the server. Ubuntu will ask you to fill in your password once again since you are now logged in as a ‘regular’ user.

To update the packages, use the following commands as the root user (and repeat those commands at least every week to get the latest security updates):

```
$ sudo apt-get update
$ sudo apt-get dist-upgrade
```

Reboot your server (just in case the kernel has been updated) and connect again.

```
$ sudo reboot
$ ssh <user>@<ip-address>
example: ssh john@13.37.13.37
```

It is important to have an accurate time on your system as this sometimes can cause for conflicts. In most cases it’s best to use pool.ntp.org to find an NTP server. The system will try finding the closest available servers for you.

```
$ sudo apt-get install ntp
$ sudo apt-get install ntpdate
$ sudo service ntp stop
$ sudo ntpdate pool.ntp.org
$ sudo service ntp start
```

Now, install additional packages which are needed or useful. We install nano text editor to edit the docker-compose file later in this tutorial.

```
$ sudo apt-get install nano
```

## Step 5: Secure your SSH connection

We’re going to change the standard SSH port to make your server just a bit more secure.

{% hint style="info" %}
To make it even more secure, you can use the following guide (not recommended): <https://www.cyberciti.biz/faq/how-to-disable-ssh-password-login-on-linux/>

We’re not recommending this, as you won’t be able to login anymore from any computer or mobile phone on the go.
{% endhint %}

Open the sshd\_config file with nano:

```
$ sudo nano /etc/ssh/sshd_config
```

Go to the line with ‘Port 22’ and change it to another port number between 49152 and 65535.

```
example ‘Port 51234’
```

From now on, we will be referring to this new port as \<new\_ssh\_port>.

Go to line ‘PermitRootLogin yes’ and change it to ‘PermitRootLogin no’.

```
example ‘PermitRootLogin no’
```

Press control + X, press Y and press enter to save your new configuration.

Restart the SSH service:

```
$ sudo service ssh restart
```

Now we’re going to disconnect and reconnect again to test if the new port is working and remember to add your new port as following:

```
$ exit
$ ssh -p <new_ssh_port> <user>@<ip-address>
example: ssh -p 51234 john@13.37.13.37
```

## Step 6: Enabling Swap space

{% hint style="info" %}
It’s not recommended to enable swap with SSD drives as it can cause drive degradation over time.
{% endhint %}

It is recommended to enable Swap on your server if you don’t have an SSD drive, if not done already.

First check if swap isn’t already enabled:

```
$ sudo swapon -s
$ free -m
```

If swap is not enabled, use the following extensive guide to enable it: <https://www.digitalocean.com/community/tutorials/how-to-add-swap-space-on-ubuntu-16-04>

## Step 7: Installing fail2ban

Fail2ban scans log files and bans IPs that show the malicious signs: too many password failures, seeking for exploits, etc. Generally Fail2Ban is then used to update firewall rules to reject the IP addresses for a specified amount of time.

```
$ sudo apt-get install fail2ban
```

Now we’re going to edit the fail2ban config to your modified ssh port:

```
$ sudo cp /etc/fail2ban/jail.conf /etc/fail2ban/jail.local
$ sudo nano /etc/fail2ban/jail.local
```

Replace every line that looks like this:

```
port = ssh
```

With your new ssh port:

```
port = <new_ssh_port>
```

It should look then similar to this:

```
example:
#
# SSH servers
#
[sshd]
port = 51234
logpath = %(sshd_log)s
```

Save and exit with ctrl + X, Y, ENTER.

Now, restart fail2ban:

```
$ sudo service fail2ban restart
```

## Step 8: Setting up your firewall

Check this tutorial fore more details: <https://www.digitalocean.com/community/tutorials/how-to-set-up-a-firewall-with-ufw-on-ubuntu-16-04>

First check the status of the firewall:

```
$ sudo ufw status
```

Now we’re going to set up the firewall, blocking all the ports but allowing traffic on the ports for your SSH connection and opening the port for synchronization with other nodes in the network.

```
$ sudo ufw disable
$ sudo ufw default deny incoming
$ sudo ufw default allow outgoing
$ sudo ufw allow 6868
$ sudo ufw allow <sshport>
example: sudo ufw allow 51234
```

```
$ sudo ufw logging on
$ sudo ufw enable
```

Check the status again to see if the rules are updated:

```
$ sudo ufw status
```

After a short period of time you can reconnect to your VPS.

## Step 9: Installing Docker

We’re finally getting close to installing your LTO Network Public node! The node is easily installed through a Docker image, so first we’re going to need to install Docker & Docker Compose on our server. Use the following guides to do so and stop when you’ve ran the test provided in this guide (sudo docker run hello-world):

* [ ] Docker: <https://docs.docker.com/install/linux/docker-ce/ubuntu/>
* [ ] Docker Compose: <https://docs.docker.com/compose/install/>

Now, give docker the proper privileges:

```
$ sudo groupadd docker
$ sudo usermod -aG docker $USER
```

Log out and log back in so that your group membership is re-evaluated.

```
$ exit
$ ssh -p <new_ssh_port>@<ip-address>
example: ssh -p 51234 john@13.37.13.37
```

Verify that you can run docker commands without sudo.

```
$ docker run hello-world
```

For more info check: <https://docs.docker.com/install/linux/linux-postinstall/#manage-docker-as-a-non-root-user>

## Step 10: Starting your node for the first time

Yay, it’s finally time to start your node! At least you have a more secure server now, and that is super important!

Head over to the LTO.network Github repository: <https://github.com/ltonetwork/lto-public-node/blob/master/docker-compose.yml> and open the default Docker Compose file.

Look up your IP address by entering the following command in your command line, copy the IP address and save it somewhere, you will need it in the next step.

```
$ curl https://api.ipify.org
```

Now, all you need is the docker-compose.yml file. What works best is copying the content in a new file. So let’s make the new file on your server:

```
$ sudo touch docker-compose.yml
```

Open the file with nano:

```
$ sudo nano docker-compose.yml
```

Paste the contents from the docker-compose.yml file from the LTO Github repository in a code editor like Visual Studio Code and enter your details. Now copy it and paste the contents in the file in your node with your right mouse click. Example:

```
version: '3'
```

```
services:
```

```
public-node:
    container_name: public-node
    image: ltonetwork/public-node
    ports:
      - 6869:6869
      - 6868:6868
```

```
    environment:
      - LTO_WALLET_SEED=<place the fifteen words here>
      - LTO_WALLET_PASSWORD=<setapasswordforencryption>
      - LTO_NETWORK=MAINNET
      - LTO_DECLARED_ADDRESS=<your_node_ip>:6868
```

***(not mandatory)*** If you want to approach your node from your localhost with a browser, add the following lines after the last line:

```
- LTO_ENABLE_REST_API=true
- LTO_API_KEY=<setapasswordforyourapi>
```

Press ctrl +x and y to close and save the file.

**Now it’s really time to start your node! Use the following command to run the Docker container in the background. It will pull the latest image from the LTO node and start running.**

```
$ docker-compose up -d
```

To see the progress use the following command:

```
$ docker logs -f public-node
```

To leave the node running in the background either close the terminal or press ctrl + c.

{% hint style="info" %}
If you get an ‘unsupported version’ error after starting your node, change the version number to ‘2’ in the docker-compose.yml file.
{% endhint %}

That’s it. You’ve successfully mastered setting up a LTO Network public node on your own Linux server. Awesome!

## **Step 11: Wait for a 1.000 blocks**

You can find the LTO Network Explorer at [https://explorer.lto.network.](https://explorer.lto.network./) It shows you the blocks generated, by who, when, how big they are and how many transactions are in the block.

After launching your node check the [Explorer](https://explorer.lto.network) to see the number of the last block. Wait till another 1.000 blocks are generated and expect your node to be part of the LTO Network.

{% hint style="info" %}
Utilize the available [Community Tech Tools](https://blog.lto.network/distributed-workforce-community-dao-level-up/#tech-lab) to get more insights into the network and your participation. Let's build a secure and useful network together!
{% endhint %}

Depending on your stake (the number of LTO tokens you have in the “2nd wallet”) it will take more or less time for you to start earning LTO. Be patient and be happy. Welcome to the amazing LTO Network community! Read more [about community programs](https://blog.lto.network/distributed-workforce-community-dao-level-up/).


# Windows with Container

This page explains in just a few steps how to get your node up and running using Windows 10 and a Docker container.

So you decided you want to be part of the LTO Network, awesome!

A great way to be part of the community is by actively participating as a node in the network.

Make sure to check out the Prepare: [Setup your wallet page](/tutorials/mining/prepare-setup-your-wallet) before continuing. The node setup pages assume you utilize a 2-wallet setup for extra safety.

## **Step 1: Preparing the setup of the node**

Get Docker installed. Go to <https://docs.docker.com/docker-for-windows/> and follow the steps to install it. This is a simple download and execute, but you might need to tweak some settings on your computer. The install will ask to restart Windows in order to activate Hyper-V.

**Docker minimum requirements:**

* Windows 10 64 bit: Pro, Enterprise or Education (1607 Anniversary Update, Build 14393 or later)
* Virtualization is enabled in BIOS. Typically, virtualization is enabled by default. This is different from having Hyper-V enabled. For more detail see Virtualization must be enabled in Troubleshooting.
* CPU SLAT-capable feature
* At least 4GB of RAM

{% hint style="info" %}
Your computer’s CPU needs to have virtualization enabled. You can check if your CPU can handle this by installing software like ‘Speccy’ and find Youtube videos on how to activate virtualization in your BIOS if you need to. If your system does not support Hyper-V and CPU virtualization to run Docker for Windows as an alternative you can install ‘Docker Toolbox’, which uses Oracle VirtualBox instead of Hyper-V.
{% endhint %}

Next up is to start Docker for Windows to ensure it is installed correctly.

Once Docker is installed, create a simple folder on your computer (example ‘C:\LTO\’) and download the necessary file(s) from LTO github to them

* Go to Link: <https://github.com/ltonetwork/lto-public-node>
* Download the file: **docker-compose.yml** to the directory you just created

Open the **docker-compose.yml** file in software like Visual Studio Code (<https://code.visualstudio.com/>), it may ask you to install the Docker extension once you open the yml file. Other editors can also work, but things like Wordpad and Notepad will garble up your content. Notepad++ seems to handle it well too though.

Edit the following values:

```
- LTO_WALLET_SEED=<Input the seed of your wallet>
```

This means: look for ‘LTO\_WALLET\_SEED=’ and put the seed words (including the spaces) directly after ‘=’. Delete all the default text between < and > including the < and >.

```
- LTO_WALLET_SEED_BASE58=<Input the seed of your wallet but then base58 encoded>
```

Choose 1 of the above. You do not need to configure both.

```
- LTO_WALLET_PASSWORD=<You choose a password>
```

This password is used to encrypt your seed on the disk of your node. It can be the same password as your wallet password when you created your LTO\_wallet, but naturally this is not recommended.

```
- LTO_API_KEY=<You choose an API password>
```

Configure a your password you want to use to access the admin options of your API.

{% hint style="info" %}
The total yml is about 17 lines. If the editor shows you much more, this text is all formatting, which is bad as the node will not properly read the contents and run! If this happens, click on the yml file on Github itself and copy paste the 17 (more or less) lines (including all the spaces) and overwrite the contents of your editor.
{% endhint %}

Save the docker-compose.yml file in the directory you created. For example: C:\LTO.

## Step 2: Startup our container on our Windows system

Open a command prompt (or another terminal like PowerShell). Go to the directory where the yml file is located and type:

```
c:\> cd LTO
c:\LTO> docker-compose up
```

Docker will now start downloading the node image and get up-to-date on the transactions. Once transaction blocks are updated it will start mining blocks and recording transactions (The output will display MicroBlocks being appended).

{% hint style="info" %}
You can type ‘**docker-compose up -d**’ to setup and run the node in the background. This will allow you to close the terminal as well, while the node keeps running.
{% endhint %}

Some Docker Commands that could proof handy:

1. ‘docker images’: shows all images
2. ‘docker ps -a’: shows all (running) containers
3. ‘docker start/stop public-node’: start node or stops a running node
4. ‘docker logs -f public-node’: Check on the running node and see the transactions.
5. ‘docker-compose down’: delete the container
6. ‘docker-compose pull’: pull the latest image into your repository. Handy if you ran testnet and the yml keeps launching the testnet node-image.

## **Step 3: Wait for a 1.000 blocks**

You can find the LTO Network Explorer at [https://explorer.lto.network.](https://explorer.lto.network./) It shows you the blocks generated, by who, when, how big they are and how many transactions are in the block.

After launching your node check the [Explorer](https://explorer.lto.network) to see the number of the last block. Wait till another 1.000 blocks are generated and expect your node to be part of the LTO Network.

{% hint style="info" %}
Utilize the available [Community Tech Tools](https://blog.lto.network/distributed-workforce-community-dao-level-up/#tech-lab) to get more insights into the network and your participation. Let's build a secure and useful network together!
{% endhint %}

Depending on your stake (the number of LTO tokens you have in the “2nd wallet”) it will take more or less time for you to start earning LTO. Be patient and be happy. Welcome to the amazing LTO Network community! Read more [about community programs](https://blog.lto.network/distributed-workforce-community-dao-level-up/).

## Additional information

### **Docker compose seemed to work but my node is not mining. What should I do?**

* Check if your yml file has the right SEED words filled in. Make certain you did not accidentally leave < and > after the ‘LTO\_WALLET\_SEED=’ notation.
* You can check the LTO wallet address of your public node by going to your webbrowser and typing in: <http://localhost:6869> (if you changed the port in the yml file, make sure you fill in the correct port here and if localhost does not work check below as the rest-API is not activated by default on mainnet).
  * Click on: addresses -> |GET| /addresses -> Try it out! The Response Body should show you the address for your own wallet.

### **Some suggestions made by the LTO team**

Those that run a VPS, please add the following lines:

* Under port: - 6868:6868
* Under environment: - LTO\_DECLARED\_ADDRESS=**yourIP**:6868
* Under environment: - LTO\_ENABLE\_REST\_API=true&#x20;
  * this will allow you to approach your node through the API webinterface
* Additional command lines can be found on the LTO-github:
  * <https://github.com/ltonetwork/docker-public-node>

### **An example of the entire yml file with the suggestions made above active**

```
version: '3'
services:
 public-node:
  container_name: public-node
  image: ltonetwork/public-node
  ports:
   - 6869:6869
   - 6868:6868
  environment:
   - LTO_WALLET_SEED=all your seedwords input here
   - LTO_WALLET_PASSWORD=the password you created
   - LTO_API_KEY=the API key you created
   - LTO_ENABLE_REST_API=true
   - LTO_DECLARED_ADDRESS=YourIP:6868
```


# REST API

* Our open source client application uses the same API.
* You can explore it and implement any kind of client application yourself.
* Our nodes expose the REST API allowing access to all blockchain data (transaction history, balances, etc.) as well as operations for creating a new transaction — it’s easy to make a transfer, exchange, issue of tokens or lease fund transactions programmatically.

## The Web Interface to LTO Full Node API

For The Web Interface to the LTO Network Full Node API, Please check [**Swagger**](https://nodes.lto.network) on Mainnet. On Testnet: [***TestNode1***](https://testnet.lto.network)


# Address

## Balance

<mark style="color:blue;">`GET`</mark> `https://nodes.lto.network/addresses/balance/:address`

Get account balance

#### Path Parameters

| Name    | Type   | Description                        |
| ------- | ------ | ---------------------------------- |
| address | String | Account's address in Base58 format |

{% tabs %}
{% tab title="200 " %}

```javascript
{
  "address": "3N3keodUiS8WLEw9W4BKDNxgNdUpwSnpb3K",
  "confirmations": 0,
  "balance": 100945889661986
}
```

{% endtab %}
{% endtabs %}

## Balance after confirmations

<mark style="color:blue;">`GET`</mark> `https://nodes.lto.network/addresses/balance/:address/:confirmations`

Get account balance after X confirmations from now

#### Path Parameters

| Name          | Type   | Description                        |
| ------------- | ------ | ---------------------------------- |
| address       | String | Account's address in Base58 format |
| confirmations | String | Number of confirmations            |

{% tabs %}
{% tab title="200 " %}

```javascript
{
  "address": "3N3keodUiS8WLEw9W4BKDNxgNdUpwSnpb3K",
  "confirmations": 500,
  "balance": 100945388397565
}
```

{% endtab %}
{% endtabs %}

## Balance details

<mark style="color:blue;">`GET`</mark> `https://nodes.lto.network/addresses/balance/details/:address`

Get balance details

#### Path Parameters

| Name    | Type   | Description                        |
| ------- | ------ | ---------------------------------- |
| address | String | Account's address in Base58 format |

{% tabs %}
{% tab title="200 " %}

```javascript
{
  "address": "3P2HNUd5VUPLMQkJmctTPEeeHumiPN2GkTb",
  "regular": 1498883844,
  "generating": 1066926675599895,
  "available": 1498883844,
  "effective": 1067913688974251
}
```

{% endtab %}
{% endtabs %}

| Balance    | Description                                               |
| ---------- | --------------------------------------------------------- |
| Regular    | The amount LTO owned by the account, including LTO leased |
| Available  | The amount LTO owned by the account, excluding LTO leased |
| Effective  | The available amount + the LTO leased to the account      |
| Generating | The minimal effective balance over the last 1000 blocks   |


# Wallet

API endpoints for the node's wallet

## Addresses

<mark style="color:blue;">`GET`</mark> `https://nodes.lto.network/wallet/addresses`

Get list of all accounts addresses in the node's wallet.

{% tabs %}
{% tab title="200 " %}

```javascript
[
  "3NBVqYXrapgJP9atQccdBPAgJPwHDKkh6A8",
  "3Mx2afTZ2KbRrLNbytyzTtXukZvqEB8SkW7"
]
```

{% endtab %}
{% endtabs %}

## Address range

<mark style="color:blue;">`GET`</mark> `https://nodes.lto.network/wallet/addresses/seq/:from/:to`

Get list of accounts addresses with indexes at this range in the node's wallet.

#### Path Parameters

| Name | Type   | Description |
| ---- | ------ | ----------- |
| from | number |             |
| to   | number |             |

{% tabs %}
{% tab title="200 " %}

```javascript
[
  "3NBVqYXrapgJP9atQccdBPAgJPwHDKkh6A8",  
  "3Mx2afTZ2KbRrLNbytyzTtXukZvqEB8SkW7"
]
```

{% endtab %}
{% endtabs %}

## Add address

<mark style="color:green;">`POST`</mark> `https://nodes.lto.network/wallet/addresses`

Generate a new account address in the wallet.

#### Path Parameters

| Name | Type   | Description |
| ---- | ------ | ----------- |
|      | string |             |

#### Headers

| Name          | Type   | Description          |
| ------------- | ------ | -------------------- |
| Authorization | string | "Bearer " + API\_KEY |

{% tabs %}
{% tab title="200 " %}

```javascript
{
  "address": "3Mx2afTZ2KbRrLNbytyzTtXukZvqEB8SkW7"
}
```

{% endtab %}
{% endtabs %}

###


# Lease Transactions

## POST /leasing/lease

![master](https://img.shields.io/badge/MAINNET-available-4bc51d.svg)

Creates lease transaction.

**Request params**

```
"sender" - Sender address, Base58-encoded
"fee" - Amount of transaction fee
"amount" - amount of leased LTO
```

**Request JSON example**

```javascript
 {
  "sender" : "3HgqG68qfeVz5dqbyvqnxQceFaH49xmGvUS",
  "fee" : 500000000,
  "amount" : 500000000,
  "recipient" : "address:3HQanDJhZSsSLbCjTCsMYpPvuj2ieGwKwQ9"
}
```

**Response JSON example**

```javascript
{
 "type":8,
 "id":"9q7X84wFuVvKqRdDQeWbtBmpsHt9SXFbvPPtUuKBVxxr",
 "sender":"3MtrNP7AkTRuBhX4CBti6iT21pQpEnmHtyw",
 "senderPublicKey":"G6h72icCSjdW2A89QWDb37hyXJoYKq3XuCUJY2joS3EU",
 "fee":100000000,
 "timestamp":46305781705234713,
 "signature":"4gQyPXzJFEzMbsCd9u5n3B2WauEc4172ssyrXCL882oNa8NfNihnpKianHXrHWnZs1RzDLbQ9rcRYnSqxKWfEPJG"
}
```

## POST /leasing/cancel

![master](https://img.shields.io/badge/MAINNET-available-4bc51d.svg)

Creates lease cancel transaction.

**Request params**

```
"sender" - Sender address, Base58-encoded
"fee" - Amount of transaction fee
"leaseId" - lease id for cancel
```

**Request JSON example**

```javascript
{
  "sender" : "3HgqG68qfeVz5dqbyvqnxQceFaH49xmGvUS",
  "fee" : 500000000,
  "leaseId" : "CYPYhYe9M94t958Nsa3DcYNBZTURwcFgQ3ojyjwEeZiK"
}
```

**Response JSON example**

```javascript
{
  "type" : 9,
  "id" : "895ryYABK7KQWLvSbw8o8YSjTTXHCqRJw1yzC63j4Fgk",
  "sender" : "3HgqG68qfeVz5dqbyvqnxQceFaH49xmGvUS",
  "senderPublicKey" : "DddGQs63eWAA1G1ZJnJDVSrCpMS97NH4odnggwUV42kE",
  "fee" : 500000000,
  "timestamp" : 1495625418143,
  "signature" : "2SUmFj4zo7NfZK7Xoqvqh7m7bhzFR8rT7eLtqe9Rrp18ugFH9SSvoTx1BtekWhU7PN1uLrnQCpJdS8JhmcBAjmb9",
  "leaseId" : "CYPYhYe9M94t958Nsa3DcYNBZTURwcFgQ3ojyjwEeZiK"
}
```


# Peers

## POST /peers/connect

![master](https://img.shields.io/badge/MAINNET-available-4bc51d.svg)

Connect to peer.

**Request:**

```javascript
{
    "host":"127.0.0.1",
    "port":"9084"
}
```

## GET /peers/connected

![master](https://img.shields.io/badge/MAINNET-available-4bc51d.svg)

Returns list of all currently connected peers to the node.

**Response JSON example:**

```javascript
{
  "peers": [
    {
      "address": "52.51.92.182/52.51.92.182:6863",
      "declaredAddress": "N/A",
      "peerName": "zx 182",
      "peerNonce": 183759
    },
    {
      "address": "ec2-52-28-66-217.eu-central-1.compute.amazonaws.com/52.28.66.217:6863",
      "declaredAddress": "N/A",
      "peerName": "zx 217",
      "peerNonce": 1021800
    }
  ]
}
```

## GET /peers/blacklisted

![master](https://img.shields.io/badge/MAINNET-available-4bc51d.svg)

Returns list of all currently blacklisted peers to the node.

## GET /peers/all

![master](https://img.shields.io/badge/MAINNET-available-4bc51d.svg)

Returns list of all ever known not blacklisted peers with publicly available declared address.


# Blocks

## GET /blocks/height

![master](https://img.shields.io/badge/MAINNET-available-4bc51d.svg)

Return the current blockchain height

**Response JSON example:**

```javascript
{   
  "height": 7788    
}
```

## GET /blocks/last

![master](https://img.shields.io/badge/MAINNET-available-4bc51d.svg)

Return the last block data

**Response JSON example:**

```javascript
{   
  "version": 2,   
  "timestamp": 1479313809528,       
  "reference": "4MLXQDbARiJDEAoy5vZ8QYh1yNnDhdGhGWkDKna8J6QXb7agVpFEi16hHBGUxxnq8x4myG4w66DR4Ze8FM5dh8Gi",        
  "nxtconsensus": {       
    "basetarget": 464,        
    "generationsignature": "7WUV2TufaRAyjiCPFdnAWbn2Q7Jk7nBmWbnnDXKDEeJv"       
  },        
  "transactions": [       
    {       
      "type": 2,        
      "id": "64hxaxZvB9iD1cfRf1j8KPTXs4qE7SHaDWTZKoUvgfVZotaJUtSGa5Bxi86ufAfp5ifoNAGknBqS9CpxBKG9RNVR",       
      "fee": 100000,        
      "timestamp": 1479313757194,       
      "signature": "64hxaxZvB9iD1cfRf1j8KPTXs4qE7SHaDWTZKoUvgfVZotaJUtSGa5Bxi86ufAfp5ifoNAGknBqS9CpxBKG9RNVR",        
      "sender": "3NBVqYXrapgJP9atQccdBPAgJPwHDKkh6A8",              
      "senderPublicKey": "CRxqEuxhdZBEHX42MU4FfyJxuHmbDBTaHMhM3Uki7pLw",        
      "recipient": "3N8UPtqiy322NVr1fLP7SaK1AaCU7oPaVuy",             
      "amount": 1000000000        
    }       
  ],        
  "generator": "3N5GRqzDBhjVXnCn44baHcz2GoZy5qLxtTh",             
  "signature": "4ZhZdLAvaGneLU4K4b2eTgRQvbBjEZrtwo1qAhM9ar3A3weGEutbfNKM4WJ9JZnV8BXenx8JRGVNwpfxf3prGaxd",        
  "fee": 100000,        
  "blocksize": 369        
}
```

## GET /blocks/at/{height}

![master](https://img.shields.io/badge/MAINNET-available-4bc51d.svg)

Return block data at the given height

## GET /blocks/seq/{from}/{to}

![master](https://img.shields.io/badge/MAINNET-available-4bc51d.svg)

Return block data at the given height range

## GET /blocks/signature/{signature}

![master](https://img.shields.io/badge/MAINNET-available-4bc51d.svg)

Return block data by a specified Base58encoded signature

## GET /blocks/address/{address}/{from}/{to}

![master](https://img.shields.io/badge/MAINNET-available-4bc51d.svg)

Get list of blocks generated by specified address


# Utils

**POST /utils/hash/secure**

![master](https://img.shields.io/badge/MAINNET-available-4bc51d.svg)

Produce a secure hash of a specified message.

**Request:**

```
ltonetwork!
```

**Response JSON example:**

```javascript
{
  "message": "ltonetwork!",
  "hash": "CU8QRLgxAbwsL616cZBRouXHfUf9dJVfiUZza5egGTs2"
}
```

## POST /utils/hash/fast

![master](https://img.shields.io/badge/MAINNET-available-4bc51d.svg)

Fast hash of specified message.

**Request:**

```
ltonetwork!
```

**Response JSON example:**

```javascript
{
  "message": "ltonetwork!",
  "hash": "2w3ezYt5p3KfEZ8K2dX9SiQzSuxTUy5AV4VW7AoPWHCF"
}
```

## GET /utils/seed/{length}

![master](https://img.shields.io/badge/MAINNET-available-4bc51d.svg)

Generate a random seed of specified length.

**Response JSON example:**

```javascript
{
  "seed": "3XcHLU6bYRax1c"
}
```

## GET /utils/seed

![master](https://img.shields.io/badge/MAINNET-available-4bc51d.svg)

Generate a random seed.

**Response JSON example:**

```javascript
{
  "seed": "2uwLAe7Rp7TuNiBTKsmTEJ5wxGqkBHjcyPq2tMXiWye7"
}
```


# FAQ

## 1. Is there actually a page where all the resources concerning nodes are mentioned ? Like all the different commands and their effects ?

Yes, in this section [***NODE API***](/node/public-node/rest-api).

## 2. My Digital Ocean node is fully synced. I have managed to lease 1000+ LTO to the node. How can I know if it is already mining?

There is a method but the API key is needed: `GET /debug/minerInfo` which shows all miners who has enough generating balance to be able to generate block.

## 3. How can you GET the LTO balance of a Wallet via API?

1. GET /addresses/balance/details/{address}&#x20;
2. GET /addresses/balance/{address}

## 4. I am unable to connect to my nodes API endpoint after successful setup of my node when I try a get request <http://my_server_ip_address:6868/addresses/balance/> wallet\_address it gives an error "Error: Failed sending data to the peer".

API port is 6869 by default, make sure you have enabled it in your config. You can enable and configure your node API using the optional LTO\_ENABLE\_REST\_API and LTO\_API\_KEY environment variable.

## 5. How can I sign a transaction with a private key using the REST API?

There are 2 ways to sign transactions:

1. Use a node. But that node should know the private key of your address. In other words, it should be your node, because you should never send your private key to anybody else.
2. Use libraries for different languages (Python, C#, JavaScript, Java). Libraries can sign transactions with the provided private key and send to the network already signed transactions.


# Security Notes

Important Security Notes to Be Considered By End Users

## SEED & Password

Before you create an account, you should know some important points about the LTO wallet system. In LTO wallet, there is no .dat file which keeps your private keys but a SEED which grants you access to them. The SEED is by default a string of 15 English words and basically your passphrase to your funds - **if you lose your SEED, you lose access to your account**.

We strongly encourage you to additionally back up the SEED on a piece of paper and store it in a safe place. The provided string of 15 English words is cryptographically extremely secure and with the current technology unbreakable. Each and every SEED is only linked to one single LTO account. Every digit, character, symbol and space counts - if there is one space too much, a different account opens up. If there is a wrong symbol, a different account opens up. If there is a spelling mistake, a different account opens up.

### Do not forget to create a backup copy of the seed phrase! See how to do it:

* [Web-Wallet](https://wallet.lto.network). During the account creation, you will also be asked to generate a password for your address.

The password has two purposes:

1. It encrypts the SEED locally so the SEED is never sent to the network unprotected.
2. Your account will be cached so you don't have to import the SEED from new every time you want to log in. The password secures that only you can log into your cached account. If you happen to lose your password, you can simply delete the cached account, restore account by using your SEED.

**Notes**

* Forgetting the password, you can easily import your account again using your SEED and set a new password in the process.

### Personal Account <a href="#securitynotes-personalaccount" id="securitynotes-personalaccount"></a>

* To access your account, do not use browsers that have extensions and plug-ins installed, they can access your secret passphrase.
* Protect the account with a password.
* You use your wallet anonymously, your account is not tied to e-mail or to other identifying information.
* Password protects your account as part of a specific device or browser.
* Check whether the connection is in secure SSL mode - in the address bar of your web browser, you should see the closed lock icon (on the right or on the left, depending on the browser).

### General Notes <a href="#securitynotes-generalnotes" id="securitynotes-generalnotes"></a>

* Use the [official LTO resources](https://blog.ltonetwork.com/lto-network-sources/) (groups in social networks, sites, applications).
* Before you enter a secret phrase from your account or download the application, carefully look at the address bar of the browser and make sure that you are on the official resource of the company:
* Use the official software. Do not install unknown or hacked programs.
* Do not open letters or links from unknown senders.
* Regularly check for updates to the operating system and browser.
* Do not go into the wallet, using public WiFi or from someone else's device.


# FAQ

## Frequently Asked Questions

### 1. How much LTO do I need to start the mining process?

In order to activate mining, the node needs not less than 1000 LTO (for testnet we can always provide you with that, do not hesitate to contact us).

### 2. What is the current mainnet state?

[***Current mainnet state.***](https://nodes.lto.network/node/status)&#x20;

### 3. What is the incentive to run my own full node instead of leasing my coins?

More revenue if you have enough people leasing to you and payout is not 100%. Also you can provide services on LTO Network with your node. Running a node might be profitable later on but it's not at the moment. If it is it's only marginal.

### 4. I want to automatically send my tokens to multiple wallets on the LTO platform. Is there a program or bot?

Yes, there are payout scripts that node owners can use to pay leasers. These can also be used/adjusted to do other automated transfers, e.g., [***LTOLPoSDistributor***](https://github.com/jayjaynl/LTO_LPoSDistributor). These scripts are provided and maintained by LTO community members.

### **5. How can I list my community node?**

Services like universal wallet pull the information about community nodes from the LTO public blockchain. Please use a [data transaction](/protocol/public/transactions/data) to set the meta properties for your node address.

The `node_name` and `payout_sharing`properties are required. All other properties are optional. Additional settings from the [community-proposed metadata standard](https://github.com/sbrekelmans/generator-info-standard) may also be used.

Use either the [**LTO CLI Client**](/wallets/lto-cli) or the **REST API of your node** to set the account data.

{% tabs %}
{% tab title="CLI" %}
Store the node information in a JSON file.

```json
{
  "node_name": "My node name",
  "node_description": "Full description about your node",
  "branding:logo_svg": "https://example.com/logo.svg",
  "website": "https://example.com",
  "social:telegram": "@telegram_handle",
  "social:twitter": "@twitter_handle",
  "payout_sharing": "95%",
  "payout_schedule": "Every week"
}
```

Install the [LTO CLI Client](/wallets/lto-cli) and import the account using the seed phrase of your node. After that, you can set the account data.

```bash
lto account seed <<< "$LTO_WALLET_SEED"
lto data set < nodeinfo.json
```

{% endtab %}

{% tab title="REST API" %}
Store the following JSON in a file on your server (eg `nodeinfo.json`). Change the `sender` and data values.

```json
{
  "fee": "100000000",
  "sender": "NODE_ADDRESS",
  "data": [
   {
      "key": "node_name",
      "type": "string",
      "value": "My node name"
    },
    {
      "key": "node_description",
      "type": "string",
      "value": "Full description about your node"
    },
    {
      "key": "website",
      "type": "string",
      "value": "https://example.com"
    },
    {
      "key": "branding:logo_svg",
      "type": "string",
      "value": "https://example.com/logo.svg"
    },
    {
      "key": "social:telegram",
      "type": "string",
      "value": "@telegram_handle"
    },
    {
      "key": "social:twitter",
      "type": "string",
      "value": "@twitter_handle"
    },
    {
      "key": "payout_sharing",
      "type": "string",
      "value": "95%"
    },    
    {
      "key": "payout_schedule",
      "type": "string",
      "value": "Every week"
    }
  ]
}
```

To use the REST API of your node, you'll need your API Key (`LTO_API_KEY` environment variable).

```bash
curl -X POST http://localhost:6869/transactions/submit/data -d @nodeinfo.json -H "Authorization: bearer API_KEY" -H "Content-Type: application/json"
```

{% endtab %}
{% endtabs %}

**Additionally**; the web wallet uses a static JSON file to list the community nodes for leasing. Please edit the file [communityNodes.json](https://github.com/ltonetwork/lto-wallet/blob/master/src/communityNodes.json) on GitHub and issue a pull request.


# Exchange integration guide

As an exchange, you may choose to rely only on the [REST API ](/node/public-node/rest-api)of the LTO public node. This means that there's no dependency on a client library or use of custom logic.

Please follow the general guide for [installing a public node](/node/public-node/installation-guide). The recommended method is using docker. Alternatively, there's a .deb package available for Debian / Ubuntu.

{% hint style="warning" %}
When setting up the node, you're required to configure a wallet seed phrase and API key. **Both should be kept extremely safe.** It's recommended to ensure that the REST API (on port 6869) is only available locally and not exposed to the internet.
{% endhint %}

*For the examples, we assume the node is running on localhost.*

## Withdrawal

The node will create a default wallet address based on the wallet seed. This address should serve as the hot wallet for the exchange. When a user does a withdrawal of LTO, tokens are sent from this address.

Transferring tokens from the hot wallet to a recipient is done by sending a `POST` request to `/transactions/submit`. The transaction will be signed by the node. Signing a transaction requires authentication with the API key using the `Authorization` header.

```
$ echo '{"sender":"3JmCa4jLVv7Yn2XkCnBUGsa7WNFVEMxAfWe", "recipient":"3JzLRZFtqRoormvAKTRXJtQAUN6WkfoKdf2", "amount": 100000000000, "fee":100000000}' \
curl -X POST http://localhost:6869/transactions/submit/transfer --data @- -H "Authorization: bearer secret"
```

The amount in LTO should be done `* 10^8`. The transfer fee is 1 LTO. The sender is the address of the hot wallet.

{% hint style="warning" %}
The `/transactions/submit` endpoint is available since v1.5.2. For older versions, first sign and then broadcasted the signed transaction.
{% endhint %}

## Deposit

### Create intermediate wallet

To enable users to deposit tokens they require an intermediate wallet on the LTO Network with a private key that's controlled by the exchange.

The public node is able to generate over 4 billion (2^32) addresses using a single seed phrase. This should be more than sufficient for any use case.

To create a new address send a `POST` request to `/wallet/addresses`. You're required to authenticate with the API key via the `Authorization` header.

```
$ curl -X POST http://localhost:6869/wallet/addresses -H "Authorization: bearer secret"
{ "address" : "3QV4xdTK9aqMYrK5Tuojq2XXw8nX1NNkhjE" }
```

The node will only return a wallet address and not a private key. The node can sign transactions for that address. It's not possible to extract the private key via the REST API.

### Watch transactions

When a user sends LTO to the intermediate wallet, it should be picked up by the software of the exchange, so the amount can be added to the user's balance.

The public node will node do a callback for transactions. Instead, the software of the exchange should poll the blocks.

```
$ curl http://localhost:6869/blocks/1834779
{
  version: 3,
  timestamp: 1646393744714,
  reference: "3kmSG1M95L5koCCoRZWNC9ya9GWXJNwxN6J2qwcSUZGEGoc8MpbZxLDFiwZdfPJZZRe8MHpsZR81gECwh3EG86am",
  nxt-consensus: { },
  features: [ ],
  generator: "3MpL7qLzS8UZH4cNcZsvJUWouiXJ6ZQdRCV",
  signature: "5jMJTpKvkJTHmLJjMKwHxJYpSNna9hcGL3DBTdxA3v9gwcsvLuB5yP5uq7C2yF1FpLtLfUAtJkMqm2yaChnuWnrq",
  blocksize: 225,
  transactionCount: 0,
  fee: 0,
  transactions: [ ],
  height: 1834779
}
```

Filter the transactions based on type and recipient address and process them.

{% hint style="warning" %}

* Make sure this process is [ACID](https://en.wikipedia.org/wiki/ACID) and/or [idempotent](https://en.wikipedia.org/wiki/Idempotence), so balance updates are never lost or done twice.
* Keep track of the last processed block and do not rely on the `/blocks/last` endpoint.
* It's recommended to delay at between 10 blocks and 100 blocks, because of potential chain reorganization (hard finalization after 100 blocks).
  {% endhint %}

Implementing this logic is outside the scope of the LTO Public Node. See [lto-chain-listener](https://github.com/ltonetwork/lto-chain-listener) as an example of this implementation.

### Transfer to hot wallet

LTO from the intermediate wallet should be sent to your hot wallet once processed. This is done by sending a `POST` request to `/transactions/submit`. The transaction will be signed by the node. Signing a transaction requires authentication with the API key using the `Authorization` header.

```
$ echo '{"sender":"3N5eQyFLimmv2Q1noYDnnrn5FNbNT9m3FZV", "recipient":"3JmCa4jLVv7Yn2XkCnBUGsa7WNFVEMxAfWe", "amount": 99900000000, "fee":100000000}' \
curl -X POST http://localhost:6869/transactions/submit/transfer --data @- -H "Authorization: bearer secret"
```

The amount in LTO should be done `* 10^8`. The sender is the address of the intermediate wallet. The recipient is the address of the hot wallet. Note that the transaction fee is 1 LTO. This must be subtracted from the amount in order to transfer all tokens from the wallet.

## Cold wallet

It's highly recommended to create a cold wallet that isn't related to a node. This can be done using the [LTO CLI](/wallets/lto-cli).

Most exchanges choose to make transferring LTO between the hot and cold wallet a manual process.

{% hint style="danger" %}
Please take decentralization of the network and our community in mind and disable staking for tokens held on the exchange. This can be done by setting the environment variable `LTO_ENABLE_MINING=no` when starting the docker container.
{% endhint %}


# Anchor node


# Installation Guide


# Linux

The LTO anchor node is comprised of a set of [Docker](https://www.docker.com/) containers. Use *docker-compose* as orchestration tool.

### Install docker

{% tabs %}
{% tab title="Ubuntu" %}

```
apt install docker
```

{% endtab %}

{% tab title="RHEL/CentOS" %}

```
yum install docker
```

{% endtab %}
{% endtabs %}

Use `pip` (python package manager) to install *docker-compose*.

```
$ pip install docker-compose
```

### Start the node

```
$ curl "https://raw.githubusercontent.com/ltonetwork/lto-anchor-node/master/docker-compose.yml" -o docker-compose.yml
$ docker-compose up
```


# MacOS

The LTO anchor node is comprised of a set of two [Docker](https://www.docker.com/) containers. Use *docker-compose* as orchestration tool.

### Docker Desktop

{% hint style="success" %}

1. Download [Docker Desktop for macOs](https://hub.docker.com/editions/community/docker-ce-desktop-mac).
2. Double-click `Docker.dmg` to open the installer, then drag Moby the whale to the Applications folder.
3. Double-click `Docker.app` in the Applications folder to start Docker.
   {% endhint %}

For more detailed instructions please read the [Installation guide in the Docker documentation](https://docs.docker.com/docker-for-mac/install/).

*Docker Desktop includes docker-compose, so it's not needed to install that separately.*

### Start the node

{% hint style="success" %}

1. Download the [docker composer configuration file](https://raw.githubusercontent.com/ltonetwork/lto-anchor-node/master/docker-compose.yml) for LTO anchor node.
2. In Terminal run `docker-composer up`.
   {% endhint %}


# Windows

The LTO anchor node is comprised of a set of two [Docker](https://www.docker.com/) containers. Use *docker-compose* as orchestration tool.

### Docker Desktop

{% hint style="success" %}

1. Download [Docker Desktop for Windows](https://hub.docker.com/editions/community/docker-ce-desktop-windows).
2. Double-click `Docker Desktop for Windows Installer.exe` to run the installer.
3. Docker does not start automatically. To start it, search for `Docker` and select *Docker Desktop for Windows* in the search results.
   {% endhint %}

For more detailed instructions please read the [Installation guide in the Docker documentation](https://docs.docker.com/docker-for-windows/install/).

*Docker Desktop includes docker-compose, so it's not needed to install that separately.*

### Start the node

{% hint style="success" %}

1. Download the [docker composer configuration file](https://raw.githubusercontent.com/ltonetwork/lto-anchor-node/master/docker-compose.yml) for LTO anchor node.
2. In PowerShell (or another terminal) run `docker-composer up`.
   {% endhint %}


# REST API

{% hint style="info" %}
In the following examples, replace`https://lto.example.com` with the domain or IP address of **your** node.&#x20;
{% endhint %}

### Authorization

A node can be configured with an authorization token. This can be done in case the api of the node is exposed publicly. Once the token is configured the anchoring of hash on the chain requires an authorization header

```
Authorization: bearer <token>
```

## Anchor a hash on the blockchain

<mark style="color:green;">`POST`</mark> `https://lto.example.com/hash`

#### Request Body

| Name     | Type   | Description |
| -------- | ------ | ----------- |
| hash     | string |             |
| encoding | string |             |

{% tabs %}
{% tab title="200 " %}

```javascript
{
  "chainpoint": {
    "@context": "https://w3id.org/chainpoint/v2",
    "type": "ChainpointSHA256v2",
    "targetHash": "8c4b53f85243892edcbb3ccec947269f95ba3da2e84fee84fcc277b19fb68044",
    "anchors": [
      {
        "type": "LTODataTransaction",
        "sourceId": "6KVLV6zRSVR8tqCZZ9cqsbUJkP8fNDiY12CmXrGnrwTd"
      }
    ],
    "block": {
      "height": "483025"
    },
    "transaction": {
      "position": "0"
    }
  }
}
```

{% endtab %}

{% tab title="400 " %}

```
invalid body given
no hash given
invalid hash given
invalid encoding given
```

{% endtab %}

{% tab title="500 " %}

```
failed to anchor '[reason]'
```

{% endtab %}
{% endtabs %}

## Verify if a hash was anchored

<mark style="color:blue;">`GET`</mark> `https://lto.example.com/hash/:hash`

Get chainpoint info of an anchored hash.

#### Path Parameters

| Name | Type   | Description                       |
| ---- | ------ | --------------------------------- |
| hash | string | anchor hash in hexadecimal format |

{% tabs %}
{% tab title="200 " %}

```javascript
{
  "chainpoint": {
    "@context": "https://w3id.org/chainpoint/v2",
    "type": "ChainpointSHA256v2",
    "targetHash": "8c4b53f85243892edcbb3ccec947269f95ba3da2e84fee84fcc277b19fb68044",
    "anchors": [
      {
        "type": "LTODataTransaction",
        "sourceId": "6KVLV6zRSVR8tqCZZ9cqsbUJkP8fNDiY12CmXrGnrwTd"
      }
    ],
    "block": {
      "height": "483025"
    },
    "transaction": {
      "position": "0"
    }
  }
}
```

{% endtab %}

{% tab title="404 " %}

```
```

{% endtab %}

{% tab title="500 " %}

```
Failed to get transaction by hash and encoding '[reason]'
```

{% endtab %}
{% endtabs %}

## Verify if a hash was anchored

<mark style="color:blue;">`GET`</mark> `https://lto.example.com/hash/:hash/encoding/:encoding`

Get chainpoint info of an anchored hash in given encoding.

#### Path Parameters

| Name     | Type   | Description                                                                          |
| -------- | ------ | ------------------------------------------------------------------------------------ |
| hash     | string | anchored hash                                                                        |
| encoding | string | <p>The encoding in which the hash is given. Options are<br>(hex, base58, base64)</p> |

{% tabs %}
{% tab title="200 " %}

```javascript
{
  "chainpoint": {
    "@context": "https://w3id.org/chainpoint/v2",
    "type": "ChainpointSHA256v2",
    "targetHash": "8c4b53f85243892edcbb3ccec947269f95ba3da2e84fee84fcc277b19fb68044",
    "anchors": [
      {
        "type": "LTODataTransaction",
        "sourceId": "6KVLV6zRSVR8tqCZZ9cqsbUJkP8fNDiY12CmXrGnrwTd"
      }
    ],
    "block": {
      "height": "483025"
    },
    "transaction": {
      "position": "0"
    }
  }
}
```

{% endtab %}

{% tab title="400 " %}

```
invalid encoding given
```

{% endtab %}

{% tab title="404 " %}

```
```

{% endtab %}

{% tab title="500 " %}

```
Failed to get transaction by hash and encoding '[reason]'
```

{% endtab %}
{% endtabs %}


# Identity node


# Installation guide


# Linux

The LTO identity node is comprised of a set of [Docker](https://www.docker.com/) containers. Use *docker-compose* as orchestration tool.

### Install docker

{% tabs %}
{% tab title="Ubuntu" %}

```
apt install docker
```

{% endtab %}

{% tab title="RHEL/CentOS" %}

```
yum install docker
```

{% endtab %}
{% endtabs %}

Use `pip` (python package manager) to install *docker-compose*.

```
$ pip install docker-compose
```

### Start the node

```
$ curl "https://raw.githubusercontent.com/ltonetwork/lto-identity-node/master/docker-compose.yml" -o docker-compose.yml
$ docker-compose up
```


# MacOs

The LTO identity node is comprised of a set of two [Docker](https://www.docker.com/) containers. Use *docker-compose* as orchestration tool.

### Docker Desktop

{% hint style="success" %}

1. Download [Docker Desktop for macOs](https://hub.docker.com/editions/community/docker-ce-desktop-mac).
2. Double-click `Docker.dmg` to open the installer, then drag Moby the whale to the Applications folder.
3. Double-click `Docker.app` in the Applications folder to start Docker.
   {% endhint %}

For more detailed instructions please read the [Installation guide in the Docker documentation](https://docs.docker.com/docker-for-mac/install/).

*Docker Desktop includes docker-compose, so it's not needed to install that separately.*

### Start the node

{% hint style="success" %}

1. Download the [docker composer configuration file](https://raw.githubusercontent.com/ltonetwork/lto-identity-node/master/docker-compose.yml) for LTO anchor node.
2. In Terminal run `docker-composer up`.
   {% endhint %}


# Windows

The LTO identity node is comprised of a set of two [Docker](https://www.docker.com/) containers. Use *docker-compose* as orchestration tool.

### Docker Desktop

{% hint style="success" %}

1. Download [Docker Desktop for Windows](https://hub.docker.com/editions/community/docker-ce-desktop-windows).
2. Double-click `Docker Desktop for Windows Installer.exe` to run the installer.
3. Docker does not start automatically. To start it, search for `Docker` and select *Docker Desktop for Windows* in the search results.
   {% endhint %}

For more detailed instructions please read the [Installation guide in the Docker documentation](https://docs.docker.com/docker-for-windows/install/).

*Docker Desktop includes docker-compose, so it's not needed to install that separately.*

### Start the node

{% hint style="success" %}

1. Download the [docker composer configuration file](https://raw.githubusercontent.com/ltonetwork/lto-identity-node/master/docker-compose.yml) for LTO anchor node.
2. In PowerShell (or another terminal) run `docker-composer up`.
   {% endhint %}


# Configuration


# Trust network

How to configure a trust network?

The configuration of roles is flexible and can be done through modifying your node's configuration files. All of the available properties can be found under `trust_network`. For the roles to take effect, `indexing` must be set to `true`, otherwise the roles will not be stored by the indexer.

```javascript
{
  "trust_network": {
    "indexing": true,
    "roles": {
      "root": { "description": "The root role" }
    }
  }
}
```

Under `roles`, you can describe what are the roles for your trust network, giving each of them a `description`.

## Structure

The blockchain address of your *own node* is always the **root** of the network. In the example, the **university** role is an association from the **root** account to the **university** account.

```javascript
"roles": {
  "root": {
    "description": "My identity",
    "issues": [
       {"type": 100, "role": "university"},
    ]
  },
  "university": {
     "description": "University"
  }
}
```

{% hint style="warning" %}
When the trust network configuration changes, the roles need to be reindexed. Resolving roles is only deterministic if the configuration is unchanged.
{% endhint %}

### Hierarchy

A role can also issue other roles, which can be configured through the `issues` property. This can be used to create a hierarchy, where your node only creates an association to follow an authority.

```javascript
"roles": {
  "root": {
    "description": "My identity",
    "issues": [
       {"type": 101, "role": "authority"},
    ]
  },
  "authority": {
    "description": "Authority to appoint universities",
     "issues": [
       {"type": 100, "role": "university"}
     ]
  },
  "university": {
     "description": "University"
  }
}
```

Under the `issues` property, you specify which roles can be issued, and what's the type of association for that role. In the example above, **authority** role can issue **university** role to an address when the association is `type: 100`.&#x20;

{% hint style="info" %}
The `issues` property is optional. When omitted, the role is an endpoint; it can't issue other roles.
{% endhint %}

### Sub-roles

The `type` property does not mean the *id* of the role, but instead the association type. Different roles can issue differently based on the `type`. This can be used to create more complex structures.

```javascript
"roles": {
  "root": {
    "description": "My identity",
    "issues": [
       {"type": 900, "role": "ministry"},
    ]
  },
  "ministry": {
     "description": "Ministry of education",
     "issues": [
       {"type": 100, "role": "university"},
       {"type": 101, "role": "authority"} // issues "authority" for type 101
     ]
  },
  "authority": {
     "description": "Delegated authority to appoint universities",
     "issues": [
       {"type": 100, "role": "university"},
       {"type": 101, "role": "sub_authority"}, // issues "sub_authority" for type 101
     ]
  },
  "sub_authority": {
     "description": "Secondary delegated authority to appoint universities",
     "issues": [
       {"type": 100, "role": "university"},
     ]
  },
  "university": {
     "description": "University",
  }
}
```

In the example above, we can see that **ministry** can issue the roles of **university** and **authority** by resolving associations of `type: 100` and `type: 101` respectively. But **authority** issues the role of **sub\_authority** when the association is `type: 101`.

### Web of trust

In a hierarchy, there is a centralized authority who should be trusted. A web of trust is a decentralized trust network that revolves around trust relationships between identities.

```javascript
"roles": {
  "root": {
    "issues": [
       {"type": 32, "role": "level1"}
    ]
  },
  "level1": {
     "issues": [
       {"type": 32, "role": "level2"}
     ]
  },
  "level2": {
     "issues": [
       {"type": 32, "role": "level3"}
     ]
  },
  "level3": {
  }
}
```

## Authorization

[Verifiable credentials](/protocol/identities/verifiable-credentials) are used for identifying subjects, but VCs alone are not enough to provide a complete toolset for verifying the authorization layer. With the trust network, we can build an [authorization framework](https://www.w3.org/TR/vc-data-model/#authorization) to fill that gap.

The `authorization` property is an array of credential URLs that the role can issue. The framework is built on this property, which can then be used to verify the authority of a credential.

```javascript
"roles": {
  "root": {
    "description": "My identity",
    "issues": [
       {"type": 101, "role": "authority"},
    ]
  },
  "authority": {
    "description": "Authority to appoint universities",
     "issues": [
       {"type": 100, "role": "university"}
     ]
  },
  "university": {
     "description": "University",
     "authorization": [
       "https://www.w3.org/2018/credentials/examples/v1"
     ]
  }
}
```

Now we can validate that the role of **university** is an authority for issuing **/examples/v1** credential, thus providing another layer of security for the network.

{% hint style="info" %}
Every role is flexible to have multiple credentials, and those can be repeated between different roles. Both **university** and **authority** could issue the same credentials for example.
{% endhint %}

The value for `authorization` should match [JSON-LD](https://www.w3.org/TR/vc-data-model/#json-ld) URLs as used in the `@context` property of the verifiable credential. Our example of university roles contains the context for college degrees:

```javascript
// Verifiable Credential
{
  "@context": [
    "https://www.w3.org/2018/credentials/v1",
    "https://www.w3.org/2018/credentials/examples/v1"
  ],
  "id": "http://example.edu/credentials/1872",
  "credentialSubject": {
    "id": "did:example:ebfeb1f712ebc6f1c276e12ec21",
    "alumniOf": {
      "id": "did:example:c276e12ec21ebfeb1f712ebc6f1",
      "name": "Example University"
    }
  },
  ...
}
```

## Sponsored Roles

You can configure roles to be **sponsored roles**, meaning once an address receives them, a [sponsorship transaction](https://docs.ltonetwork.com/v/edge/protocol/public/transactions/sponsor) will be sent to the configured node. This allows for the authority to effectively sponsor the transactions for an address.

```javascript
"roles": {
  "authority": {
    "description": "Authority to appoint universities",
    "issues": [ {"type": 100, "role": "university"} ]
  },
  "university": {
    "description": "University",
    "sponsored": true // anyone with the role "university" will be sponsored
  }
}
```

In the same way, when an account loses its sponsored roles through revoking, a [cancel sponsorship transaction](https://docs.ltonetwork.com/v/edge/protocol/public/transactions/cancel-sponsor) will be sent, stopping the sponsor.

{% hint style="warning" %}
For sponsored roles, the account configured on the *node wallet* will be the one sponsoring the accounts that are granted the roles.
{% endhint %}

## Resolving an identity's roles

To retrieve the roles associated with an identity, you need to know the associations made with this particular address. These associations are indexed on the node, so that resolving the roles is easier and faster.

See the documentation on the [REST API](/node/identity-node/rest-api) for retrieving roles.


# REST API

{% hint style="info" %}
In the following examples, replace`https://lto.example.com` with the domain or IP address of **your** node.&#x20;
{% endhint %}

### Authorization

A node can be configured with an authorization token. This can be done in case the api of the node is exposed publicly. Once the token is configured the anchoring of hash on the chain requires an authorization header

```
Authorization: bearer <token>
```

## Decentralized identifiers (DID)

## Resolve DID

<mark style="color:blue;">`GET`</mark> `https://lto.example.com/identities/:address`

Resolve a DID into a DID document

#### Path Parameters

| Name    | Type   | Description        |
| ------- | ------ | ------------------ |
| address | string | DID or LTO address |

{% tabs %}
{% tab title="200 " %}

```
```

{% endtab %}
{% endtabs %}

## Resolve derived DID

<mark style="color:blue;">`GET`</mark> `https://lto.example.com/identities/:address/derived/:secret`

#### Path Parameters

| Name    | Type   | Description                  |
| ------- | ------ | ---------------------------- |
| address | string | DID or LTO address           |
| secret  | string | Base58 encoded random secret |

{% tabs %}
{% tab title="200 " %}

```
```

{% endtab %}
{% endtabs %}

## Trust network

## Get all the roles of an identity

<mark style="color:blue;">`GET`</mark> `https://lto.example.com/trust/:address`

Resolves the roles from an identity

#### Query Parameters

| Name    | Type   | Description                        |
| ------- | ------ | ---------------------------------- |
| address | string | Account's address in Base58 format |

{% tabs %}
{% tab title="200 " %}

```
{
  "roles": [
    "authority",
    "notary"
  ],
  "issues_roles": [
    { "type": 100, "role": "notary" }
  ],
  "issues_authorization": [
    "https://www.w3.org/2018/credentials/examples/v1"
  ]
}
```

{% endtab %}

{% tab title="400 " %}

```
{
  "error": "invalid address"
}
```

{% endtab %}
{% endtabs %}


# Workflow node

![](https://4048573506-files.gitbook.io/~/files/v0/b/gitbook-x-prod.appspot.com/o/spaces%2F-LB0RTB-jl8RVmWX9aeE-887967055%2Fuploads%2Flw0xR5NYWiPrgBGKXWgv%2Fletsflow.png?alt=media\&token=0b6255d6-ea5f-4be8-87b3-5cc6d33b5ace)

[LetsFlow is a workflow engine](https://letsflow.io) for running processes, described in YAML or JSON.

{% tabs %}
{% tab title="YAML" %}

```yaml
schema: "https://specs.letsflow.io/v0.3.0/scenario#"
title: My first scenario

actors:
  user:
    title: The user

actions:
  complete:
    title: Complete the process

states:
  initial:
    on: complete
    goto: (success)
```

{% endtab %}

{% tab title="JSON" %}

```javascript
{
    "schema": "https://specs.letsflow.io/v0.3.0/scenario#",
    "title": "My first scenario",
    "actors": {
        "user": {
            "title": "user"
        }
    },
    "actions": {
        "complete": {
            "title": "Complete the process"
        }
    },
    "states": {
        "initial": {
            "action": "complete",
            "transition": "(success)"
        }
    }
}
```

{% endtab %}

{% tab title="JSON (full)" %}

```javascript
{
    "$schema": "https://specs.letsflow.io/v0.3.0/scenario#",
    "title": "My first scenario",
    "actors": {
        "user": {
            "$schema": "https://specs.letsflow.io/v0.3.0/actor#",
            "title": "user"
        }
    },
    "actions": {
        "complete": {
            "title": "Complete the process",
            "responses": {
                "ok": {
                    "title": null,
                    "display": "always"
                    "update": [ ]
                }
            }
        }
    },
    "states": {
        "initial": {
            "actions": [
                "complete"
            ],
            "transitions": [
                {
                    "on": "*.*"
                    "goto": "(success)"
                }
            ]
        }
    }
}
```

{% endtab %}
{% endtabs %}


# Installation Guide


# MacOS

Install LTO Network full node plus supporting tools on Apple macOS Mojave.

## LTO Network full node

The LTO full node is comprised of a set of [Docker](https://www.docker.com/) containers. For development, use *docker compose* as orchestration tool.

### Docker Desktop

{% hint style="success" %}

1. Download [Docker Desktop for macOs](https://hub.docker.com/editions/community/docker-ce-desktop-mac).
2. Double-click `Docker.dmg` to open the installer, then drag Moby the whale to the Applications folder.
3. Double-click `Docker.app` in the Applications folder to start Docker.
   {% endhint %}

For more detailed instructions please read the [Installation guide in the Docker documentation](https://docs.docker.com/docker-for-mac/install/).

*Docker Desktop includes docker compose, so it's not needed to install that separately.*

### LTO full node

```
$ curl "https://raw.githubusercontent.com/legalthings/lto-deepdive/master/docker/dev/docker-compose.yml" -o docker-compose.yml
$ docker-compose up
```

## Live contracts tester

The live contract tester (`lctest`) is build on [Behat](http://behat.org/en/latest/) and runs on [PHP](https://php.net/). It requires PHP 7+ with the  *mongodb* and *yaml* PECL extension.

### PHP CLI

PHP 7 is pre-installed on macOS Mojave. Earlier versions of macOS need to update PHP using `brew`.

{% hint style="success" %}
Verify that you have a correct version of PHP by running `php -v` in the terminal.
{% endhint %}

### PECL extensions for PHP

```
$ pecl install mongodb
$ pecl install yaml
```

*The yaml extension requires* [*LibYAML*](https://pyyaml.org/wiki/LibYAML)*, which should be pre-installed on your system.*&#x20;

### lctest.phar

```
$ curl "https://github.com/legalthings/livecontracts-tester/raw/master/lctest.phar" -o lctest.phar
$ php lctest.phar --version
```


# Windows

Install LTO Network full node plus supporting tools on Windows 10.

## LTO Network full node

The LTO full node is comprised of a set of [Docker](https://www.docker.com/) containers. For development, use *docker compose* as orchestration tool.

### Docker Desktop

{% hint style="success" %}

1. Download [Docker Desktop for Windows](https://hub.docker.com/editions/community/docker-ce-desktop-windows).
2. Double-click `Docker Desktop for Windows Installer.exe` to run the installer.
3. Docker does not start automatically. To start it, search for `Docker` and select *Docker Desktop for Windows* in the search results.
   {% endhint %}

For more detailed instructions please read the [Installation guide in the Docker documentation](https://docs.docker.com/docker-for-windows/install/).

*Docker Desktop includes docker compose, so it's not needed to install that separately.*

### LTO full node

{% hint style="success" %}

1. Download the [docker composer configuration file](https://raw.githubusercontent.com/legalthings/lto-deepdive/master/docker/dev/docker-compose.yml) for LTO full node.
2. In PowerShell (or another terminal) run `docker-composer up`.
   {% endhint %}

## Live contracts tester

The live contract tester (`lctest`) is build on [Behat](http://behat.org/en/latest/) and runs on [PHP](https://php.net/). It requires PHP 7+ with the  *mongodb* and *yaml* PECL extension.

### PHP CLI

{% hint style="success" %}

1. Install the [Visual C++ Redistributable for Visual Studio 2015](http://www.microsoft.com/en-us/download/details.aspx?id=48145).
2. [Download PHP for Windows](https://windows.php.net/download/). Recommended is the 64-bit *Non-thread-safe* version.
3. Expand the zip file into the path `C:\PHP7`.
4. Configure PHP to run correctly on your system:
   1. In the `C:\PHP7` folder, rename the file `php.ini-development` to `php.ini`.
   2. Edit the `php.ini` file in a text editor (e.g. Notepad++, Atom, or Sublime Text).
   3. Change the following settings in the file and save the file:
      1. Uncomment the line that reads `; extension_dir = "ext"` (remove the `;` so the line is just `extension_dir = "ext"`).
      2. In the section where there are a bunch of `extension=` lines, uncomment the following lines:
         1. `extension=php_curl.dll`
         2. `extension=php_openssl.dll`
         3. `extension=php_sodium.dll`
5. Add `C:\PHP7` to your Windows system path:
   1. Open the System Control Panel.
   2. Click 'Advanced System Settings'.
   3. Click the 'Environment Variables...' button.
   4. Click on the `Path` row under 'System variables', and click 'Edit...'
   5. Click 'New' and add the row `C:\PHP7`.
   6. Click OK, then OK, then OK, and close out of the System Control Panel.
6. Open PowerShell (or another terminal emulator), and type in `php -v` to verify PHP is working.
   {% endhint %}

### PECL extensions for PHP

#### MongoDB

{% hint style="success" %}

1. Visit <https://windows.php.net/downloads/pecl/releases/mongodb/> and choose the latest stable version (not alpha, beta or RC).
2. Download the version that matches your PHP installation. For PHP 7.3 64-bit Non-thread-safe, choose the version that ends with `7.3-nts-vc15-x64.zip`.
3. Extract the zip file into path `C:\PHP7\ext`.
4. Configure PHP to run correctly on your system and add the following line:\
   `extension=php_mongodb.dll`.
5. In PowerShell (or another terminal emulator) type `php --re mongodb` to verify the extension is installed correctly.
   {% endhint %}

#### Yaml

{% hint style="success" %}

1. Visit <https://windows.php.net/downloads/pecl/releases/yaml/> and choose the latest stable version (not alpha, beta or RC).
2. Download the version that matches your PHP installation. For PHP 7.3 64-bit Non-thread-safe, choose the version that ends with `7.3-nts-vc15-x64.zip`.
3. Extract the zip file into path `C:\PHP7\ext`.
4. Configure PHP to run correctly on your system and add the following line:\
   `extension=php_yaml.dll`.
5. In PowerShell (or another terminal emulator) type `php --re yaml` to verify the extension is installed correctly.
   {% endhint %}

### lctest.phar

{% hint style="success" %}

1. Download [lctest.phar](https://github.com/legalthings/livecontracts-tester/raw/master/lctest.phar) from the LTO *livecontracs-tester* repository.
2. Run `php lctest.phar` to verify it's working correctly.
   {% endhint %}


# Ubuntu Linux

Install LTO Network full node plus supporting tools on Ubuntu Linux 18.04+.

## LTO Network full node

The LTO full node is comprised of a set of [Docker](https://www.docker.com/) containers. For development, use *docker compose* as orchestration tool.

### Docker

```
$ apt install docker
```

Use `pip` (python package manager) to install *docker compose*.

```
$ pip install docker-compose
```

### LTO full node

```
$ curl "https://raw.githubusercontent.com/legalthings/lto-deepdive/master/docker/dev/docker-compose.yml" -o docker-compose.yml
$ docker-compose up
```

## Live contracts tester

The live contract tester (`lctest`) is build on [Behat](http://behat.org/en/latest/) and runs on [PHP](https://php.net/). It requires PHP 7+ with the  *mongodb* and *yaml* PECL extension.

### PHP

```
$ apt install php-cli php-mongodb php-yaml php-curl php-libsodium
```

### lctest.phar

```
$ curl "https://github.com/legalthings/livecontracts-tester/raw/master/lctest.phar" -o lctest.phar
$ php lctest.phar --version
```


# REST API

The event-chain, workflow and dispatcher service all expose REST APIs. These are available through the LTO API gateway service which acts as a proxy server.

{% hint style="info" %}
In the following examples, replace`https://lto.example.com` with the domain or IP address of **your** node.&#x20;
{% endhint %}

### LTO API client libraries

It's recommended to use one of the LTO API client libraries if available. These libraries are configured to correctly sign requests.

[Read more](broken://pages/-LbfVT5_WUPHbav2pvvJ)

### HTTP Signature

All requests need to be signed following the [HTTP Signatures specification](https://tools.ietf.org/html/draft-cavage-http-signatures-10) using your ED25519 key set. Each request must have `Date` header. Request with a body like `POST` and `PUT` requests, must have a `Content-Type` and `Digest` header. The `(request-uri)` must also be part of the signature.

The `KeyId` must be the base58 encoded public ED25519 key. The `algorithm` may be either `ed25519` or `ed25519-sha256`. If you use the the SHA-256 version, the signature string needs to be hashed. The signature must be ***base64*** encoded as required by the http signatures specifications.

### Digest

The HTTP signature string is only constructed from the HTTP headers, not the body. To make sure the body hasn't been manipulated, requests are required to have a `Digest` header as described in [RFC 3230](https://tools.ietf.org/html/rfc3230). The digest needs to be a SHA-256 hash.

*Note that the Digest header, is a different specification than HTTP Digest Authentication.*


# What are Ownables?

<figure><img src="https://4048573506-files.gitbook.io/~/files/v0/b/gitbook-x-prod.appspot.com/o/spaces%2F-LB0RTB-jl8RVmWX9aeE-887967055%2Fuploads%2FZ14UuSIAAdw6NAofVh9u%2Fownables_twitter.png?alt=media&amp;token=0afcd30e-435c-4a65-8dd1-6ebb2d46527e" alt=""><figcaption></figcaption></figure>

Ownables are digital assets that live in your wallet. To understand the power of Ownables, we first need to look at how NFTs and blockchain wallets work.

A blockchain wallet doesn’t hold NFTs. It only holds key pairs which are used for cryptographic signatures. Each key pair is associated with a blockchain address. For an NFT, an on-chain record is kept connecting a unique number with the owner’s address. Transferring or interacting with the NFT requires the owner to sign with its private key.

Ownables flip this concept around. **Everything concerning the Ownable is stored in your wallet.** Not only images or media but also the smart contract and event chain. We have also made it possible to embed whole applications, opening up a world of endless possibilities.

What makes LTO Network unique is that it’s a hybrid blockchain with a public and private layer. The private layer allows holding info privately, delegating consensus to the public layer. Ownables live on the [Private layer](/protocol/private).

<figure><img src="https://4048573506-files.gitbook.io/~/files/v0/b/gitbook-x-prod.appspot.com/o/spaces%2F-LB0RTB-jl8RVmWX9aeE-887967055%2Fuploads%2FhISGuoT8vyWLtzZLo6ag%2Fscreenshot-ltonetwork.com-2023.01.31-10_10_25.png?alt=media&amp;token=e5f163dc-3a79-4c3e-81be-20ea8c8fbfc9" alt=""><figcaption></figcaption></figure>

Since there are no gas fees and no costs for the size of the contracts, smart contracts on the private layer may be larger and more complex than typical blockchain contracts.

* These smart contracts aren’t run on a node but are executed directly in your wallet.
* Ownable contracts are never published on-chain. They're obtained using a [bridge](/ownables/ownables-bridge).
* Smart contracts are compiled into WebAssembly using the [CosmWasm](https://cosmwasm.com/) standard library.&#x20;
* They run in a sandboxed and deterministic runtime environment.

Smart Contracts are typically written in Rust, but any WebAssembly program can function as a smart contract with only a few constraints. The main constraint is that the contract must be deterministic. That means that the state of the contract can only be changed through events that have been added to the event chain. Information about ownership is part of the state of the contract.

{% hint style="success" %}
Want to explore Ownables and create your own? [Get started with Ownables SDK.](/ownables/ownables-sdk)
{% endhint %}


# Making your first ownable

Ownables can vary from simple static widgets to dynamic stateful widgets. In this guide, we will provide you with an example to create a **static ownable**, since it's the easiest to get started with.

## What is a static ownable?

A static ownable is a non-interactive asset. A common example of this would be an image, such as a piece of art, or a video, representing a 3D model.

To create a simple static ownable, all you need to do is create 3 files, zip them, and upload them to the ownable wallet. In the guide below we will describe this process.

## Required files

There are at least two files required to create a static ownable, a `package.json` and a `index.html`. These files are described in more detail below.

Alongside these 2 files, you should also provide a representation of the ownable, such as an image or video. All of these files should be placed inside a folder, which you should name after the ownable that you want to create.

In this example, we will create an ownable that represents the LTO Network logo. For this, we first have to create a folder named `lto-logo`. which contains an image `lto.jpg`. The image can be downloaded [here](https://avatars.githubusercontent.com/u/50703120).

```
lto-logo
  package.json
  index.html
  lto.jpg
```

Feel free to change the image and name of the folder, based on the ownable you want to create.

### package.json

This file contains basic information about the ownable, such as its name and description, and should at least contain the following:

```json
{
  "name": "ownable-lto-logo",
  "description": "The LTO logo as an ownable"
}
```

You should replace the name and description based on what your ownable should represent.

### index.html

This file contains the actual representation of the ownable widget. It can be styled using html and css. In this case, we are loading the `lto.jpg` file, which is the image that is used to represent the widget.

```html
<html lang="">
  <head>
    <title>LTO logo</title>
    <style>
      html, body {
        margin: 0;
        height: 100%;
      }

      body {
        width: 100%;
        height: 100%;
        overflow: hidden;
      }

      img {
        width: 100%;
        height: 100%;
      }
    </style>
  </head>
  <body>
    <img src="lto.jpg"/>
  </body>
</html>
```

You can use this template and customize it to display your own ownable widget. All you have to do is replace the title used in `<title>` and the image used in `<img src>`.

{% hint style="warning" %}
Please note that widgets cannot make HTTP calls, which means that every asset used should be provided in the folder of the ownable. You cannot load things such as images from the internet, they need to be provided in the folder of the ownable.
{% endhint %}

## Publishing the ownable

Now that we have created all of the required files, we can upload them to the ownables wallet by following these steps:

1. Zip up the contents of the ownable folder. In this example, we created a folder named `lto-logo`, so we will zip that. Ensure that the zip does not contain the folder, but that the files of the folder are directly in it.
2. Navigate to <https://demo.ownables.info>. Keep in mind that this is our testnet environment, and you will not be charged to create an ownable. In the future when we have a mainnet environment, creating an ownable will require a fee.
3. You will be prompted to create an account or import an existing LTO wallet based on a seed. Choose whichever option applies to you. For testing purposes just create a new account.
4. Click on the plus icon on the bottom right. A popup window will be shown. Now click on the `Import packages` button and select your zip file.
5. Your new ownable should now be imported. Select your ownable in the list that is shown in the popup window and it should be forged!

## What to do next?

You have now created your first static ownable! Feel free to browse our example ownable templates, which vary from easy to complex. You can find our example ownables [here](https://github.com/ltonetwork/ownables-sdk#examples). For more information about ownables, please continue reading to discover our ownables SDK.


# Ownables SDK

<figure><img src="https://4048573506-files.gitbook.io/~/files/v0/b/gitbook-x-prod.appspot.com/o/spaces%2F-LB0RTB-jl8RVmWX9aeE-887967055%2Fuploads%2FbB7klECixpwrBXrgvdpf%2Fsdk_header_2.png?alt=media&amp;token=91fab721-d64f-459f-b343-185d5d0e64aa" alt=""><figcaption></figcaption></figure>

Ownables are CosmWasm smart contracts that define ownership. Instead of running on a blockchain node, Ownables run directly in a wallet using the LTO Network [private layer](/protocol/private).

Looking into [CosmWasm](https://cosmwasm.com/) smart contracts and [WebAssembly](https://webassembly.org/) is a great idea to grasp the fundamentals upon which Ownables are designed.

{% embed url="<https://youtu.be/O18Ra3vkhUM>" %}

{% content-ref url="/pages/4rYot8OgCHqPOirLagnu" %}
[Prerequisites](/ownables/ownables-sdk/prerequisites)
{% endcontent-ref %}

{% content-ref url="/pages/XtxIgshJrOXrelzKeWLV" %}
[Setup](/ownables/ownables-sdk/setup)
{% endcontent-ref %}


# Prerequisites

#### Summary

The following dependencies will be required to develop OWNABLES:

* `git`
* `rustc` and `cargo` versions 1.61.0 or later
* `clang`
* `npm` version 8.11.0 or later
* `node` version 16.15.0 or later
* `wasm-pack` version 0.10.2 or later

If you do not have the above dependencies on your machine, see the sections below for instructions.

### Git

[Download and install git](https://git-scm.com/downloads). Git is a version control system. It's used to fetch the Ownables SDK from GitHub.

Alternatively, you can use [GitHub desktop](https://desktop.github.com/), which is more user-friendly.

### Rust and Cargo

Ownable packages are built with Rust.

To install Rust and its package manager Cargo, follow the official [documentation guide from the Rust Book](https://doc.rust-lang.org/cargo/getting-started/installation.html). On Linux and macOS systems, this is done as follows:

```shell-session
$ curl https://sh.rustup.rs -sSf | sh
```

Verify the installation by checking the version:

```shell-session
$ cargo version
```

The version should be 1.61.0 or later.

### clang

Rust may depend on [clang](https://clang.llvm.org/) for building an ownable. Install clang, if you come across the following error

```
Failed to find tool. Is `clang` installed?
```

On Mac, clang should come pre-installed. On Linux you should be able to install it from the distro's repository. E.g. on Ubuntu Linux run

<pre class="language-shell-session"><code class="lang-shell-session"><strong>$ apt install clang
</strong></code></pre>

### Node and npm

`npm` will be needed for running the local wallet instance and building the OWNABLES packages.

Install it as described on the official [Node.js website](https://nodejs.org/en/download/).

Verify the installation with:

<pre class="language-shell-session"><code class="lang-shell-session"><strong>$ npm -v
</strong>$ node -v
</code></pre>

The node version should be 16.15.0 or later. The npm version should be 8.11.0 or later.

### wasm-pack

The smart contracts written in Rust need to be compiled to WebAssembly. This way we can easily interact with them in our wallet.

`wasm-pack` makes building and working with rust-generated WASM easy.&#x20;

Follow the latest steps described in [their official documentation](https://rustwasm.github.io/wasm-pack/installer/#) to install it. On Linux and macOS systems, this is done as follows:

```shell-session
$ curl https://rustwasm.github.io/wasm-pack/installer/init.sh -sSf | sh
```

Once that is done, verify the installation:

```shell-session
$ wasm-pack -V
```

The version should be 0.10.2 or later.

### Code editor (optional)

Any editor you prefer will do the job, but there are a few recommendations worth looking into here.

First is the VSCode editor which you can download from the [official source](https://code.visualstudio.com/). Along with it, you may consider installing [this](https://marketplace.visualstudio.com/items?itemName=rust-lang.rust) Rust plugin to help with syntax highlighting and other amenities.

Another great pick is the [WebStorm by Jetbrains](https://www.jetbrains.com/webstorm/). JetBrains provides a Rust [plugin](https://intellij-rust.github.io/) which is very useful to help with the development flow.


# Setup

### Cloning the base repository

First, you will need to clone the base `ownables-sdk` [repository](https://github.com/ltonetwork/ownable-demo) and save it under your preferred location.

```shell-session
$ git clone git@github.com:ltonetwork/ownable-sdk.git
$ cd ownable-sdk
```

Open it in your preferred editor and proceed to the next section.

### Starting the demo wallet

First, navigate to the wallet directory and install the dependencies:

```shell-session
$ cd www/
$ npm i
```

We can now start the wallet:

```shell-session
$ npm run start
```

Once that is done, navigate to <http://localhost:8080/> and you should see an empty wallet that is ready to import OWNABLES packages.

<figure><img src="https://4048573506-files.gitbook.io/~/files/v0/b/gitbook-x-prod.appspot.com/o/spaces%2F-LB0RTB-jl8RVmWX9aeE-887967055%2Fuploads%2Fwo8NHw9T9TaPI6bjXADd%2Fownables_wallet_empty.jpg?alt=media&amp;token=cd4e26fd-8b0f-4643-86f8-1d63d2681f2d" alt=""><figcaption><p>Empty wallet</p></figcaption></figure>

### Building the Ownable

Now that the wallet is running, we need some Ownable packages that we can import.

There are a few handy commands for that.

The `ownables:build` script, which takes a `--package` parameter that specifies which OWNABLE should be packaged. The potion OWNABLE is built by running:

```shell-session
$ npm run ownables:build --package=potion
```

Running this will produce a zip file containing the Ownable under `ownables` folder.

Now we can go back to our wallet and click the :heavy\_plus\_sign: icon at the bottom right. This will open an action menu in which we can choose to import a new Ownable from a file and select the zipped package from the previous step.

After importing the potion Ownable package, there will be another option in the action menu named **potion**, clicking on which will issue the Ownable.

<figure><img src="https://4048573506-files.gitbook.io/~/files/v0/b/gitbook-x-prod.appspot.com/o/spaces%2F-LB0RTB-jl8RVmWX9aeE-887967055%2Fuploads%2FML65eIRX6qmCwIQRPw96%2Fownables_wallet_initialized.png?alt=media&amp;token=7176da19-e8c5-457d-8a0d-d34f46baa22a" alt=""><figcaption><p>Wallet with an Ownable</p></figcaption></figure>

*Success!* The issued Ownable will be visible in your wallet.

#### Building all Ownables

In case you want to build all Ownables in your project at once, run:

```shell-session
$ npm run ownables:build-all
```

It will simply run the previous script in every directory under `/ownables` .

{% hint style="info" %}
To get more insight on how to build your own custom Ownable read about the [Ownable Architecture](/ownables/ownables-architecture/smart-contract).
{% endhint %}


# Ownables Architecture


# Smart Contract

The architecture of Ownables follows that of a general CosmWasm contract. The only exception is that instead of deploying the contract on-chain and interacting with it that way, Ownable contracts are executed locally.

The wallet expects some methods from `ownable-std` to be used.

### Rust

**`msg.rs`**

Message file defines the expected interface for messages that are passed to our smart contract. You are free to introduce your own custom variants and fields for each message, but there are some macros provided by the `ownable-std` crate.

Lets look at an example with all macros enabled:

<pre class="language-rust"><code class="lang-rust">use cosmwasm_std::{Addr};
use ownable_std::NFT;
use schemars::JsonSchema;
use serde::{Deserialize, Serialize};
use ownable_std_macros::{
    ownables_transfer, ownables_lock,
    ownables_query_info, ownables_query_locked, ownables_query_metadata,
    ownables_query_consumer_of, ownables_query_widget_state,
    ownables_instantiate_msg
};

#[ownables_instantiate_msg]
#[derive(Serialize, Deserialize, Clone, Debug, PartialEq, JsonSchema)]
#[serde(rename_all = "snake_case")]
pub struct InstantiateMsg {}

#[ownables_transfer]
#[ownables_lock]
#[derive(Serialize, Deserialize, Clone, Debug, PartialEq, JsonSchema)]
#[serde(rename_all = "snake_case")]
pub enum ExecuteMsg {}
<strong>
</strong><strong>#[ownables_query_info]
</strong>#[ownables_query_locked]
#[ownables_query_metadata]
#[ownables_query_consumer_of]
#[ownables_query_widget_state]
#[derive(Serialize, Deserialize, Clone, Debug, PartialEq, JsonSchema)]
#[serde(rename_all = "snake_case")]
pub enum QueryMsg {}
</code></pre>

Procedural macros like `#[`ownables\_instantiate\_msg`]` will introduce properties expected by the Ownable architecture. In the instantiation case, it would merge the `InstantiateMsg` defined by you with all its properties with the following:

```rust
struct InstantiateMsg {
    pub ownable_id: String,
    pub package: String,
    pub nft: Option<NFT>,
    pub ownable_type: Option<String>,
    pub network_id: u8,
}
```

For the `ExecuteMsg` case, having the #\[ownables\_transfer] and #\[ownables\_lock] will produce the following enum:

```rust
pub enum ExecuteMsg {
    Transfer { to: Addr },
    Lock {},
}
```

And for `QueryMsg`, the following:

```rust
pub enum QueryMsg {
    GetInfo {},
    GetMetadata {},
    GetWidgetState {},
    IsLocked {},
    IsConsumerOf { issuer: Addr, consumable_type: String, },
}
```

If you are curious about the properties/variants being introduced, feel free to take a look at [ownable-std](https://github.com/ltonetwork/ownable-std/blob/main/macros/ownable-std-macros/src/lib.rs).

A few things are important to note that apply to all cases. First, ownable-std macro annotations should be declared above any derive and serde macros (as in the examples above).

Second, you are free to introduce any variants/fields that are necessary for your ownable.

Consider the following `ExecuteMsg`:

```rust
#[ownables_transfer]
#[ownables_lock]
#[derive(Serialize, Deserialize, Clone, Debug, PartialEq, JsonSchema)]
#[serde(rename_all = "snake_case")]
pub enum ExecuteMsg {
    ChangeColor { new_color: String, },
} 
```

&#x20;After compiling, the `ExecuteMsg` will look like the following:

```rust
pub enum ExecuteMsg {
    ChangeColor { new_color: String, },
    Transfer { to: Addr },
    Lock {},
}
```

**`contract.rs`**

In the contract file, we define the logic that will update and query the state of our contract.

The `instantiate()` method should extract the necessary properties from its arguments and save them into the appropriate `cw_storage_plus::Item` defined in `state.rs`. If everything goes well, we return the `Ok()` response with all the relevant properties that have been saved to the host wallet.

`execute()` will contain any functions that the Ownable may contain. At the very least, having a transfer method is expected, but even that is technically optional if you want your Ownable to be non-transferable. Any logic surrounding that should be implemented by you. With the appropriate `Item.update()` , the state will be updated to reflect the results of execution (if any).

Usually in your `execute()` you will need to exhaustively match all variants available in `ExecuteMsg` defined in our `msg.rs` file. Given a transferable and lockable ownable, it may make sense to route the execution to respective methods:

```rust
match msg {
        ExecuteMsg::Transfer { to } => try_transfer(info, deps, to),
        ExecuteMsg::Lock {} => try_lock(info, deps),
}
```

`try_transfer` and `try_lock` are the methods where you will define your application logic related to transfering and locking the ownable.

With `query()` method we query the contract state. `Item.load()` will load the existing state variables, which you can then use to return the desired type (in the expected binary format). Considering our `QueryMsg` definition above, our query entry point may look like this:

```rust
pub fn query(deps: Deps, _env: Env, msg: QueryMsg) -> StdResult<Binary> {
    match msg {
        QueryMsg::GetInfo {} => query_ownable_info(deps),
        QueryMsg::GetMetadata {} => query_ownable_metadata(deps),
        QueryMsg::GetWidgetState {} => query_ownable_widget_state(deps),
        QueryMsg::IsLocked {} => query_lock_state(deps),
        QueryMsg::IsConsumerOf {
            issuer,
            consumable_type
        } => query_is_consumer_of(deps, issuer, consumable_type),
    }
}
```

Once again, logic in methods like `query_ownable_info` is entirely up to you. In general they will involve loading the appropriate state variables, building your return object, and converting it to `StdResult<Binary>`.&#x20;

**`state.rs`**

We use the state to define what properties our Ownables should have.

In most cases you will only be required to define your own `Config` struct containing any properties specific to your design.

Other than that, you should store the following properties to allow your Ownable to be bridged, have metadata (defined in the [CW721 spec](https://github.com/CosmWasm/cw-nfts/blob/main/packages/cw721/README.md)), and to have the unlockable content:

```rust
pub const OWNABLE_INFO: Item<OwnableInfo> = Item::new("ownable_info");
pub const METADATA: Item<Metadata> = Item::new("metadata");
pub const NFT_ITEM: Item<NFT> = Item::new("nft");
pub const LOCKED: Item<bool> = Item::new("locked");
pub const PACKAGE_CID: Item<String> = Item::new("package_cid");
pub const NETWORK_ID: Item<u8> = Item::new("network_id");
```

Properties like `OwnableInfo`, `Metadata`, and `NFT` should be imported from the `ownable-std` package.

**`lib.rs`**

`lib.rs` defines the entry point into our contract logic. It accepts and produces JSON (`JsValue` or `JsError`), which the wallet/dApp expects and interprets.&#x20;

In turn, `lib` methods will call the respective `contract.rs` methods that contain the actual execution logic.

{% hint style="warning" %}
The code here should not change, as the wallet expects the functions to have the parameters and return values as they are defined.
{% endhint %}


# Widget

The other side of the Ownable package will contain the visual elements: HTML, and media files like images and videos.

### HTML

The `index.html` file will be rendered as widget in the wallet. It should have a structure resembling the following:

```html
<html>
  <head>
    <style>
      // all the styles for your ownable
    </style>
  </head>
  <body>
    <div>
      // your ownable html
    </div>
    <script>
      // any necessary functions
    </script>
  </body>
```

### Styling

The styling should be responsive on all devices. As the wallet will render your provided template, you are in complete control of how it will be displayed.

The widgets in which the Ownables will be placed always have a 1:1 aspect ratio (square). Use the [viewport units](https://css-tricks.com/fun-viewport-units/) `vh` and `vw`, and/or [`aspect-ratio`](https://developer.mozilla.org/en-US/docs/Web/CSS/aspect-ratio) to ensure the content of the widget properly scales.

```css
.square {
  width: 50vw;
  height: 50vh;
  border: 1px solid black;
}

img.banner {
  width: 80vw;
  aspect-ratio: 4:1;
}
```

### Javascript

Ownable templates communicate with the wallet via messages.

An `execute` message can be sent to the window parent, which will be forwarded to the CosmWasm smart contract and stored on the event chain.

```javascript
window.parent.postMessage({
  type: "execute",
  ownable_id: ownable_id,
  msg: {
    "do_something: {}
  }
});
```

The widget will receive a message from the parent window after the state of the smart contract changes.

```javascript
window.addEventListener("message", (event) => {
  const state = event.data.state;
  document.getElementById("my_element").style.backgroundColor = state.color;
});
```

#### Example

If we consider the potion example which you can find in our demo repository, the script part of our HTML template may contain methods like this:

```javascript
// Listen for a click on the button defined in the html template
// which will trigger the consume method
document.getElementById("drink-button").addEventListener('click', () => consume());

function consume() {
  // building the message to be passed to WASM for execution
  // this should match the msg expected by the lib.rs entry points
  let msg = {
    "consume": {
      "amount": getDrinkAmount(),
    },
  };
  // posting the message to the wallet which will relay it to WASM
  // check index.js for the listener to see how it does it
  // https://github.com/ltonetwork/ownable-demo/blob/eb0bda9c323659a78d69bd669861f46473d16fa2/www/index.js#L163
  window.parent.postMessage({type: "execute", ownable_id, msg}, "*");
}

// gets the selected amount to drink from the html slider
function getDrinkAmount() {
  let stringAmount = document.getElementsByClassName('slider')[0].valueOf().value;
  return parseInt(stringAmount);
}

// listener for the wallet messages indicating the state after the execute msg
// see wasm-wrappers.js for details:
// https://github.com/ltonetwork/ownable-demo/blob/main/www/wasm-wrappers.js#L210-L217
window.addEventListener("message", (event) => {
  const state = event.data.state;
  updateTemplate(state.color, state.current_amount)
});

// method to update the visual template defined in the html file
function updateTemplate(color, amt) {
  document.getElementsByClassName('juice')[0].style.backgroundColor = color;
  document.getElementsByClassName('juice')[0].style.top = (100 - amt) + '%';
  document.getElementsByClassName('juice')[0].style.height = amt + '%';
  document.getElementsByClassName('amount')[0].textContent = amt;
}
```


# Ownables Bridge

An OWNABLE can be presented as unlockable content for an NFT. This allows OWNABLES to be traded on platforms like [OpenSea](https://opensea.io/) and [Rarible](https://rarible.com/).

At any time, either the NFT or the OWNABLE is locked. When the NFT is unlocked and tradable, the OWNABLE needs to be in the locked state and uploaded to an OWNABLES bridge. The bridge allows the new NFT owner to obtain the OWNABLE.

## Universal Wallet

As the owner of the NFT, you can obtain your OWNABLE using LTO's [Universal Wallet](/wallets/universal-wallet).

Universal Wallet will show your Ethereum (EIP-155) address in addition to your LTO address. If you create an account with the seed phrase from your Ethereum wallet, like Metamask, you'll notice that the Ethereum address will match. Alternatively, if you create a new account, you'll first need to transfer the NFT to the displayed Ethereum address.

{% hint style="warning" %}
When bridging, the cipher (cryptographic protocol) of the LTO wallet must match that of the blockchain the NFT is on. If the NFT is on an EVM network, like Ethereum, you're only able to obtain the Ownable with an [secp256k1](/protocol/accounts#secp256k1) account.
{% endhint %}

### Obtaining the OWNABLE

Before the NFT can be downloaded from the bridge, the NFT will be locked. Universal Wallet will send a transaction with a `lock` call to the NFT smart contract. You'll need to be able to pay the gas fee of the transaction from the wallet address.

Once the NFT is locked, Universal Wallet will download the OWNABLE package and event chain from the bridge. The download request is signed by the wallet, allowing the bridge to verify that you are the owner of the NFT. The NFT contract emits a `Lock` event.

The downloaded OWBNABLE is instantiated within your wallet. The wallet will unlock the OWNABLE, using the `Lock` event of the NFT contract as proof.

### Unlocking the NFT

While you'll remain the owner of the NFT, you'll be unable to transfer it until it's unlocked. To unlock the NFT, you'll need to send the OWNABLE to the bridge.

Universal Wallet will start by locking the OWNABLE. Only locked OWNABLES are accepted by the bridge. This ensures that the OWNABLE isn't modified while bridged.

Both the OWNABLE package and event chain are uploaded to the bridge. The bridge will verify the event chain and make sure that the OWNABLE you are indeed the current owner. It will send proof in the form of a cryptographic signature. This proof is needed to unlock the NFT

The wallet will send a transaction with an `unlock` call to the NFT smart contract, passing the cryptographic proof it got from the bridge.

Once unlocked, you'll able to transfer and trade it on an NFT platform.

## Choosing a Bridge

Anyone is able to host an OWNABLE bridge. It's up to the issuer of the NFT contract to decide which bridge or bridges can be used. Only cryptographic proof of a bridge that's authorized by the smart contract, can be used to unlock the NFT.

By default, Universal Wallet will continue to use the bridge it obtained the OWNABLE from. If multiple bridges are authorized you'll be able to switch bridges in the app.

### Backup

A bridge *may* offer to backup up the OWNABLE package and event chain. This is an extra safeguard to ensure the OWNABLE is never lost. However, it should not be used to replace the cloud backup made by Universal Wallet.


# Templates Overview

## Overview

Currently, the oBuilder creates Ownables with different feature sets for the users. Each different feature requires a different Ownable template for the internal LTO based flow of cosm/wasm Smart Contract compilation to reflect the required functionality.&#x20;

### Example of different functionalities

* Template 1: Ownable with a picture, thumbnail, name, description, keywords, owner
* Template 2: Ownable with a picture, thumbnail, name, description, keywords, owner + rwacontract.html (resides in parallel to the index.html file under assets directory)
* Template 3: (feature not enabled yet) Ownable with a picture, thumbnail, name, description, keywords, owner + audio file and/or short movie file&#x20;

### Templates folder structure

All templates are structured as Rust-based smart contracts with web assets:

```markup
template/
├── assets/ # Directory for web assets for the NFT
│ ├── index.html # Main HTML file
│ └── [other assets] # Template-specific assets
├── src/ # Rust smart contract code directory
│ ├── contract.rs # Main contract file
│ ├── error.rs # Errors file
│ ├── lib.rs # Library file
│ ├── msg.rs # Messages file
│ └── state.rs # State file
├── .cargo/ # Directory for rust configuration
│ └── config # Configuration file
├── examples/ # Directory for schema examples
│ └── schema.rs # Schema example
├── Cargo.toml # Cargo package manifest
└── rustfmt.toml # Rust formatting configuration
```

## Template Modifications

### Placeholder system overview

The templates use a placeholder system where specific tags in the code are replaced during the ownable creation process. These placeholders allow customization of the ownable's appearance, metadata, and functionality.

### Placeholders by File

#### Cargo.toml

Contains package metadata placeholders:

* PLACEHOLDER1\_NAME - Package name (e.g., "ownable\_my\_artwork")
* PLACEHOLDER1\_DESCRIPTION - Package description
* PLACEHOLDER1\_VERSION - Package version
* PLACEHOLDER1\_AUTHORS - Package authors
* PLACEHOLDER1\_KEYWORDS - Package keywords (as array)

```
[package]
name = PLACEHOLDER1_NAME
description = PLACEHOLDER1_DESCRIPTION
version = PLACEHOLDER1_VERSION
authors = [PLACEHOLDER1_AUTHORS]
edition = "2018"
keywords = [PLACEHOLDER1_KEYWORDS]
```

#### assets/index.html

Contains display/visual placeholders:

* PLACEHOLDER2\_TITLE - Title displayed in the browser tab
* PLACEHOLDER2\_IMG - Image file path for displaying the main image

```html
<html lang="">

<head>
	<title>PLACEHOLDER2_TITLE</title>
	...
	
<body>
	<div class="image-container">
		<img src=PLACEHOLDER2_IMG/>
	</div>
</body>
```

#### examples/schema.rs

Contains code module reference placeholders:

* PLACEHOLDER3\_MSG - Module path for message types
* PLACEHOLDER3\_STATE - Module path for state types

```rust
use PLACEHOLDER3_MSG::msg::{InstantiateMsg, ExecuteMsg, QueryMsg};
use PLACEHOLDER3_STATE::state::{Config};
```

#### src/contract.rs

Contains contract identity placeholders:

* PLACEHOLDER4\_CONTRACT\_NAME - Name of the smart contract
* PLACEHOLDER4\_TYPE - Type identifier for the ownable
* PLACEHOLDER4\_DESCRIPTION - Detailed description
* PLACEHOLDER4\_NAME - Display name

```rust
const CONTRACT_NAME: &str = PLACEHOLDER4_CONTRACT_NAME;
const CONTRACT_VERSION: &str = env!("CARGO_PKG_VERSION");

pub fn instantiate(
    deps: DepsMut,
    _env: Env,
    info: MessageInfo,
    msg: InstantiateMsg,
) -> Result<Response, ContractError> {
    set_contract_version(deps.storage, CONTRACT_NAME, CONTRACT_VERSION)?;

    let derived_addr = address_lto(
        msg.network_id as char,
        info.sender.to_string()
    )?;

    let ownable_info = OwnableInfo {
        owner: derived_addr.clone(),
        issuer: derived_addr.clone(),
        ownable_type: Some(PLACEHOLDER4_TYPE.to_string()),
    };

    let metadata = Metadata {
        image: None,
        image_data: None,
        external_url: None,
        description: Some(PLACEHOLDER4_DESCRIPTION.to_string()),
        name: Some(PLACEHOLDER4_NAME.to_string()),
        background_color: None,
        animation_url: None,
        youtube_url: None
    };
```

### How Modifications Work

The user changes the different PLACEHOLDER in the template file used to create the Ownable and the ownable will be unique to the user specified variables:

For example, when a user creates an Ownable with an image named "artwork.webp" with title "My Digital Artwork":

* PLACEHOLDER2\_TITLE becomes "My Digital Artwork"
* PLACEHOLDER2\_IMG becomes "artwork.webp"
* Other placeholders must be changed by the user in the same manner

This template system allows the same base templates to create unique ownables with different content, metadata, and appearance while maintaining consistent smart contract functionality.

### Placeholder Mapping Example

The oBuilder e.g. uses the following placeholder ownableData.json to create the Ownables. The user should use a similar approach.

```
[
  {
    "PLACEHOLDER1_NAME": "ownable_my_artwork",
    "PLACEHOLDER1_DESCRIPTION": "My amazing artwork description",
    "PLACEHOLDER1_VERSION": "0.1.0",
    "PLACEHOLDER1_AUTHORS": "John Doe",
    "PLACEHOLDER1_KEYWORDS": ["art", "digital", "nft"],
    "PLACEHOLDER2_TITLE": "My Digital Artwork",
    "PLACEHOLDER2_IMG": "artwork.webp",
    "PLACEHOLDER4_TYPE": "artwork",
    "PLACEHOLDER4_DESCRIPTION": "A detailed description of my artwork",
    "PLACEHOLDER4_NAME": "My Artwork NFT"
  }
]
```

### Template Differences:

* Template 1: Basic template with standard assets
* Template 2: Enhanced template with additional HTML file (rwacontract.html)
* Template 3: Alternative templates with different assets such as audio or short video files (Not yet implemented)
* More coming up...!


# JavaScript

JavaScript / TypeScript client library for interacting with LTO Network

{% hint style="success" %}
Visit the [project on GitHub](https://github.com/ltonetwork/lto-api.js).
{% endhint %}

## Installation

```
npm install @ltonetwork/api --save
```

## Usage

```javascript
import LTO from '@ltonetwork/lto';
import { Transfer } from '@ltonetwork/transactions';
import { Event } from '@ltonetwork/events';
import { Message } from '@ltonetwork/messages';

// Account
const lto = new LTO('T'); // 'T' for testnet, 'L' for mainnet
const account = lto.account();

// Public layer
const amount = 1000;
const recipient = "3JmEPiCpfL4p5WswT21ZpWKND5apPs2hTMB";

const transaction = new Transfer(recipient, amount).signWith(account);
await lto.node.broadcast(transaction);

// Private layer
const chain = new EventChain(account);

const body = {
  '@context': 'instantiate_msg.json',
  ownable_id: '88pDRu52FpsU3kKHwdvPV21RMkBqVqNnthjfdCesTHQhLnUpanw49n6b2PzGnEy',
  package: 'bafybeie4ts4mbcw4pswzh45bj32ulcyztup2dr7zbbjv3y2ym3q3uuejba',
  network_id: 'T',
};

new Event(body).addTo(chain).signWith(account);

const message = new Message(chain).to(recipient).signWith(account);
await lto.anchor(message.hash);
await lto.relay.send(message);
```

## Testnet

To obtain testnet tokens, please join the [@ltotech Telegram group](broken://spaces/-MBYc9qN1f4JIHaaKv_7/pages/-MBZl07aA4kueaeoPZW3) and ask for testnet tokens. Testnet tokens will be provided to you by the community for free.


# Accounts

## **Creation**

You can create a new account with a random seed with keypair (ed25519):

```javascript
import LTO from '@ltonetwork/lto';

const lto = new LTO('T');
const account = lto.account();

console.log(account.seed);  // lion devote brush lemon salmon eyebrow near autumn aspect april ugly position dismiss suit finger
console.log(account.publicKey);  // AvWa7XokpR284pNCnoKZhudQdNA5AV3PXPi6HhggAhbT
console.log(account.privateKey);  // 4dXzhzRcpiukcRBUGfre8s8aRaUqwyKHUzfbQTtNRRMFxZXQ6BsbfKPbA2QVBELNjoxxy6NQkii6HVg1zPzti4mB
```

It's also possible to recover a keypair from an existing seed:

```javascript
import LTO from '@ltonetwork/lto';

const lto = new LTO('T');
const seed = 'satisfy sustain shiver skill betray mother appear pupil coconut weasel firm top puzzle monkey seek';
const account = lto.account({ seed });
```

### Nonce

You can create multiple accounts from a single seed phrase, by passing a nonce.

```javascript
import LTO from '@ltonetwork/lto';

const lto = new LTO('T');
const seed = 'satisfy sustain shiver skill betray mother appear pupil coconut weasel firm top puzzle monkey seek';

const account1 = lto.account({ seed, nonce: 0 });
const account2 = lto.account({ seed, nonce: 1 });
const account3 = lto.account({ seed, nonce: 2 });
```

Alternatively, pass a binary value as a nonce. Use the `Binary` class to convert a string to a binary value

```javascript
const account4 = lto.account({ seed, nonce: new Binary('some value') });
```

### **Child accounts**

Instead of specifying the `seed`, you can specify a parent account and a nonce to create a child account. Transactions signed by the child account will be co-signed by the parent so that the parent account will pay the transaction fee.

```javascript
const child = lto.account({parent: account, nonce: new Binary('foo')});
```

### Multi-chain accounts

LTO Networks supports 3 ciphers: ed25519, secp256k1, and secp256r1. To create an Ethereum-compatible key pair, use the secp256k1 key type and the Ethereum derivation path

```javascript
import LTO from '@ltonetwork/lto';

const lto = new LTO('T');
const account = lto.account({ keyType: 'secp256k1', derivationPath: `m/44'/60'/0'/0` });

console.log(account.seed);
console.log(account.address); // LTO address
console.log(account.getAddressOnNetwork('ethereum')); // Ethereum address
```

For secp256k1, the seed phrase is generated according to bip32 with a length of 12 words. When creating the account from seed, also pass the derivation path.

## Seed encryption

It's recommended to encrypt your seed when storing the account

```javascript
import LTO from '@ltonetwork/lto';

const lto = new LTO('T');
const seed = 'satisfy sustain shiver skill betray mother appear pupil coconut weasel firm top puzzle monkey seek';
const account = lto.account({ seed });

const password = 'verysecretpassword';
const encrypted = account.encrypt(password); 

console.log(encrypted); //U2FsdGVkX18tLqNbaYdDu5V27VYD4iSylvKnBjMmvQoFFJO1KbsoKKW1eK/y6kqahvv4eak8Uf8tO1w2I9hbcWFUJDysZh1UyaZt6TmXwYfUZq163e9qRhPn4xC8VkxFCymdzYNBAZgyw8ziRhSujujiDZFT3PTmhhkBwIT7FMs=
```

Supply the password to create the account from an encrypted seed

```javascript
import LTO from '@ltonetwork/lto';

const encryptedSeed = 'U2FsdGVkX18tLqNbaYdDu5V27VYD4iSylvKnBjMmvQoFFJO1KbsoKKW1eK/y6kqahvv4eak8Uf8tO1w2I9hbcWFUJDysZh1UyaZt6TmXwYfUZq163e9qRhPn4xC8VkxFCymdzYNBAZgyw8ziRhSujujiDZFT3PTmhhkBwIT7FMs=';
const password = 'verysecretpassword';

const lto = new LTO('T');
const account = lto.account({ seed: encryptedSeed, password });

console.log(account.seed); // satisfy sustain shiver skill betray mother appear pupil coconut weasel firm top puzzle monkey seek
```


# Transactions

Send transactions on the public layer

## Basic usage

```js
import LTO, { Binary } from '@ltonetwork/lto';
enum RELATIONSHIP { MEMBER_OF=0x3400 };
enum STATEMENT { VERIFIED=0x3500 };

lto = new LTO('T');
const account = lto.account();

const recipient = '3N2XoMuukk4BPiLn95vDkv4ocU5szMXuxVN';

lto.getBalance(account);
lto.transfer(account, recipient, 100_00000000);
lto.massTransfer(account, [{recipient: recipient1, amount: 100_00000000}, {recipient: recipient2, amount: 50_00000000}]);

lto.anchor(account, new Binary('some value').hash(), new Binary('other value').hash());
lto.anchor(
  account,
  { key: new Binary('some key').hash(), value: new Binary('some value').hash() },
  { key: new Binary('other key').hash(), value: new Binary('other value').hash() },
);

lto.associate(account, RELATIONSHIP.MEMBER_OF, recipient);
lto.revokeAssociation(account, RELATIONSHIP.MEMBER_OF, recipient);

lto.lease(account, recipient, 10000_00000000);
lto.cancelLease(account, '9V7tdKEEJiH86eCPNxPg1vxhmp8oNH6Mqtf1fQeSeS4U');

lto.sponsor(account, recipient);
lto.cancelSponsorship(account, recipient);

lto.makeStatement(account, STATEMENT.VERIFIED, recipient);

lto.setData(account, {foo: 'bar'});
lto.getData(account);
```

{% hint style="info" %}
Amounts are in `LTO * 10^8`. Eg: 12.46 LTO is`1246000000`, which may be written as `12_46000000` in JavaScript.
{% endhint %}

## Executing Transactions

The `LTO` class provides a simple way for doing transactions. Alternatively, you can create a transaction object, sign it, and broadcast it.

### Create transaction

```js
import { Transfer } from '@ltonetwork/lto/transactions';

const transaction = new Transfer(recipient, amount);
```

### Sign transaction

The Transaction needs then to be signed. In order to sign a transaction an account is needed.

```js
account.sign(transaction);
```

### Broadcasting transaction

For last the transaction needs to be broadcasted to the node. In order to do so we need to connect to the node using the PublicNode class.

```js
const broadcastedTx = await lto.node.broadcast(transaction);
```

### Fluent interface

Transaction classes have convenience methods, providing a fluent interface

```js
import { Transfer } from '@ltonetwork/lto/transactions';

const tx = await new Transfer(recipient, amount)
    .signWith(account)
    .broadcastTo(lto.node);
```

### Sponsoring transactions

A second account can offer to pay for the transaction fees by co-signing the transaction.

```js
import { Anchor } from '@ltonetwork/lto/transactions';

const tx = await new Anchor(new Binary('foo').hash())
    .signWith(someAccount)
    .sponsorWith(mainAccount)
    .broadcastTo(lto.node);
```

Alternatively, you can set the `parent` property of an account to automatically have the parent sponsor all transactions of the child.

## Transaction types

### Transfer transaction

```js
import { Transfer } from '@ltonetwork/lto/transactions';

const tx = new Transfer(recipient, amount, new Binary('attachment'))
```

### Mass Transfer transaction

```js
import { MassTransfer } from '@ltonetwork/lto/transactions';

const tx = new MassTransfer(
  [
    {recipient: recipient1, amount: amount1},
    {recipient: recipient2, amount: amount2}
  ],
  new Binary('attachment'),
);
```

### Anchor transaction

```js
import { Anchor } from '@ltonetwork/lto/transactions';

const hash1 = new Binary('hello').hash();
const hash2 = Binary.fromHex('e3b0c44298fc1c149afbf4c8996fb92427ae41e4649b934ca495991b7852b855');

const tx = new Anchor(hash1, hash2, ...);
```

### Mapped Anchor transaction

```javascript
import { MappedAnchor } from '@ltonetwork/lto/transactions';

const hashKey = new Binary('key').hash();
const hashValue = new Binary('value').hash();

const tx = new MappedAnchor({ key: hashKey, value: hashValue }, ...);
```

### Lease transaction

```js
import { Lease } from '@ltonetwork/lto/transactions';

const tx = new Lease(recipient, amount);
```

### Cancel Lease transaction

```js
import { CancelLease } from '@ltonetwork/lto/transactions';

const tx = new CancelLease(leaseId);
```

### SetScript transaction

Create a `SetScript` transaction using the `compile` method of the public node.

```js
const tx = lto.node.compile(script);
```

Clear a script by using `null` as compiled script.

```js
import { SetScript } from '@ltonetwork/lto/transactions';

const tx = new SetScript(null);
```

### Sponsorship transaction

```js
import { SetScript } from '@ltonetwork/lto/transactions';

const tx = new Sponsorship(recipient);
```

### Cancel Sponsorship transaction

```js
import { CancelSponsorship } from '@ltonetwork/lto/transactions';

const tx = new CancelSponsorship(recipient);
```

### Association transaction

```js
import { Association } from '@ltonetwork/lto/transactions';

const tx = new Association(
  association_type,
  recipient,
  new Binary('subject'),
  expires,
  data
);
```

### Revoke Association transaction

```js
import { RevokeAssociation } from '@ltonetwork/lto/transactions';

const tx = new RevokeAssociation(association_type, recipient, new Binary('subject'));

```

### Statement transaction

```javascript
import { Statement } from '@ltonetwork/lto/transactions';

const tx = new Statement(
  statement_type,
  recipient,
  new Binary('subject'),
  expires,
  data
);
```

### Data transaction

```javascript
import { Data } from '@ltonetwork/lto/transactions';

const tx = new Data({
  num: 100,
  str: 'some string',
  bin: new Binary('Hello').hash(),
  bool: true,
});
```

## Public Node

By default, the following public nodes are used

* **Mainnet** - <https://nodes.lto.network>
* **Testnet** - <https://testnet.lto.network>

To use your own public node, set the node address of the `LTO` object.

```javascript
lto.nodeAddress = "http://localhost:6869";
```

The `lto.node` object will automatically be replaced when the node address is changed.


# Event chain

Microledger on the private layer

The event chain is a microledger. Normally, a ledger is a hash chain of blocks, with each block containing multiple transactions. The event chain is a hash chain of individual events.

## **Create an event chain**

The event id is generated from the account public key and a random value or a nonce, to prevent collisions.

```javascript
import LTO from '@ltonetwork/lto';
import { EventChain } from '@ltonetwork/lto/events';

const lto = new LTO('T');
const account = lto.account();
const chain = new EventChain(account); // Creates an empty event chain with a valid id
```

## Adding events

The genesis event determines the purpose of the event chain. For an Ownable, the genesis event contains an instantiate message.

```javascript
import { EventChain, Event } from '@ltonetwork/lto/events';

const body = {
  '@context': 'instantiate_msg.json',
  ownable_id: '88pDRu52FpsU3kKHwdvPV21RMkBqVqNnthjfdCesTHQhLnUpanw49n6b2PzGnEy',
  package: 'bafybeie4ts4mbcw4pswzh45bj32ulcyztup2dr7zbbjv3y2ym3q3uuejba',
  network_id: 'T',
};

const lto = new LTO('T');
const account = lto.account();
const chain = new EventChain(account);

new Event(body).addTo(chain).signWith(account);
```

{% hint style="warning" %}
Events need to be added to the chain before they can be signed.
{% endhint %}

## Loading an event chain

You can store or submit an event chain as JSON. To create an event chain object from JSON data use the `from` method.

```javascript
import { EventChain } from '@ltonetwork/lto/events';

const data = {
  id: '2dZKMnHHsM1MGqTPZ5p3NmmGmAFE4hYFtMwb2e6tGVDMGZT13cBomKoo8DLEWh',
  events: [
    {
      timestamp: 1519882600,
      previous: 'A332JTKSBZipjXxjC1xPxQoheF83WkEBMwLYaYs8yUBa',
      signKey: {
        keyType: 'ed25519',
        publicKey: '2KduZAmAKuXEL463udjCQkVfwJkBQhpciUC4gNiayjSJ',
      },
      signature: '4xn3xqLFXDLVtUjyKXAjTVGfjWkbCbtyQxFSVoYGLRzePGeyRAeEU7a29ZFztgD3ifwBBMWv9T51ecY2ZBNyWvXV',
      hash: 'BRFnaH3UFnABQ1gV1SvT9PLo5ZMFzH7NhqDSgyn1z8wD',
      mediaType: 'application/json',
      data: 'base64:eyJmb28iOiJiYXIiLCJjb2xvciI6InJlZCJ9',
    },
    {
      timestamp: 1519883600,
      previous: 'BRFnaH3UFnABQ1gV1SvT9PLo5ZMFzH7NhqDSgyn1z8wD',
      signKey: {
        keyType: 'ed25519',
        publicKey: '2KduZAmAKuXEL463udjCQkVfwJkBQhpciUC4gNiayjSJ',
      },
      signature: '2hqLhbmh2eX2WhAgbwHhBZqzdpFcjWBYYN5WBj8zcYVKzVbnVH7mESCC9c9acihxWFwfvufnFYxxgFMgJPbpbU4N',
      hash: '9Y9DhjXHdrsUE93TZzSAYBWZS5TDWWNKKh2mihqRCGXh',
      mediaType: 'application/json',
      data: 'base64:eyJmb28iOiJiYXIiLCJjb2xvciI6ImdyZWVuIn0=',
    },
    {
      timestamp: 1519884600,
      previous: '9Y9DhjXHdrsUE93TZzSAYBWZS5TDWWNKKh2mihqRCGXh',
      signKey: {
        keyType: 'ed25519',
        publicKey: '2KduZAmAKuXEL463udjCQkVfwJkBQhpciUC4gNiayjSJ',
      },
      signature: 'BDtUgUJRmbumMMw3V35v7AJrnJ954cBVYQDPyyMc1Hx2x5LZYZkByuUzNJ2zvUWUhCUL3PJF86FQE6WFyQ7VCZU',
      hash: 'C2TsRTTsj7V923RQnEARYL596AXvccd1np32N9of4FaP',
      mediaType: 'application/json',
      data: 'base64:eyJmb28iOiJiYXIiLCJjb2xvciI6ImJsdWUifQ==',
    },
  ],
};

const chain = EventChain.from(data);
```

### Validation

When receiving an event chain from an untrusted source, you should always validate it. The `validate` method checks the integrity of the hash chain and verifies the signatures.

```javascript
chain.validate();
```

The `validate` function does not return any value, but throws an error in case something is wrong with the chain.

Additionally, you may want to check if the signer of the genesis event is the account that created the event chain.

```javascript
const genesisSigner = lto.account(chain.events[0].signKey);
if (!chain.isCreatedBy(genesisSigner))
  throw new Error('Event chain hijacking: genesis event not signed by chain creator');
```

## Partial chain

There are several reasons why you'd only want to get part of the event chain. For instance, you may only need to share added events with another party. To do so, you can `startingWith` or `startingAfter` method.

```javascript
const partial1 = chain.startingWith('9Y9DhjXHdrsUE93TZzSAYBWZS5TDWWNKKh2mihqRCGXh');
const partial2 = chain.startingAfter('9Y9DhjXHdrsUE93TZzSAYBWZS5TDWWNKKh2mihqRCGXh');
```

You can either pass an event hash or an `Event` object.

```javascript
const partial = chain.startAfter(chain.event[1]);
```

### Appending a partial chain

You can append the events of a partial chain to the full chain. If there's an overlap in events, the `add` method will skip those events.

If both chains have the same genesis event, but branch off, a `MergeConflict` will be thrown.

```javascript
try {
  chain.add(partial);
} catch (error) {
  if (!(error instanceof MergeConflict)) throw error;
  // handle merge conflict
}
```

The event chain doesn't have an internal consensus mechanism. Instead, it relies on anchoring events on the public chain to determine which branch should be accepted in case of a merge conflict.

## Anchoring events

To detect rollbacks, resolve merge conflicts, and prevent tampering, events should be anchored. Anchoring is the action of writing the event hash to the public chain.

For rollback detection, we use mapped anchoring where the event hash is combined with a state.

```javascript
import LTO from '@ltonetwork/lto';
const lto = new LTO('T');
const account = lto.account();

const appendedEvents = chain.startingAfter(lastKnownEvent);
const anchorMap = appendedEvents.anchorMap();

await lto.anchor(account, anchorMap);
```


# Messages

Send messages on the private layer

To share information on the private layer, it should be wrapped as a message.

```javascript
import LTO from '@ltonetwork/lto';
import { Message } from '@ltonetwork/lto/messages';

const lto = new LTO('T');
const account = lto.account();

const message = new Message('hello')
  .to('3MsAuZ59xHHa5vmoPG45fBGC7PxLCYQZnbM')
  .signWith(account);
```

To send a message through a public [LTO Relay service](https://github.com/ltonetwork/relay), it needs to be anchored.

```javascript
await lto.anchor(account, message.hash);
await lto.relay.send(message);
```

{% hint style="success" %}
The requirement to anchor prevents spam by associating a small cost for each message.
{% endhint %}

### Encrypted messages

Messages can be encrypted so the data can only be read or processed by a specific LTO account. Encrypting a message is done using the public key of the recipient.

To get the public key from an address, we'll need to resolve the address. This uses the LTO DID resolver internally.

```javascript
import LTO from '@ltonetwork/lto';
import { Message } from '@ltonetwork/lto/messages';

const lto = new LTO('T');
const account = lto.account();

const recipient = await lto.resolveAccount('3MsAuZ59xHHa5vmoPG45fBGC7PxLCYQZnbM');

const message = new Message('hello')
  .encryptFor(recipient)
  .signWith(account);
```

{% hint style="warning" %}
Only accounts that have submitted at least one transaction on the public chain can be resolved.
{% endhint %}

The recipient can decrypt the message using its private key.

<pre class="language-javascript"><code class="lang-javascript">import LTO from '@ltonetwork/lto';
import { Message } from '@ltonetwork/lto/messages';

const lto = new LTO('T');
const account = lto.account({ seed: 'satisfy sustain shiver skill betray mother appear pupil coconut weasel firm top puzzle monkey seek', nonce: 1 });

const data = {
  type: 'message',
  sender: { keyType: 'ed25519', publicKey: '3ct1eeZg1ryzz24VHk4CigJxW6Adxh7Syfm459CmGNv2' },
  recipient: '3MsAuZ59xHHa5vmoPG45fBGC7PxLCYQZnbM',
  timestamp: '2023-06-20T21:40:40.268Z',
  signature: '362PiaufpQotrVjXJNQFF9HQ3cqKnmgwD3LzkX3PCWHRzqjUGAQxrWPfCC2irvFUqrM4YkWq9jpv6QYiPJMHTDCJ',
  hash: '8cb1ab4507c0f0f9cf9742f98805bf2cb69277c3ac7a845958dfbe087285fbbd',
  encryptedData: 'VuQ5544fbeodXVy86g9yk8zVgCjNNXqrMVOAou9d8SQM+2PF/CPuUm/rWEoB5OHSc40H2V3DheEiqkQ9di66NQ==',
};

const message = Message
<strong>  .from(data)
</strong>  .decryptWith(account);
</code></pre>

### Adding Metadata to Messages

To enhance client-side rendering and improve UX, you can attach metadata to a message before sending it. This metadata allows the receiving wallet to preview the content with a title, description, and thumbnail.

**Supported Metadata Fields**

* `type`: A string identifier (e.g., `"ownable"`) if type is left undefined the library defaults to "basic", generally advised to explictly use "ownable" if its an ownable.
* `title`: A short, human-readable title
* `description`: A brief explanation of the message contents
* `thumbnail`: A binary image preview (max size: **256KB**)

```typescript
const thumbnail = Binary.from(new Uint8Array(buffer)); // ensure <= 256KB

const meta = {
  type: "ownable",
  title: "Cool Ownable",
  description: "Ownable created by @user123",
  thumbnail,
};

const message = new Message(
  messageContent,
  "application/octet-stream",
  meta
)
  .to(recipient)
  .signWith(sender);

await this.relay.send(message);
```

{% hint style="info" %}
Metadata is optional, but including it enables:&#x20;

* Rich previews in wallet interfaces
* Early validation before import
  {% endhint %}

## Ownables messages

By default, messages are assigned the `basic` type, which provides minimal descriptive context. While this is sufficient for most simple message exchanges, it lacks the flexibility needed for richer, more descriptive content.

Starting from versions **v0.15.17** and **v0.16.9+**, support for **message metadata** and **message versioning** was introduced. This enhancement allows developers to embed additional context such as a **title**, **description**, and a **thumbnail** directly into the message metadata.

This is particularly valuable for **Ownables**, where visual and descriptive cues are essential for user comprehension. With metadata support, client-side applications can render messages with meaningful context, without decrypting and parsing message bodies just to extract basic display information. This not only improves performance but also significantly enhances the developer and user experience.

```javascript
import {Message, Binary} from '@ltonetwork/lto/messages'


const imageBuffer = await some-image-file.arrayBuffer()

const meta = {
      type: "ownable", //defaults to basic if not provided
      title: "ownableRobot",
      description: "A simple robot ownables",
      thumbnail: Binary.from(new Uint8Array(image-file)),
}

//application-octet sets the mediaType arbitrarily
const message = new Message('hello', "application/octet-stream", meta)
  .encryptFor(recipient)
  .signWith(account);
```

{% hint style="info" %}
Messages with a metadata are marked version=1, Messages without a metadata have a version=0
{% endhint %}

{% hint style="info" %}
Thumbnails are optional, but if you must include it, then it should be in a Binary format
{% endhint %}

## Relay service

By default, messages are posted through <https://relay.lto.network>. Instead of depending on the public relay service, you can [host your own](https://github.com/ltonetwork/relay).

```javascript
import LTO from '@ltonetwork/lto';
import { Relay } from '@ltonetwork/lto/messages';

const lto = new LTO('T');
lto.relay = new Relay('https://my-relay.example.com');
```


# Identities

Create a DID Document for an account

Any account on LTO network, for which the public key is known, can be resolved as DID (decentralized identifier). To explicitly create a DID use the identity builder.

```js
import LTO from '@ltonetwork/lto';
import { IdentityBuilder } from '@ltonetwork/lto/identities';

const lto = new LTO('T');
const account = lto.account();

new IdentityBuilder(account)
  .transactions.map(tx => lto.node.broadcast(tx));
```

The main account is known as the management key.

{% hint style="info" %}
Use `Promise.all()` if you wait to await for the transactions to be broadcasted.
{% endhint %}

### Verification methods

By default, the account's public key is the only verification method of the DID. Other verification methods can be added through associations with other accounts.

```js
import LTO from '@ltonetwork/lto';
import { IdentityBuilder } from '@ltonetwork/lto/identities';

const lto = new LTO('T');
const account = lto.account();
const key1 = lto.account({ publicKey: "8cMyCW5Esx98zBqQCy9N36UaGZuNcuJhVe17DuG42dHS" });
const key2 = lto.account({ publicKey: "9ubzzV9tRYTcQee68v1mUPJW7PHdB74LZEgG1MgZUExf" });

const expires = new Date();
expires.setFullYear(expires.getFullYear() + 1);

new IdentityBuilder(account)
  .addVerificationMethod(key1)
  .addVerificationMethod(key2, ['authentication', 'assertionMethod'], expires)
  .transactions.map(tx => lto.node.broadcast(tx));
```

If no verification relationships are specified, it is only listed as a verification method, which is typically not what you want. Optionally, you can have the verification method automatically expire.

#### Revoking verification methods

```javascript
import LTO from '@ltonetwork/lto';
import { IdentityBuilder } from '@ltonetwork/lto/identities';

const lto = new LTO('T');
const account = lto.account();
const key = lto.account({publicKey: "8cMyCW5Esx98zBqQCy9N36UaGZuNcuJhVe17DuG42dHS"});

new IdentityBuilder(account)
  .removeVerificationMethod(key)
  .transactions.map(tx => lto.node.broadcast(tx));
```

Verification methods can also be removed by address.

### Services

```javascript
import LTO from '@ltonetwork/lto';
import { IdentityBuilder } from '@ltonetwork/lto/identities';

const lto = new LTO('T');
const account = lto.account();

new IdentityBuilder(account)
  .addService({type: 'LTORelay', serviceEndpoint: 'ampq://relay.lto.network'})
  .transactions.map(tx => lto.node.broadcast(tx));
```

#### Removing services

```javascript
import LTO from '@ltonetwork/lto';
import { IdentityBuilder } from '@ltonetwork/lto/identities';

const lto = new LTO('T');
const account = lto.account();

new IdentityBuilder(account)
  .removeService({type: 'LTORelay'})
  .transactions.map(tx => lto.node.broadcast(tx));
```

A service may also be removed by id.

### Deactivation

If the management key is compromised, the DID should be deactivated.

```javascript
import LTO from '@ltonetwork/lto';
import { IdentityBuilder } from '@ltonetwork/lto/identities';

const lto = new LTO('T');
const account = lto.account();

new IdentityBuilder(account).deactivate().broadcastTo(lto.node);
```

#### Grant deactivation capability

Allow a trusted party to deactivate the DID in case the management key is lost.

```javascript
import LTO from '@ltonetwork/lto';
import { IdentityBuilder } from '@ltonetwork/lto/identities';

const lto = new LTO('T');
const account = lto.account();
const trustedAccount = lto.account({publicKey: "8cMyCW5Esx98zBqQCy9N36UaGZuNcuJhVe17DuG42dHS"});

const expires = new Date();
expires.setFullYear(expires.getFullYear() + 1);

const revokeDelay = 86400_000; // 24h in ms

new IdentityBuilder(account)
  .grantDisableCapability(trustedAccount, expires, revokeDelay)
  .transactions.map(tx => lto.node.broadcast(tx));
```

The `expires` and `revokeDelay` arguments are optional.

#### Revoke deactivation capability

```javascript
import LTO from '@ltonetwork/lto';
import { IdentityBuilder } from '@ltonetwork/lto/identities';

const lto = new LTO('T');
const account = lto.account();
const trustedAccount = lto.account({publicKey: "8cMyCW5Esx98zBqQCy9N36UaGZuNcuJhVe17DuG42dHS"});

new IdentityBuilder(account)
  .revokeDisableCapability(trustedAccount)
  .transactions.map(tx => lto.node.broadcast(tx));
```


# HTTP Authentication

To authenticate to a backend service with an LTO account, you can sign the HTTP request using the [HTTP Message Signatures draft standard](https://www.ietf.org/archive/id/draft-ietf-httpbis-message-signatures-00.html).

## Installation

```
npm install @ltonetwork/http-message-signatures --save
```

## Signing

The `sign()` method accepts an LTO account as the `signer`. The `keyid` will be the public key of the account.

```javascript
import LTO from '@ltonetwork/lto';
import { sign } from '@ltonetwork/http-message-signatures';

const lto = new LTO();
const account = lto.account();

const request = {
  method: 'GET',
  url: 'https://example.com/api/data',
};

const signedRequest = await sign(request, { signer: account });

// ... Send the signed request to the server
```

You can sign a [Fetch API Request](https://developer.mozilla.org/en-US/docs/Web/API/Request) object or a plain object.

## Verification

The `verify()` method accepts an LTO client as verifier. The key type is determined based on the algorithm specified in the `Signature`. The keyid is used as the public key. The `verify()` method uses the LTO Client to create an account from the public key and verify the signature.

```javascript
import LTO from '@ltonetwork/lto';
import { verify } from '@ltonetwork/http-message-signatures';

const lto = new LTO();

const request = {
  method: 'GET',
  url: 'https://example.com/api/data',
  headers: {
    'Signature-Input': 'sig1=("@method" "@path" "@authority");created=1618884475;keyid="2KduZAmAKuXEL463udjCQkVfwJkBQhpciUC4gNiayjSJ";alg=ed25519',
    'Signature': 'sig1=:base64signature:'
  }
};

(async () => {
  try {
    const account = await verify(request, lto);
    console.log('Verification succeeded');
  } catch (err) {
    console.error('Verification failed:', err.message);
  }
})();
```


# Python

Python client library for interacting with LTO Network

{% hint style="info" %}
Visit the [project on Github](https://github.com/ltonetwork/lto-api.python)
{% endhint %}

## Installation

```shell
pip install lto
```

## Usage

```python
from lto import LTO
from lto.public_node import PublicNode

seed = "manage manual recall harvest series desert melt police rose hollow moral pledge kitten position add"

account = LTO("T").Account(seed='seed')
node = PublicNode("https://testnet.lto.network")

amount = 1000.0 # Amount of LTO to transfer
recipient = "3Jo1JCrBvnWCg37VDxMXAjYhsS9rRDLBSze"

transaction = Transfer(recipient, amount)
transaction.sign_with(account)
transaction.broadcast_to(node)
```

To check the response from the node is easy, just modify the last line and add a print

```python
response = transaction.broadcast_to(node)
print(response.to_json())
```


# Accounts

## Creation

### Create an account

```
from lto import LTO

account = LTO(chain_id).Account()
```

### Create an account from seed

```
from lto import LTO

account = LTO(chain_id).Account(seed=my_seed)
```

### Create an account from public key

```
from lto import LTO

account = LTO(chain_id).Account(public_key=my_pub_key)
```

### Create an account from private key

```
from lto import LTO

account = LTO(chain_id).Account(provate_key=my_priv_key)
```

## Different encryption algorithms

### If not specified EdDSA is default:&#x20;

**ed25519**

```
account = LTO(chain_id).Account()
```

### For ECDSA we have two available curves:

**secp256k1**

```
account = LTO(chain_id).Account(key_type = "secp256k1")
```

**secp256r1**

```
account = LTO(chain_id).Account(key_type = "secp256r1")
```

## Signing

### Signing a message

We first need to convert the string to bytes using our crypto library

```
from lto import crypto

message = crypto.str2bytes("test")
signature = account.sign(message)
```

### Verifying a message

```
account.verify_signature(message, signature)
```


# Public layer

## Executing Transactions

### Create transaction

First a transaction needs to be created.

```python
from src.LTO.Transactions.Transfer import Transfer
transaction = Transfer(recipient, amount)
```

The Transaction needs then to be signed. In order to sign a transaction an account is needed.

### Sign transaction

```python
transaction.sign_with(account)
```

### Broadcast transaction

For last the transaction needs to be broadcasted to the node. In order to do so we need to connect to the node using the PublicNode class.

```python
from src.LTO.PublicNode import PublicNode
node = PublicNode(url)
```

The url refers to the node, there are many nodes available, here there are two examples, one for the mainnet and one for the testnet

* <https://nodes.lto.network>
* <https://testnet.lto.network>

```python
transaction.broadcast_to(node)
```

## Transactions

### Transfer Transaction

```python
from lto.transactions import Transfer

transaction = Transfer(recipient, amount)
```

### Mass Transfer Transaction

```python
from lto.transactions import MassTransfer

transaction = MassTransfer(transfers)
```

### Anchor Transaction

```python
from lto.transactions import Anchor

transaction = Anchor(anchor)
```

### Lease Transaction

```python
from lto.transactions import Lease

transaction = Lease(recipient, amount)
```

### Cancel Lease Transaction

```python
from lto.transactions import CancelLease

transaction = CancelLease(lease_id)
```

### SetScript Transaction

```python
from lto.transactions import SetScript

transaction = SetScript(script)
```

### Sponsorship transaction

```python
from lto.transactions import Sponsorship

transaction = Sponsorship(recipient)
```

### Cancel Sponsorship transaction

```python
from lto.transactions import CancelSponsorship

transaction = CancelSponsorship(recipient)
```

### Association transaction

```python
from lto.transactions import Association

transaction = Association(recipient, association_type, anchor)
```

### Revoke Association transaction

```python
from lto.transactions import RevokeAssociation

transaction = RevokeAssociation(recipient, association_type, anchor)
```

### Data transaction

```python
from lto.transactions import Data

transaction = Data(data_entries)
```

### Register transaction

```python
from lto.transactions import Register

transaction = Register(account2, account3)
```

### Burn transaction

```python
from lto.transactions import Burn

transaction = Burn(amount)
```


# PHP

PHP client library for interacting with LTO Network

{% hint style="success" %}
Visit the [project on GitHub](https://github.com/ltonetwork/lto-api.php).
{% endhint %}

## Installation

```
composer require lto/api
```

## Usage

```php
use LTO\Transaction\Transfer;
use LTO\PublicNode;

// Create account for signing
$seedText = "manage manual recall harvest series desert melt police rose hollow moral pledge kitten position add";

$factory = new LTO\AccountFactory('T'); // 'T' for testnet, 'L' for mainnet
$account = $factory->seed($seedText);

// Public layer
$node = new PublicNode('https://nodes.lto.network');

$amount = 1000.0; // Amount of LTO to transfer
$recipient = "3Jo1JCrBvnWCg37VDxMXAjYhsS9rRDLBSze";

$transferTx = (new Transfer($amount, $recipient))
    ->signWith($account)
    ->broadcastTo($node);
    
// Private layer
$body = [
    '$schema' => "http://specs.example.com/message",
    'content' => "Hello world!",
];

$chain = $account->createEventChain();
$chain->addIdentity($account->asIdentity())->signWith($account);
$chain->add(new Event($body))->signWith($account);

```


# Accounts

## Creation

### **Create an account from seed**

```php
$seedText = "manage manual recall harvest series desert melt police rose hollow moral pledge kitten position add";

$factory = new LTO\AccountFactory('T'); // 'T' for testnet, 'L' for mainnet
$account = $factory->seed($seedText);
```

### **Create an account from private sign key**

```php
$secretKey = 'wJ4WH8dD88fSkNdFQRjaAhjFUZzZhV5yiDLDwNUnp6bYwRXrvWV8MJhQ9HL9uqMDG1n7XpTGZx7PafqaayQV8Rp';

$factory = new LTO\AccountFactory('T'); // 'T' for testnet, 'L' for mainnet
$account = $factory->create($secretKey);
```

### **Create an account from full info**

```php
$accountInfo = [
  'address' => '3PLSsSDUn3kZdGe8qWEDak9y8oAjLVecXV1',
  'sign' => [
    'secretkey' => 'wJ4WH8dD88fSkNdFQRjaAhjFUZzZhV5yiDLDwNUnp6bYwRXrvWV8MJhQ9HL9uqMDG1n7XpTGZx7PafqaayQV8Rp',
    'publickey' => 'FkU1XyfrCftc4pQKXCrrDyRLSnifX1SMvmx1CYiiyB3Y'
  ],
  'encrypt' => [
    'secretkey' => 'BnjFJJarge15FiqcxrB7Mzt68nseBXXR4LQ54qFBsWJN',
    'publickey' => 'BVv1ZuE3gKFa6krwWJQwEmrLYUESuUabNCXgYTmCoBt6'
  ]
];

$factory = new LTO\AccountFactory('T'); // 'T' for testnet, 'L' for mainnet
$account = $factory->create($accountInfo);
```

Properties that are specified will be verified. Properties that are omitted will be generated where possible.

## Signing (ED25519)

### **Sign a message**

```php
$signature = $account->sign('hello world'); // Base58 encoded signature
```

### **Verify a signature**

```php
if (!$account->verify($signature, 'hello world')) {
    throw new RuntimeException('invalid signature');
}
```

## Encryption (X25519)

### **Encrypt a message for another account**

```php
$message = 'hello world';

$recipientPublicKey = "HBqhfdFASRQ5eBBpu2y6c6KKi1az6bMx8v1JxX4iW1Q8"; // base58 encoded X25519 public key
$recipient = $factory->createPublic(null, $recipientPublicKey);

$cyphertext = $account->encryptFor($recipient, $message); // Raw binary, not encoded
```

You can use `$account->encryptFor($account, $message)` to encrypt a message for yourself.

### **Decrypt a message received from another account**

```php
$senderPublicKey = "HBqhfdFASRQ5eBBpu2y6c6KKi1az6bMx8v1JxX4iW1Q8"; // base58 encoded X25519 public key
$sender = $factory->createPublic(null, $senderPublicKey);

$message = $account->decryptFrom($sender, $cyphertext);
```

You can use `$account->decryptFrom($account, $message)` to decrypt a message from yourself.


# Identities

The LTO identity library supports resolving DIDs to DID documents. It's DID method independent.

## Resolver

```php
use LTO\Identity\Resolver\LTONetwork as LTOResolver;

$resolver = new LTOResolver();

$identity = $resolver->resolve("lto:did:3JkihPXS5iPs8xDKcFQmhR8TVcAmDRUZpyx");
```

The Resolver class can be used to combine multiple resolvers.

```php
use LTO\Identity\Resolver;
use LTO\Identity\Resolver\LTONetwork as LTOResolver;
use LTO\Identity\Resolver\WebNetwork as WebResolver;

$resolver = new Resolver(
   new LTOResolver(),
   new WebResolver(),
);

$identity = $resolver->resolve("lto:did:3JkihPXS5iPs8xDKcFQmhR8TVcAmDRUZpyx");
```

## Identity

The identity is a representation of a DID document.

After a signature or JWT is verified, use `hasVerificationMethod()` to check if the public key used in the verification belongs to the identity.

```php
$method = [
    "type": "Ed25519VerificationKey2018", 
    "publicKeyBase58": "H3C2AVvLMv6gmMNam3uVAjZpfkcJCwDwnZn6z3wXmqPV",
];

$identity->hasVerificationMethod($method);
```

Optionally check if the verification method can be used for a specific purpose

```php
use LTO\Identity\VerificationMethod;

$identity->hasVerificationMethod($method, VerificationMethod\Authentication);
```


---

[Next Page](/llms-full.txt/1)